Introduction
Tired of store-bought granola that’s either too sweet or lacks crunch? You’re not alone. Most commercial granolas are loaded with excessive sugar, lose their crispness within days, and often taste bland despite the hefty price tag.
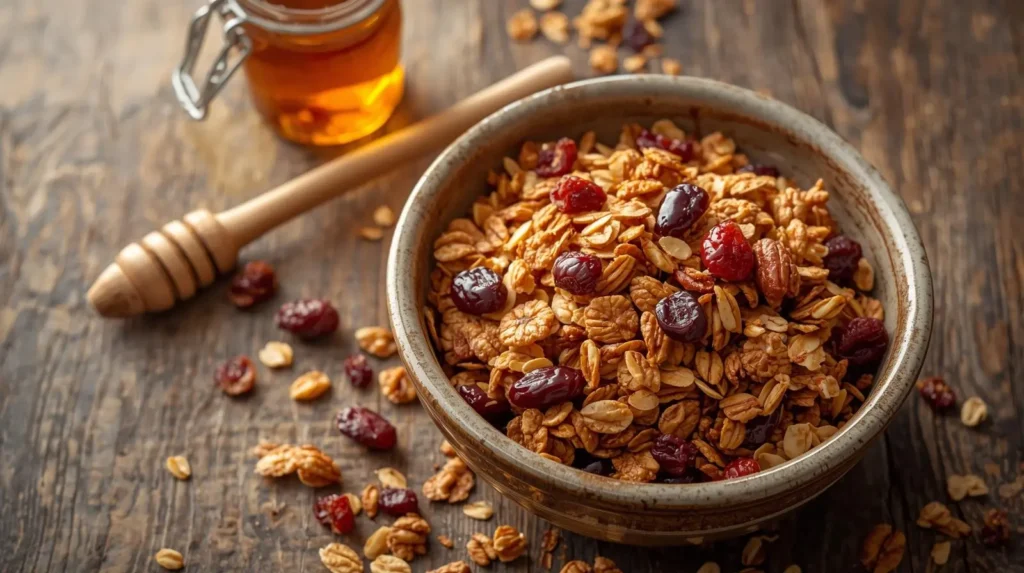
This homemade granola stays crispy for weeks and tastes amazing. Unlike store-bought versions that go stale quickly, this granola recipe creates perfectly golden clusters that maintain their crunch whether you store them for days or weeks.
After testing dozens of granola variations over the years, I’ve perfected this recipe. I’ve experimented with different ratios of sweeteners, tested various baking temperatures, and tried countless ingredient combinations to create a granola recipe that delivers consistent results every single time.
In this guide, you’ll learn everything about making perfect granola—from selecting the best ingredients and mastering the baking method to proper storage tips and creative flavor variations. Whether you’re new to homemade granola or looking to improve your technique, this recipe will become your go-to breakfast staple.
Table of Contents
Why This Granola Recipe Works
This granola recipe delivers on three essential fronts: incredible flavor, perfect texture, and simple preparation that fits into any schedule.
Made with wholesome, pantry-friendly ingredients. You don’t need specialty items or expensive add-ins to create delicious granola. This recipe uses everyday ingredients you likely already have in your kitchen—rolled oats, honey, oil, and basic spices. No complicated shopping lists or hard-to-find ingredients required.
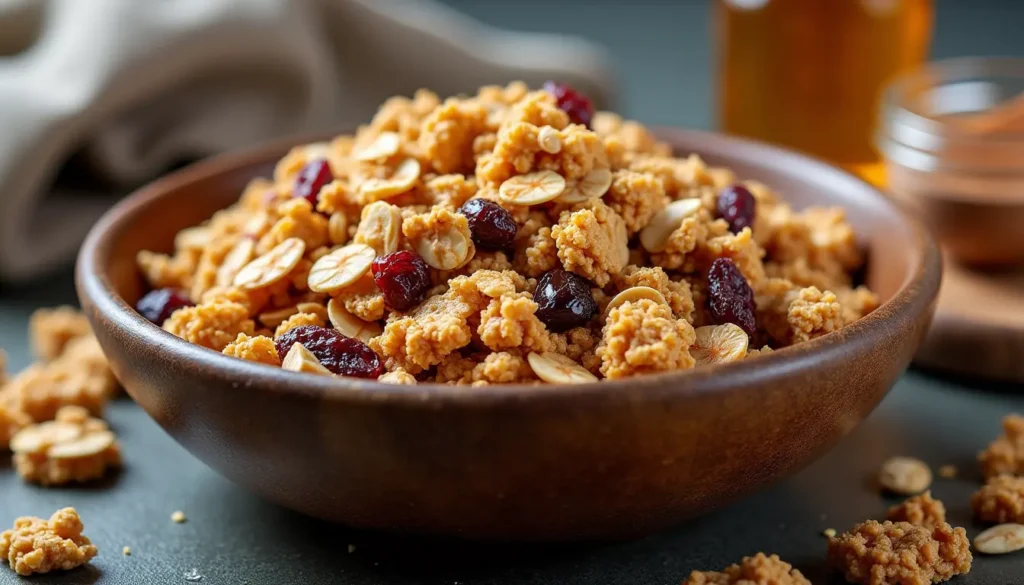
Customizable with nuts, seeds, or dried fruit. Think of this recipe as your blank canvas. Add almonds, walnuts, or pecans for crunch. Toss in pumpkin seeds, sunflower seeds, or chia for nutrition. Mix in dried cranberries, raisins, or apricots for sweetness. The base recipe works perfectly with any combination you prefer.
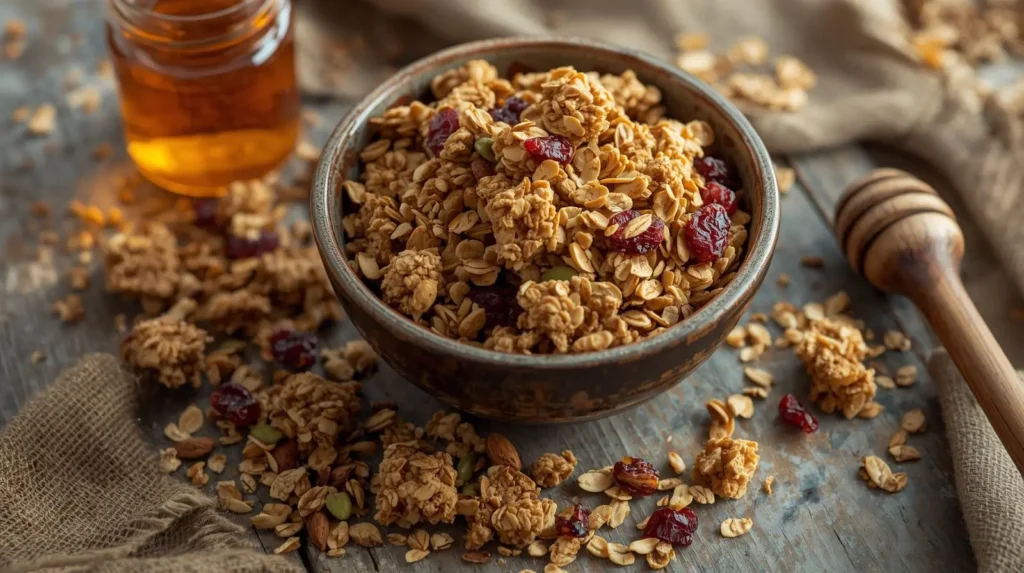
Crispy, golden texture every time. The secret lies in the low-and-slow baking method combined with the perfect ratio of wet to dry ingredients. This creates those coveted crunchy clusters that make homemade granola so irresistible. No more soggy, chewy disappointments.
Choosing the Right Ingredients
Best Ingredients for Crunchy Granola
Rolled oats form the foundation of great granola. Use old-fashioned rolled oats, not instant or quick oats. Rolled oats have the perfect texture and size to create crunchy clusters. Instant oats turn mushy during baking, while steel-cut oats remain too hard.
Honey provides natural sweetness and acts as a binding agent that helps create clusters. It caramelizes during baking, adding depth and that signature golden color. The sticky consistency of honey is key to achieving those coveted clumps.
Coconut oil creates a crispy texture better than any other fat. It coats the oats evenly and promotes even browning. Coconut oil also adds a subtle, pleasant flavor that complements the other ingredients without overpowering them.
Vanilla extract adds warmth and depth to the flavor profile. Don’t skip this ingredient—vanilla enhances all the other flavors and makes your granola smell absolutely incredible while baking.
Cinnamon is the classic spice for granola. It adds warmth and pairs beautifully with the sweetness of honey. Just a teaspoon transforms basic oats into something special.
Nuts and seeds provide protein, healthy fats, and satisfying crunch. Choose raw, unsalted varieties so you control the flavor and salt content. Popular choices include almonds, pecans, walnuts, cashews, pumpkin seeds, and sunflower seeds.
Salt might seem minor, but it’s crucial for balanced flavor. A pinch of salt enhances sweetness and prevents your granola from tasting flat or one-dimensional.
Buying Tips
Use organic oats if possible for cleaner flavor and to avoid pesticide residues. Organic oats tend to be fresher and have better texture than conventional options.
Choose raw nuts rather than roasted. Since you’re baking the granola, raw nuts toast perfectly in the oven. Pre-roasted nuts can become too dark or even burnt during the baking process.
Buy pure honey instead of honey blends. Pure honey has better flavor and creates superior clusters. Check the ingredient label—it should say only “honey.”
Select unrefined coconut oil for the best flavor. Refined coconut oil works fine but lacks the subtle coconut taste that makes this granola extra special.
Substitutions
Maple syrup instead of honey: Use pure maple syrup in equal amounts for a different flavor profile. Maple syrup creates a slightly less sticky granola with a more complex, earthy sweetness. It works perfectly if you’re making vegan granola.
Coconut flakes instead of nuts: Swap nuts for unsweetened coconut flakes for a nut-free version. Use the same measurement—if the recipe calls for 1 cup of nuts, use 1 cup of coconut flakes. Toast them the same way for beautiful golden crunch.
Oil alternatives: Replace coconut oil with melted butter for a richer flavor, or use neutral vegetable oil if you don’t have coconut oil. The texture will be slightly different but still delicious.
Sweetener options: Agave nectar, brown rice syrup, or even melted coconut sugar can replace honey. Keep in mind that different sweeteners affect clustering—stickier sweeteners create better clumps.
Ingredients & Prep
Granola Prep Essentials
Mixing dry and wet ingredients separately ensures even distribution. Combine all dry ingredients (oats, nuts, spices, salt) in one large bowl. Mix all wet ingredients (honey, oil, vanilla) in a separate bowl. This two-bowl method guarantees every oat gets coated with the sweet mixture.
Spreading evenly on the baking sheet is crucial for uniform toasting. Don’t pile your granola high in the center—spread it in an even, relatively thin layer. Thick spots won’t crisp properly, while thin spots might burn.
The baking method makes or breaks your granola. Low temperature (300-325°F) allows gradual toasting without burning. High heat creates uneven results with burnt edges and raw centers. Patience is key—rushing the process leads to inferior granola.
Stirring at the right time ensures even browning. Stir once or twice during baking, but not more. Over-stirring prevents cluster formation. Under-stirring creates unevenly toasted granola.
Pantry Staples
Here’s what you need for basic granola:
| Ingredient | Quantity | Purpose |
|---|---|---|
| Old-fashioned rolled oats | 3 cups | Base of the granola |
| Honey | ½ cup | Natural sweetener and binding agent |
| Coconut oil (melted) | ¼ cup | Creates crispy texture |
| Vanilla extract | 1 tsp | Adds aromatic depth |
| Ground cinnamon | 1 tsp | Warm, classic spice |
| Nuts (almonds, pecans, or walnuts) | 1 cup | Protein and crunch |
| Seeds (pumpkin or sunflower) | ½ cup | Extra nutrition and texture |
| Salt | ½ tsp | Enhances all flavors |
| Dried fruit (optional) | ½-1 cup | Add after baking for sweetness |
| Chocolate chips (optional) | ½ cup | Add after cooling for treats |
Optional add-ins: Shredded coconut, additional spices like nutmeg or cardamom, or extra dried fruits of your choice.
Step-by-Step Cooking Instructions
Pre-Bake Prep
Preheat your oven to 300°F. This lower temperature is essential for even toasting. Don’t skip preheating—starting with a cold oven affects baking time and results.
Line a large baking sheet with parchment paper. This prevents sticking and makes cleanup effortless. Parchment paper also promotes even browning better than greasing the pan. If you don’t have parchment, use a silicone baking mat.
Chop your nuts into bite-sized pieces if using whole nuts. Leave some larger pieces for better texture variation. You want a mix of sizes for visual appeal and varied crunch.
Measure all ingredients before you begin. Having everything ready streamlines the process and prevents mistakes.
Mixing the Granola
Combine dry ingredients in a large mixing bowl. Add rolled oats, chopped nuts, seeds, cinnamon, and salt. Stir thoroughly to distribute the spices and salt evenly throughout the mixture.
Whisk wet ingredients in a separate bowl. Warm the coconut oil slightly if it’s solid (just until liquid, not hot). Add honey and vanilla extract. Whisk until completely combined into a smooth mixture.
Pour wet mixture over dry ingredients. Drizzle it evenly across the surface rather than dumping it in one spot. This helps coat everything more uniformly.
Stir thoroughly using a large spoon or spatula. Mix until every oat and nut is coated with the honey-oil mixture. The granola should look evenly moist and glossy. Keep mixing for at least 30-45 seconds—thorough coating is essential.
Baking
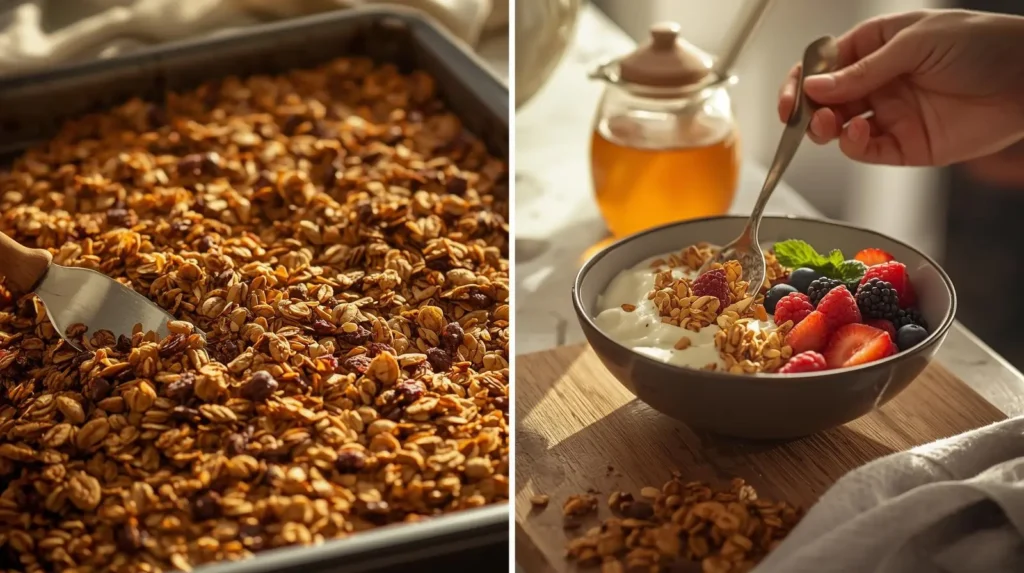
Spread the mixture onto your prepared baking sheet in an even layer about ½-inch thick. Use the back of your spatula to press it down gently. This pressing creates clusters—loose granola won’t clump.
Bake for 20 minutes without stirring. This initial period allows the bottom to set and begin forming clusters.
Stir gently after 20 minutes. Use a spatula to flip sections of granola, breaking up only the very large pieces. Don’t overmix—you want to maintain some clumps.
Continue baking for another 15-20 minutes. Watch carefully during this phase. The granola should turn golden brown and smell amazing. It will still seem slightly soft—that’s normal. It crisps up significantly as it cools.
Check for doneness. Look for an even golden color with no white or pale patches. The edges will be darker than the center, which is fine. Remember that granola darkens slightly as it cools, so remove it when it’s light golden rather than waiting for deep brown.
Cooling
Remove from oven when golden. Don’t wait for it to look fully crispy—that comes during cooling.
Let cool completely on the baking sheet. This is critical. Moving or breaking apart hot granola prevents cluster formation. Resist the urge to taste it immediately. Wait at least 45 minutes to an hour.
The granola will harden as it cools. The honey and oil solidify, creating that satisfying crunch. What seems soft at first transforms into perfectly crispy granola.
Break into clusters once fully cooled. Use your hands to break the granola into your desired chunk size. Some people like big clusters, others prefer smaller pieces. There’s no wrong answer.
Add dried fruit now if using. Wait until after baking to add dried fruit—it burns easily in the oven. Stir in raisins, cranberries, or chopped apricots after the granola has cooled.
Pro Tips for Perfect Granola
Avoid Overbaking: Light golden color is perfect—don’t wait for deep brown. Granola continues cooking from residual heat after you remove it from the oven. Pull it out when it’s just slightly lighter than your target color. Overbaked granola tastes burnt and becomes too hard.
The Clumping Trick: Press the granola mixture down firmly on the baking sheet before baking. Use the back of a spatula or your hands to compact it into an even layer. The more you press, the bigger your clusters. For maximum clumps, don’t stir at all during baking—just rotate the pan halfway through.
Stir carefully and minimally. If you want clusters, limit stirring to once during baking. Each time you stir, you break potential clumps. For loose granola, stir every 10-15 minutes. For chunky granola, stir only once or not at all.
Use a light-colored baking sheet. Dark pans absorb more heat and can cause the bottom to brown too quickly. If using a dark pan, reduce temperature by 25°F and watch carefully.
Let honey mixture cool slightly before pouring over oats. If it’s too hot, it can make the mixture soggy. Room temperature or just-warm is ideal.
Storage: Store in airtight containers for up to 2 weeks at room temperature. Glass jars work beautifully and let you see your delicious creation. Mason jars are perfect for gifting. Make sure granola is completely cool before sealing—any residual warmth creates condensation that makes granola soggy.
Freeze for longer storage. freezes beautifully for up to 3 months. Store in freezer bags or airtight containers. It thaws quickly at room temperature and maintains its crunch perfectly.
Don’t refrigerate granola. The moisture in refrigerators makes granolaa soft and chewy. Room temperature storage is always best for maintaining crispness.
Flavor Variations
Chocolate Granola: Add 3 tablespoons cocoa powder to the dry ingredients for rich chocolate flavor. Mix in ½ cup dark chocolate chips after the granola has completely cooled. The result is like eating chocolate cereal but healthier and more sophisticated. Kids and adults alike love this version.
Pumpkin Spice Granola: Replace cinnamon with pumpkin pie spice (or make your own blend with cinnamon, nutmeg, ginger, and cloves). Add ¼ cup pumpkin puree to the wet ingredients for moisture and flavor. Use pecans and pepitas (pumpkin seeds) for autumn-inspired crunch. This version is perfect for fall and makes your kitchen smell incredible.
Tropical Granola: Mix in ½ cup unsweetened coconut flakes with the oats. Use macadamia nuts or cashews instead of almonds. After baking, stir in dried mango, pineapple, and papaya pieces. This variation tastes like vacation in a bowl and pairs beautifully with coconut yogurt.
Apple Cinnamon Granola: Add dried apple pieces and an extra teaspoon of cinnamon. Use maple syrup instead of honey for a different sweetness profile. Include chopped walnuts or pecans. After baking, mix in more apple chips for extra fruit flavor. This variation tastes like apple pie for breakfast.
Nut-Free Version: Use seeds exclusively for an allergy-friendly granola. Combine pumpkin seeds, sunflower seeds, and sesame seeds for variety and nutrition. Add extra coconut flakes for bulk and texture. This version is perfect for school lunches or anyone with nut allergies, and it’s just as delicious and crunchy as the original.
Maple Pecan Granola: Replace honey with pure maple syrup and use pecans as your main nut. Add a pinch of nutmeg along with the cinnamon. The maple-pecan combination is a classic for good reason—rich, warming, and utterly satisfying.
Berry Almond Granola: Use sliced almonds and add dried blueberries, strawberries, and raspberries after baking. The tart berries balance the sweet granola perfectly. This version is beautiful to look at and tastes like summer.
Serving Suggestions
Pair with yogurt for a classic breakfast combination. The creamy coolness of yogurt contrasts beautifully with crunchy granola. Greek yogurt adds protein, while vanilla or coconut yogurt adds extra flavor. Layer them in a glass for an Instagram-worthy parfait.
Serve with milk for traditional cereal-style eating. Use dairy milk, almond milk, oat milk, or any plant-based alternative. The granola stays crunchy longer than most cereals, giving you plenty of time to enjoy your breakfast.
Top smoothie bowls with a generous handful of granola. The crunch adds texture contrast to smooth, creamy smoothies. It also adds satisfying calories and makes your smoothie bowl feel more like a complete meal.
Mix with fresh fruit for a simple, healthy snack. Sliced bananas, berries, or chopped apples pair wonderfully with granol. Add a dollop of nut butter for extra protein and satisfaction.
Sprinkle on ice cream for a gourmet dessert topping. Granola adds sophisticated crunch to ice cream sundaes. It’s especially good on vanilla, chocolate, or fruit-flavored ice cream. The temperature contrast between cold ice cream and room-temperature granola is delightful.
Bake into bars for portable snacks. Press your granola mixture into a baking pan before baking for homemade granola bars. Cut into squares after cooling. These bars are perfect for lunchboxes, hiking trips, or on-the-go breakfasts.
Create a trail mix by combining cooled granolaa with extra nuts, seeds, and chocolate chips. Pack in small bags for convenient snacking. This makes a great gift idea too.
Use as a pie crust by processing granola into fine crumbs and mixing with melted butter. Press into a pie pan for a unique, crunchy crust that works beautifully with cheesecakes or cream pies.
FAQs
“How do I make my granola crunchy?”
The secret to crunchy lies in three key techniques. First, press the granol mixture firmly onto the baking sheet before baking—this compacts it and promotes cluster formation. Second, bake at a low temperature (300°F) for longer rather than high heat for a short time. Low and slow allows moisture to evaporate completely, creating that signature crunch. Third, and most importantly, let the granol cool completely on the baking sheet without touching it.
It will seem soft when hot but hardens dramatically as it cools. Avoid the temptation to taste it immediately. The cooling process is when the magic happens—the honey and oil solidify, transforming soft oats into crispy clusters. If your granol still isn’t crunchy enough after cooling, return it to a 300°F oven for another 5-10 minutes, then cool again completely.
“Can I reduce the sugar?”
Yes, you can definitely reduce the honey or maple syrup, but keep in mind that sweetener serves two purposes in recipe
—flavor and binding. If you cut the sweetener too much, your granola will be less sweet (which might be fine) but also won’t cluster as well. Start by reducing the honey by 2-3 tablespoons rather than cutting it in half. You can also replace some of the honey with unsweetened applesauce (use ¼ cup applesauce to replace ¼ cup honey), though this changes the texture slightly.
Another option is using mashed banana or pumpkin puree as partial sweetener replacements. These add natural sweetness and moisture while reducing added sugars. Keep in mind that less sweetener means less caramelization and potentially lighter color. The granola will still taste delicious, just less candy-like and more wholesome. For reference, homemade granol typically contains far less sugar than store-bought versions, even with the full amount of honey.
“Is it gluten-free?”
This granola recipe can easily be gluten-free if you use certified gluten-free oats. While oats are naturally gluten-free, they’re often processed in facilities that also handle wheat, barley, or rye, leading to cross-contamination. Look for packages specifically labeled “gluten-free oats” or “certified gluten-free.” Brands like Bob’s Red Mill, Quaker, and others offer gluten-free oat options. All the other ingredients in this recipe—honey, coconut oil, vanilla, cinnamon, nuts, seeds, and salt—are naturally gluten-free.
Just double-check your vanilla extract label, as some brands use grain alcohol that may contain gluten (though most are fine). If you’re making this for someone with celiac disease or severe gluten sensitivity, stick with certified gluten-free oats and verify all ingredient labels. The recipe itself requires no modifications beyond choosing the right oats—it’s naturally suited to gluten-free diets.
Conclusion
Grab your oats and bake this recipe today! In less than an hour of active time, you’ll have weeks worth of delicious, crunchy granola that beats anything you can buy at the store. The process is straightforward, the ingredients are simple, and the results are consistently excellent.
This recipe transforms basic pantry staples into something truly special. Whether you eat it for breakfast with milk, sprinkle it over yogurt for a midday snack, or give it as a thoughtful homemade gift, this granola delivers on every level. The crispy texture, customizable flavors, and wholesome ingredients make it a recipe you’ll return to again and again.
Thousands of home cooks love this crunchy granola, and once you make your first batch, you’ll understand why. The comments and reviews speak for themselves—people rave about the perfect cluster formation, the balanced sweetness, and how much better it tastes than expensive store-bought brands. Many readers report that their families refuse to go back to commercial granola after trying this homemade version.
The best part? You control every ingredient. No mysterious additives, no excessive sugar, no artificial flavors—just pure, wholesome goodness that you can feel good about feeding your family. Experiment with different nuts, adjust the sweetness to your preference, and create flavor variations that suit your taste.
Next, try our Homemade Energy Bars Recipe for another healthy, make-ahead breakfast and snack option! Energy bars pair perfectly with granola in your meal prep routine, and they share many of the same wholesome ingredients. Once you experience the satisfaction of making your own breakfast foods from scratch, you’ll never want to stop.
How did you find results our recipes
There are no reviews yet. Be the first one to write one.