
Introduction
Struggling to get that flawless cookie icing? This royal icing recipe gives you bakery-quality results every time!
There’s nothing quite as satisfying as beautifully decorated cookies with smooth, glossy icing that dries to perfection. Whether you’re preparing holiday cookies, wedding favors, or an elaborate gingerbread house, royal icing is the secret weapon that transforms simple baked goods into edible masterpieces.
This royal icing recipe is smooth, glossy, and easy to work with — perfect for cookies, cakes, or gingerbread houses. It delivers professional results without requiring professional skills or expensive equipment.
After years of decorating cookies for holidays, birthdays, and special occasions, I’ve refined this recipe to be foolproof. It works beautifully for beginners yet sophisticated enough for experienced decorators who demand consistency and reliability.
In this guide, you’ll discover everything you need to master royal icing. We’ll cover the perfect ingredient ratios, multiple icing consistencies for different decorating techniques, coloring tips that keep your icing vibrant, and expert decorating advice from renowned pastry professionals like Duff Goldman, Mary Berry, and Buddy Valastro.
By the end of this article, you’ll have the confidence to create stunning decorated treats that look like they came from a high-end bakery.
Table of Contents
Why This Royal Icing Recipe Works
This royal icing recipe has been tested countless times and consistently delivers exceptional results. Here’s what makes it so reliable.
It sets with a beautiful smooth finish every time. The formula creates an icing that dries to a hard, glossy surface without cracks, dimples, or uneven textures that plague many homemade attempts.
The icing dries firm enough for stacking and packaging cookies. Once fully dried, your decorated cookies can be carefully stacked, wrapped, or transported without smudging or damage. This makes them perfect for gift-giving or selling at bake sales.
It’s easy to adjust consistency for flooding or piping. With simple water additions, you can transform the same batch from thick piping consistency to smooth flooding consistency. This versatility means you don’t need multiple recipes for different decorating techniques.
The ingredients are straightforward and widely available. You won’t need to hunt down specialty items or make substitutions that compromise the final result. Everything you need is available at your local grocery store.
Chef Tip from Mary Berry: “Patience is key — let your icing rest to release air bubbles before decorating.”
This royal icing recipe also has excellent color-holding properties. The white base takes gel food coloring beautifully, producing vibrant hues that don’t fade as the icing dries. Unlike buttercream or cream cheese frosting,Royal Icing Recipe maintains its colors brilliantly.
The icing remains workable for an extended period when properly covered. This gives you plenty of time to complete intricate designs without rushing or worrying about the icing crusting over mid-project.
Perhaps most importantly, this recipe tastes delicious. While Royal Icing Recipe is known more for its decorative properties than flavor, this version strikes the perfect balance between sweetness and texture, with optional flavor enhancements that elevate it beyond basic sugar icing.
Ingredients & Ratios for Royal Icing Recipe
Getting the proportions right is crucial for royal icing success. Here’s the formula that delivers perfect results:
| Ingredient | Measurement | Purpose |
|---|---|---|
| Powdered Sugar | 4 cups | Sweetness & structure |
| Meringue Powder | 3 tbsp | Stability & gloss |
| Water | 5–6 tbsp | Controls consistency |
| Vanilla or Almond Extract | ½ tsp | Flavor enhancement |
Expert Tip from Duff Goldman: “Use room temperature ingredients for smoother blending and fewer lumps.”
Powdered Sugar
Also called confectioner’s sugar or icing sugar, this is the foundation of Royal Icing Recipe. The ultra-fine texture creates smoothness impossible to achieve with granulated sugar. Always sift your powdered sugar before measuring to remove any lumps that could clog piping tips or create texture issues.
Choose a high-quality brand for best results. Some generic brands contain more cornstarch as a filler, which can affect the icing’s texture and drying time. The additional cornstarch may also make the icing more prone to cracking.
Four cups of powdered sugar equals approximately one pound. This recipe makes enough icing to decorate about three dozen medium cookies, depending on your design complexity.
Meringue Powder
Meringue powder is the secret ingredient that gives royal icing its signature properties. Made from dehydrated egg whites, sugar, and stabilizers, it provides structure and helps the icing dry hard and glossy.
Unlike raw egg whites, meringue powder is pasteurized, making it food-safe without additional preparation. This is especially important when making icing for children or anyone with compromised immune systems.
Meringue powder also provides superior stability compared to fresh egg whites. The icing holds its shape better, dries more consistently, and has a longer shelf life.
If you’re using meringue powder for the first time, popular brands include Wilton and Ateco. Store it in a cool, dry place, and it will last for months.
Water
Water controls the consistency of your royal icing. Start with the minimum amount and add more gradually until you reach your desired thickness. It’s much easier to thin icing than to thicken it.
Use room temperature water for best results. Cold water can shock the mixture and create lumps, while hot water might dissolve the ingredients too quickly, affecting texture.
Some decorators prefer using a combination of water and light corn syrup (about 1 teaspoon) for extra shine and a softer bite. This is optional but can be a nice enhancement.
Extracts
While vanilla is traditional, don’t be afraid to experiment with other extracts. Almond extract provides a sophisticated bakery flavor that pairs beautifully with sugar cookies. Lemon extract adds brightness that cuts through the sweetness.
Use pure extracts rather than imitation for the best flavor. The quality difference is noticeable, especially since royal icing has such a simple ingredient list.
If you’re making icing for children or anyone avoiding alcohol, look for alcohol-free extracts or use emulsions instead.
Optional Additions
A tiny pinch of cream of tartar (⅛ teaspoon) can help stabilize the icing further and create an even whiter base color. This is especially helpful if you’re creating white-on-white designs.
Some decorators add a teaspoon of light corn syrup for added shine and a slightly softer texture once dried. This makes the icing less brittle and easier to bite through.
Step-by-Step Instructions for Royal Icing Recipe
Creating perfect royal icing is straightforward when you follow these steps carefully:
| Step | Description | Time |
|---|---|---|
| 1 | Whisk powdered sugar and meringue powder. | 2 min |
| 2 | Slowly add water and mix until glossy. | 3–5 min |
| 3 | Check consistency (soft peaks for piping, ribbons for flooding). | — |
| 4 | Add color using gel food coloring. | — |
Chef Advice from Buddy Valastro: “Use gel colors — liquid ones thin the icing and ruin your piping precision.”
Step 1: Combine Dry Ingredients
In a large mixing bowl, whisk together the sifted powdered sugar and meringue powder. Make sure they’re thoroughly combined before adding any liquid. This prevents lumps and ensures even distribution of the meringue powder.
Use a whisk rather than a spoon for this step. The whisk breaks up any clumps and incorporates air, which helps create a lighter texture.
Step 2: Add Liquid Gradually
Add the extract first, then begin adding water one tablespoon at a time. Mix on low speed with an electric mixer or by hand with a sturdy spoon or spatula.
As you mix, the icing will transform from a thick paste to a smooth, glossy mixture. This process takes 3-5 minutes. Don’t rush it—proper mixing ensures the meringue powder fully hydrates and the icing reaches its full potential.
The icing should look bright white and have a satin-like sheen. If it appears dull or grainy, continue mixing. The friction from mixing activates the meringue powder and creates that characteristic glossy finish.
Step 3: Check and Adjust Consistency
This is the most important step. Lift your mixer beater or spoon from the bowl and watch how the icing behaves.
For stiff consistency (piping and details), the icing should hold stiff peaks that don’t collapse. When you pull the beater up, the peak should stand straight up without drooping.
For medium consistency (borders and lettering), the icing should form soft peaks that slowly settle back into the bowl within about 10 seconds.
For flood consistency (filling large areas), the icing should flow off the spoon in a smooth ribbon that disappears back into itself within 10-15 seconds. It should be thin enough to self-level but thick enough not to run off the cookie edges.
Add water by the half-teaspoon when thinning. Add powdered sugar by the tablespoon when thickening. Make adjustments gradually—it’s easy to go too far.
Step 4: Add Color
Divide your icing into separate bowls before coloring. Start with small amounts of gel food coloring—you can always add more, but you can’t remove it.
Use a toothpick to transfer gel color to your icing. Dip the toothpick into the gel, then swirl it into your icing. Mix thoroughly before adding more color. Colors deepen slightly as the icing dries, so aim for a shade slightly lighter than your target.
Keep one bowl of white icing uncolored if your design includes white elements. True white is difficult to achieve by adding color.
Pro Tips for Mixing
Cover your bowl with a damp towel while working to prevent crusting. Royal icing begins to dry as soon as it’s exposed to air.
If you notice air bubbles in your icing, let it rest for 5-10 minutes, then gently stir (don’t whip) before using. Alternatively, tap the bowl firmly on the counter several times to bring bubbles to the surface where they can be popped.
Mix at low to medium speed throughout the process. High-speed mixing incorporates too much air, creating bubble problems later.
Icing Consistency Guide
Understanding the three main royal icing consistencies is essential for successful cookie decorating:
| Type | Texture | Ideal Use |
|---|---|---|
| Stiff | Holds peaks | Outlining cookies |
| Medium | Slightly soft | Borders or lettering |
| Flood | Smooth and runny | Filling large areas |
Pro Tip: Let the icing rest for 10 minutes before use to eliminate air bubbles.
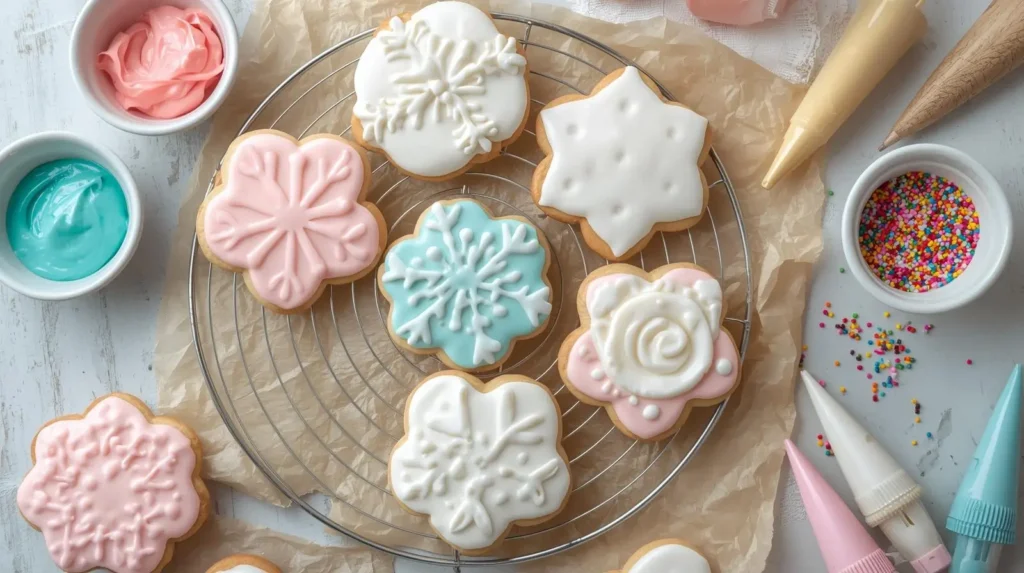
Stiff Consistency
Stiff Royal Icing Recipe is thick enough to hold its shape completely. When you pull a spoon through it, the icing doesn’t flow back together. The peaks stand straight up without drooping.
This consistency is perfect for piping fine details, creating textured designs, making flowers, or piping lettering that needs to stand out dimensionally. It’s also ideal for assembling gingerbread houses because it acts like edible glue.
Stiff icing requires more pressure to pipe, so use it with sturdy piping bags and tips that won’t collapse under pressure.
Medium Consistency
Medium Royal Icing Recipe forms soft peaks that slowly relax. When you lift the mixer, peaks form but gently fold over at the tips. A spoonful dropped back into the bowl maintains its shape for about 10 seconds before smoothing out.
This consistency works beautifully for borders, dimensional lettering, and designs where you want some texture but also need the icing to settle slightly for a smooth appearance.
It’s versatile and forgiving, making it an excellent choice for beginners who aren’t sure which consistency they need.
Flood Consistency
Flood icing (also called flow icing) is thin and pourable. It flows off the spoon in a smooth ribbon and disappears back into itself within 10-15 seconds. Some decorators call this the “15-second rule.”
This consistency is specifically designed for flooding—filling in large areas within an outline to create smooth, flat surfaces. It self-levels beautifully, eliminating brush marks and creating that professional bakery finish.
When properly thinned, flood icing settles into corners and edges perfectly without needing to be spread manually.
Testing Your Consistency
The ribbon test is the most reliable method. Drizzle icing from your spoon or piping bag back into the bowl. Count how long it takes for the ribbon to completely disappear back into the surface.
- 1-3 seconds: Too thin (add powdered sugar)
- 5-7 seconds: Perfect for details and outlining
- 10-15 seconds: Perfect for flooding
- 20+ seconds or doesn’t disappear: Too thick (add water)
Practice with small amounts until you develop an eye for the right consistency. After a few batches, you’ll be able to judge by sight and feel.
Consistency Troubleshooting
If your stiff icing seems grainy, continue mixing. Under-mixed icing never fully incorporates the meringue powder.
If your flood icing has bubbles, let it rest or use a pin to pop bubbles individually after applying to cookies.
If your icing consistency keeps changing as you work, you’re not covering it properly. Keep unused icing tightly covered at all times.
Coloring & Flavor Variations
Customizing your Royal Icing Recipe with colors and flavors transforms basic cookies into themed creations:
| Flavor | Add-In | Notes |
|---|---|---|
| Vanilla | Pure extract | Classic bakery flavor |
| Lemon | Lemon zest or oil | Bright & tangy |
| Almond | Almond extract | Subtle sweetness |
| Peppermint | Peppermint extract | Perfect for holidays |
Chef Advice from Christina Tosi: “A drop of lemon juice adds brightness and cuts sweetness perfectly.”
Coloring Techniques
Gel food coloring is non-negotiable for royal icing. Liquid food coloring contains too much moisture and will thin your icing, ruining your carefully calibrated consistency Royal Icing Recipe.
Gel colors are highly concentrated, so start with tiny amounts. A little goes a long way. Use toothpicks or small spatulas to add color rather than squeezing directly from the bottle.
Popular gel color brands include Americolor, Wilton, and Chefmaster. Professional decorators often prefer Americolor for its consistency and color range.
Achieving Specific Colors
True red and black are notoriously difficult with gel colors. For deep red, start with a burgundy or wine-colored gel rather than bright red. For black, use a combination of black gel and cocoa powder to avoid a bitter taste from excessive gel.
For vibrant colors, add gel color the day before and let the icing rest overnight. This allows the color to fully develop and deepen.
For pastel shades, use the tiniest amount of gel color and mix thoroughly. It’s better to add color gradually than to overshoot and end up with neon when you wanted soft pink.
White icing naturally has an off-white or ivory tone. For true bright white, add a tiny amount of white gel color or a drop of violet gel to counteract the yellow undertones.
Flavor Combinations
Classic vanilla pairs with everything and is the most crowd-pleasing option. Use it as your default unless you have a specific reason to change.
Almond extract gives royal icing a sophisticated, bakery-quality flavor that’s subtle but distinctive. It’s especially lovely with sugar cookies and shortbread.
Lemon brightens the sweetness and provides a fresh flavor that’s perfect for spring and summer cookies. Combine lemon extract with yellow gel color for lemon-themed designs.
Peppermint is festive and refreshing, ideal for holiday cookies, winter themes, or candy cane designs. Pair with red and white colors for classic Christmas treats.
Creative Flavor Ideas
For chocolate royal icing, replace ½ cup of powdered sugar with ½ cup of cocoa powder. You’ll need to adjust the water slightly as cocoa absorbs more liquid.
For coffee-flavored icing, dissolve 1 teaspoon of instant espresso powder in your water before adding it to the dry ingredients.
For maple icing, replace the extract with maple flavoring and add a tiny bit of brown gel color for that authentic maple appearance.
For coconut icing, use coconut extract and consider mixing in a teaspoon of coconut cream for richness.
Flavor Pairing Tips
Match your icing flavor to your cookie flavor for cohesive results. Vanilla icing on vanilla cookies, lemon on lemon, chocolate on chocolate, etc.
Alternatively, choose complementary flavors. Almond icing works beautifully on vanilla or chocolate cookies. Peppermint pairs well with chocolate.
If you’re unsure about a flavor combination, make a small test batch rather than committing your entire batch to an untested flavor.
Decorating Tips
Mastering royal icing application techniques separates amateur cookies from professional-looking creations:
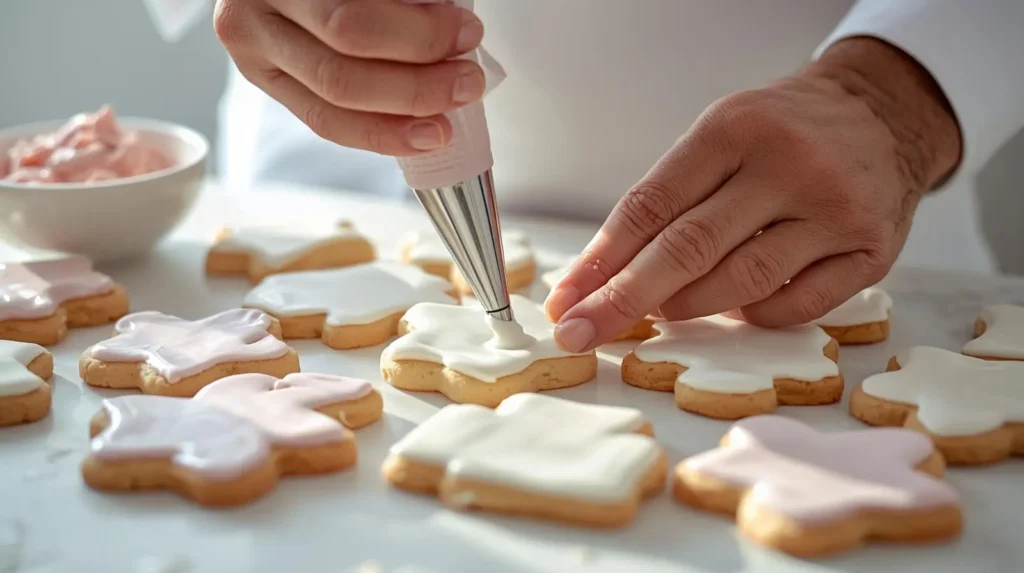
Always outline before flooding to prevent runoff. Create a dam around the edges of your cookie using stiff or medium consistency icing. This border contains the flood icing and ensures it doesn’t spill over the cookie edges.
Wait 5-10 minutes for the outline to set before flooding. This prevents the outline from mixing with the flood icing and maintains clean, crisp edges.
Use a squeeze bottle or piping bag for control. Squeeze bottles are excellent for flooding because they allow steady, even pressure. Piping bags fitted with small round tips (size 2 or 3) are perfect for outlining and details.
Let each layer dry fully before adding details. Royal icing typically takes 6-8 hours to dry completely, though surface drying happens in 30-60 minutes. If you add details too soon, they’ll sink into the base layer or cause colors to bleed together.
Store icing airtight to prevent crusting. Cover bowls with plastic wrap pressed directly against the icing surface, or use airtight containers. Even brief exposure to air creates a crusty skin that’s difficult to mix back in.
Chef Note from Mary Berry: “For glossy cookies, dry them at room temperature — not in the fridge.”
Piping Bag Basics
Fill piping bags only half to two-thirds full. Overfilled bags are difficult to control and messy to work with. They’re also more likely to burst under pressure.
Twist the top of the bag to eliminate air pockets and create pressure. Hold the twisted portion with one hand while squeezing with the other.
Cut piping bag tips carefully. Start with a small opening and enlarge if needed. You can always cut more, but you can’t undo a cut that’s too large.
For stiff icing, use coupler systems so you can change tips without changing bags. This saves icing and reduces waste.
Flooding Techniques
Apply flood icing in sections if decorating large cookies. This prevents the icing from drying before you can spread it evenly.
Use a scribe tool, toothpick, or pin to guide flood icing into corners and tight spaces. Gently encourage the icing to flow where you want it without stirring (which creates bubbles).
For perfectly smooth flooding, hold the cookie at an angle and let gravity help spread the icing. Gently tap the cookie on the counter to eliminate air bubbles and encourage even spreading.
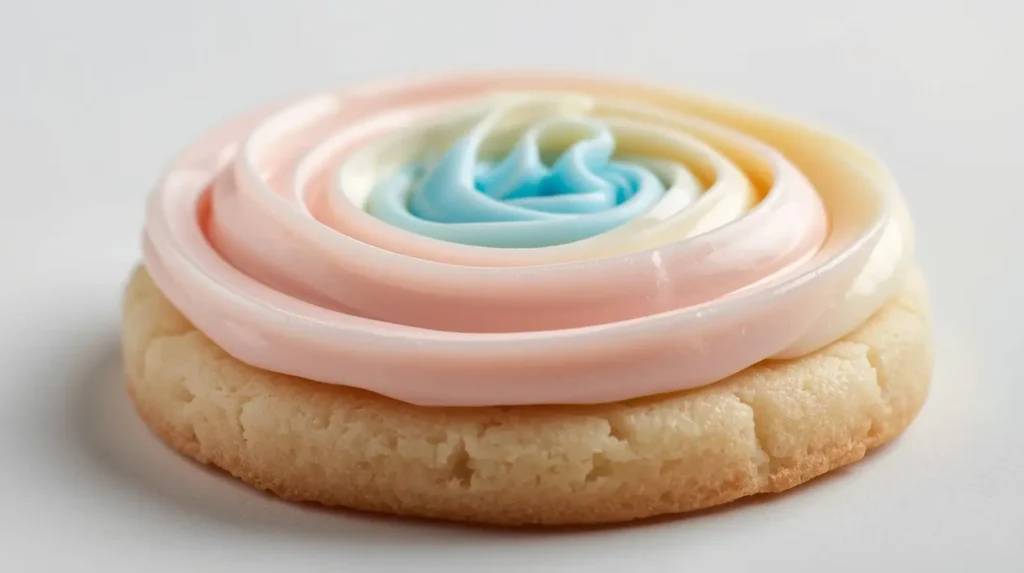
The marbling technique involves flooding a cookie with one color, then immediately adding dots or lines of another color while the base is still wet. Use a toothpick to swirl the colors together for beautiful patterns.
Detail Work
For fine details and delicate designs, use a size 1 or 2 piping tip. Keep steady pressure and move at a consistent speed.
For lettering, sketch your message on paper first to plan spacing. Pipe slowly and deliberately, maintaining even pressure for consistent letter width.
For dimensional flowers, use a flower nail and build petals in layers, allowing each layer to dry before adding the next. Once complete, transfer the dried flower to your cookie with a dot of fresh icing.
Practice your designs on parchment paper before piping on actual cookies. This builds confidence and helps you refine your technique without wasting cookies.
Common Decorating Mistakes
Don’t work too quickly. Royal icing requires patience. Rushing leads to smudged designs, bleeding colors, and frustration.
Don’t overfill your piping bags. This creates hand fatigue and makes it difficult to maintain consistent pressure.
Don’t add too much detail. Sometimes simplicity is more striking than elaborate designs. Focus on clean execution rather than complexity.
Don’t forget to plan your layers. Always work from background to foreground, allowing each layer to dry before adding the next.
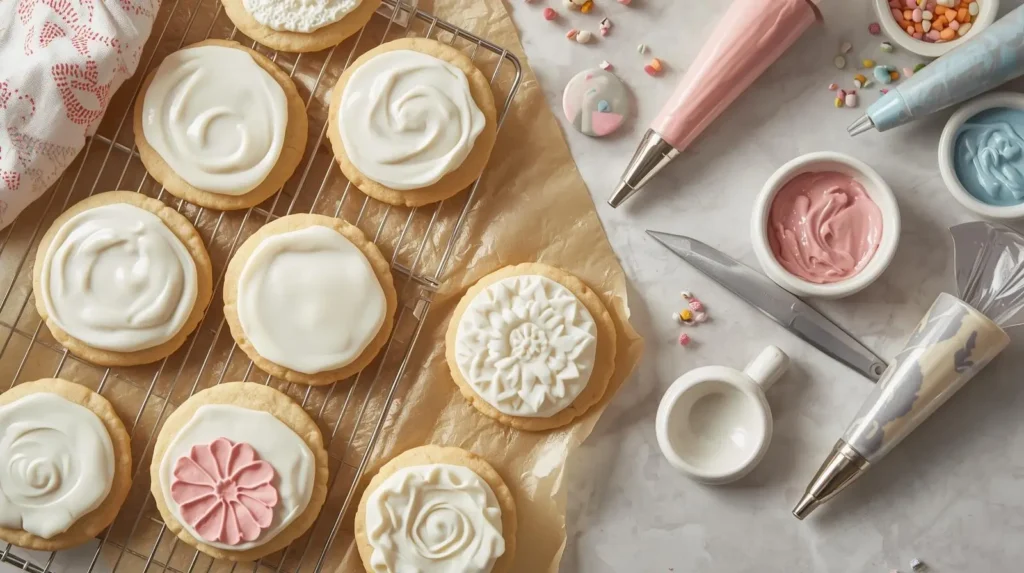
Professional Finishing Touches
For extra sparkle, add edible glitter, sanding sugar, or luster dust while the icing is still wet. These adhere only to wet icing and won’t stick once the surface has dried.
For dimension, pipe wet-on-wet designs where you add details on top of wet flood icing. The new icing sinks slightly into the base, creating interesting textured effects.
For smooth, clean edges, use an offset spatula or small knife to clean up any imperfections while the icing is still wet.
For perfectly straight lines, use a ruler as a guide, holding it just above the cookie surface and piping along its edge.
Storage & Shelf Life
Proper storage keeps your royal icing fresh and your decorated cookies beautiful:
| Storage Method | Duration | Notes |
|---|---|---|
| Airtight Container | 2–3 days | Room temperature |
| Refrigerator | 1 week | Keep covered tightly |
| Freezer | Up to 3 months | Thaw slowly before use |
Pro Tip: Re-whip icing briefly after storage to restore texture.
Storing Unused Icing
Transfer icing to airtight containers immediately after use. Press plastic wrap directly onto the surface before sealing to prevent skin formation.
Label containers with the color and consistency so you know what you have when you return to it later.
Room temperature storage works for 2-3 days. If you need to store icing longer, refrigeration extends its life to about one week.
Before reusing refrigerated icing, bring it to room temperature and re-whip briefly. The icing may have separated slightly or stiffened during storage. Adding a few drops of water and mixing restores the original consistency.
Storing Decorated Cookies
Once royal icing is completely dry (6-8 hours minimum, ideally overnight), decorated cookies are ready for storage.
Store in single layers between sheets of parchment or wax paper to prevent sticking. If you must stack cookies, ensure they’re absolutely dry first and use adequate padding between layers.
Airtight containers at room temperature keep decorated cookies fresh for up to two weeks. Don’t refrigerate decorated cookies—humidity causes royal icing to become soft and sticky.
For longer storage, freeze decorated cookies in airtight containers with layers of parchment between cookies. Frozen cookies last up to three months. Thaw in the container to prevent condensation from forming on the icing.
Preventing Common Storage Issues
Cookies becoming soft: This happens when icing absorbs humidity from the air. Store in truly airtight containers with silica gel packets if you live in a humid climate.
Icing developing spots: This is usually caused by storing cookies before the icing is fully dry. Always wait at least 8 hours, preferably overnight.
Colors bleeding: This occurs when cookies are stored in too much humidity or stacked before completely dry. Ensure thorough drying and use proper spacing between cookies.
Icing losing shine: This is normal over time but is accelerated by light exposure. Store cookies in opaque containers away from direct light.
Freezing Tips
Freeze icing in small portions for convenience. Ice cube trays or small containers work perfectly.
Thaw frozen icing slowly in the refrigerator overnight rather than at room temperature. This prevents condensation and separation.
After thawing, bring icing to room temperature before use. Cold icing is difficult to pipe and may have texture issues.
Don’t refreeze thawed icing. Quality degrades with each freeze-thaw cycle.
FAQs [Royal Icing Recipe]
Why does my royal icing dry dull?
Dull royal icing usually results from under-mixing. The meringue powder needs adequate mixing time to fully activate and create that glossy sheen. Mix for the full 3-5 minutes even if the icing looks combined sooner. Another common cause is using old or low-quality powdered sugar, which may contain too much cornstarch. Finally, drying icing in the refrigerator rather than at room temperature causes dullness. Always dry decorated cookies at room temperature in a dry environment.
Can I make royal icing without meringue powder?
Yes, you can substitute fresh egg whites for meringue powder. Use 3 tablespoons of fresh egg whites (approximately 1-2 eggs) in place of the meringue powder and water. However, there are drawbacks: the icing doesn’t dry as hard, has a shorter shelf life, and presents food safety concerns with raw eggs. If using fresh eggs, consume decorated cookies within a few days and be cautious serving them to children, pregnant women, or immunocompromised individuals. Pasteurized egg whites from a carton are a safer alternative to fresh eggs.
How do I fix icing that’s too runny or too thick?
For icing that’s too runny, add powdered sugar one tablespoon at a time, mixing thoroughly between additions until you reach desired consistency. Be patient—it takes a moment for the sugar to fully incorporate. For icing that’s too thick, add water by the half-teaspoon, mixing well after each addition. Remember that adjustments are easier to make gradually. Always test consistency before adding more adjusting ingredients. Keep notes about how much you add so you can replicate your perfect consistency next time.
What’s the best way to store decorated cookies?
Wait until royal icing is completely dry—minimum 6-8 hours, ideally overnight. Store cookies in single layers between sheets of parchment or wax paper in airtight containers at room temperature. Never refrigerate decorated cookies as humidity makes the icing soft and sticky. For mailing cookies, wrap individually in cellophane bags once fully dry, then pack with crumpled paper or bubble wrap to prevent shifting. Decorated cookies stay fresh at room temperature for up to two weeks or frozen for up to three months.
How long does royal icing take to dry?
Surface drying occurs within 30-60 minutes, creating a thin skin that won’t smudge when lightly touched. However, complete drying takes 6-8 hours minimum, and thick applications or humid environments require even longer. For best results, let decorated cookies dry overnight before stacking, packaging, or adding additional layers. Factors affecting drying time include humidity levels, icing thickness, flood versus piping consistency, and room temperature. Lower humidity and warmer temperatures speed drying.
Can I add flavor to royal icing without affecting consistency?
Yes, but use concentrated flavorings specifically designed for baking—extracts, emulsions, or flavoring oils. These are potent enough that you only need ½ to 1 teaspoon per batch, which doesn’t significantly alter consistency. Avoid using juice or other liquid flavorings, which thin the icing. If you want stronger flavor, slightly reduce the water in your recipe and use flavoring as part of your liquid measurement. For example, use 5 tablespoons of water and ½ tablespoon of flavoring instead of 5½ tablespoons of water.
Why is my royal icing grainy?
Graininess usually comes from insufficient mixing or unsifted powdered sugar. Always sift powdered sugar before measuring to remove lumps. Mix the icing for the full recommended time—rushing this step leaves particles undissolved. If your finished icing is grainy, continue mixing for several more minutes, which often resolves the issue. Using high-quality powdered sugar also helps. Finally, ensure you’re measuring accurately. Too much sugar relative to liquid creates a grainy texture that’s difficult to smooth out.
How do I prevent air bubbles in royal icing?
Let mixed icing rest for 5-10 minutes before using, allowing bubbles to naturally rise to the surface. Stir gently (don’t whip) before transferring to piping bags. Mix on low to medium speed rather than high speed to minimize air incorporation. When filling piping bags, tap them on the counter to release trapped air. After flooding cookies, use a toothpick to pop any visible bubbles immediately. A scribe tool can help guide bubbles to edges where they’re less visible. Some decorators use a small kitchen torch to gently pass over wet icing, which pops surface bubbles instantly.
Conclusion
This royal icing recipe is your go-to for every celebration — glossy, sturdy, and easy to customize. Whether you’re decorating Christmas cookies with the kids, creating elegant wedding favors, or building an elaborate gingerbread house, this formula delivers consistent, beautiful results.
The techniques and tips shared here give you the foundation to decorate with confidence. Understanding consistency, mastering color techniques, and knowing proper storage methods transform you from a hesitant beginner into a capable decorator.
Chef Inspiration from Duff Goldman: “Royal icing is like edible art — once you master it, your desserts will never look the same.”
Remember that practice makes progress. Your first batch of decorated cookies might not look perfect, and that’s completely normal. Each cookie you decorate teaches you something new about pressure control, consistency, and timing.
Start simple with basic outlines and flooding before attempting intricate designs. Build your skills gradually, and soon you’ll be creating masterpieces that impress everyone who sees them.
Grab your piping bag and start decorating like a pro today!
Set aside an afternoon for practice. Bake a batch of simple sugar cookies, mix this royal icing recipe, and experiment with different consistencies and techniques. You’ll be amazed at how quickly your skills develop.
Don’t be discouraged by early attempts that don’t match your vision. Even professional decorators spent years perfecting their craft. The beautiful part about royal icing is that it’s forgiving—mistakes can be scraped off and redone while wet, or covered with additional designs once dry.
Share your decorated creations with friends and family. Handmade decorated cookies are one of the most thoughtful gifts you can give, and people appreciate the time and effort behind each design.
Next, try our [Homemade Sugar Cookie Recipe] for the perfect decorating base!
The right cookie makes all the difference in your decorating success. Cookies that spread too much, brown too heavily, or have rough surfaces create frustrating decorating experiences. A recipe specifically designed for decorating gives you the smooth, flat canvas that royal icing deserves.
Once you master both the cookie and the icing, you’ll have a skill set that brings joy to every celebration and creates memories that last long after the cookies are eaten. Happy decorating!
How did you find results our recipes
There are no reviews yet. Be the first one to write one.

