Introduction
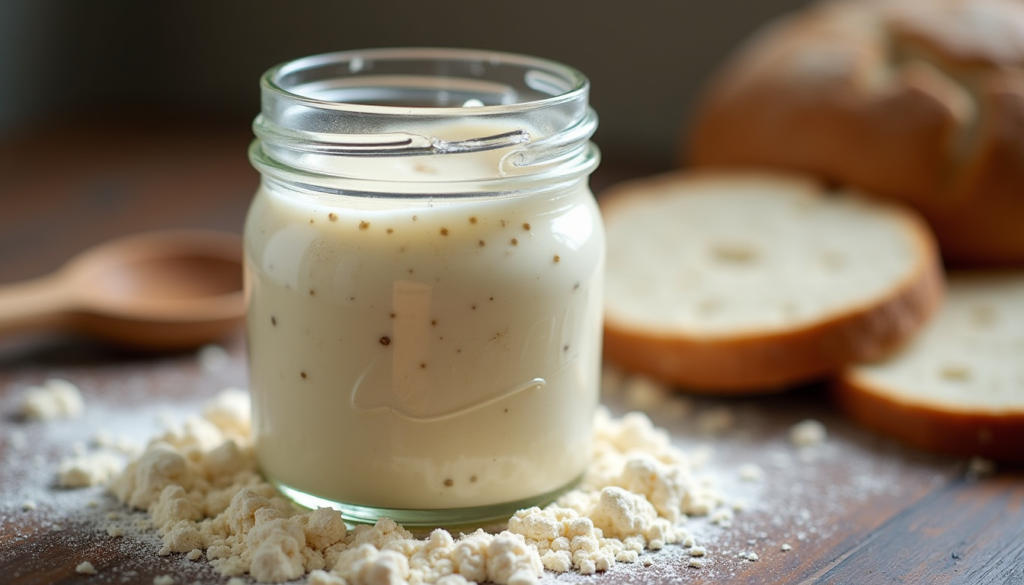
Want to bake sourdough bread at home but don’t know where to start? Creating your own Easy Sourdough Starter Recipe – Build Your Own Starter from Scratch might seem intimidating, but it’s surprisingly simple. With just flour, water, and patience, you’ll cultivate a living culture that produces the most flavorful, aromatic bread imaginable.
This sourdough starter recipe—perfect for baking bread, rolls, or pizza. No special equipment needed, no mysterious ingredients required. Just two basic components and a week of gentle care transform into a powerful leavening agent that lasts indefinitely.
After years of baking sourdough, I’ve simplified the process for beginners to succeed every time. I’ve tested countless methods, troubleshot every common problem, and distilled the essential techniques that guarantee success. This isn’t complicated artisan magic—it’s straightforward science that anyone can master.
In this comprehensive guide, you’ll learn starter preparation from day one, proper feeding schedules that build strength, troubleshooting solutions for common issues, expert tips from renowned bakers, and answers to frequently asked questions. Get ready to join the Sourdough Starter Recipe – community and experience the satisfaction of baking with your own living culture.
Table of Contents
Why This Sourdough Starter Recipe Works
This method succeeds because it respects the natural fermentation process while remaining accessible to beginners who’ve never worked with wild yeast before.
Uses only flour and water—no complicated ingredients. Sourdough Starter Recipe requires nothing else. The wild yeast and bacteria already exist naturally on flour and in your environment. You’re simply creating optimal conditions for them to thrive and multiply.
Easy daily maintenance for a healthy starter. The feeding schedule is consistent and predictable. Once you establish a routine, maintaining your starter takes just 5 minutes daily. It becomes as automatic as making morning coffee.
Chef-approved tips to ensure strong yeast activity. Professional bakers have refined Sourdough Starter Recipe techniques over decades. This recipe incorporates their wisdom, ensuring your starter develops robust fermentation power that produces reliable rises and complex flavor.
Perfect for beginners and experienced bakers alike. Whether this is your first fermentation project or you’re an experienced baker refining your technique, this straightforward method produces excellent results. The simplicity appeals to beginners while the reliability satisfies experienced bakers.
Choosing the Right Ingredients
Best Ingredients for Sourdough Starter Recipe
| Ingredient | Purpose | Notes |
|---|---|---|
| All-purpose flour | Base for starter | Reliable, consistent results |
| Bread flour | Alternative base | Higher protein = stronger gluten structure |
| Water (filtered) | Hydration and fermentation | Chlorine kills yeast; filter if needed |
| Whole wheat flour (optional) | Flavor & fermentation boost | Natural yeast on bran accelerates development |
| Rye flour (optional) | Enhanced fermentation | Most active wild yeast; speeds starter maturity |
Buying Tips for Sourdough Starter Recipe
Use fresh, high-quality flour that hasn’t been sitting in your pantry for months. Fresh flour contains more active enzymes and nutrients that feed wild yeast. Check expiration dates and buy from stores with good turnover.
Avoid ultra-processed or pre-sifted flours. These have been stripped of the bran and germ where wild yeast naturally lives. Whole grain or stone-ground flours work best for starting, though you can transition to all-purpose later.
Choose unbleached flour. Bleaching chemicals can inhibit fermentation. Look for flour labeled “unbleached” on the package.
Filter your water if necessary. Tap water often contains chlorine or chloramine that kills beneficial microorganisms. Let tap water sit uncovered overnight to dissipate chlorine, or use filtered water from the start.
Buy organic when possible. Organic flours often contain more diverse microbial populations, which can speed up starter development and create more complex flavors.
Substitutions Sourdough Starter Recipe
Mix flours for flavor complexity. Try 50% rye and 50% all-purpose for a tangier, more active starter. Or use 25% whole wheat and 75% all-purpose for subtle nutty flavor while maintaining light texture.
Use bread flour instead of all-purpose for slightly stronger gluten development. This creates a more elastic starter that holds gases better, resulting in more dramatic rises.
Try different water sources. Spring water, well water, or filtered water each contribute different mineral profiles that affect fermentation and flavor subtly.
Chef Advice on Ingredients about Sourdough Starter Recipe
Chad Robertson, founder of Tartine Bakery and author of “Tartine Bread,” emphasizes consistency: “Use consistent temperature and hydration for a predictable starter. Your starter is a living thing that thrives on routine. Feed it at the same time daily, use the same ratio of flour to water, and maintain similar temperatures.”
Ken Forkish, author of “Flour Water Salt Yeast,” recommends simplicity: “Start with all-purpose flour and room temperature water. Don’t overthink it. The wild yeast will find you. Complexity comes later—begin with basics.”
Peter Reinhart, legendary bread instructor and author, notes: “Whole grain flours jumpstart fermentation because they contain more nutrients and naturally occurring yeasts. Add 10-20% whole wheat or rye to your initial mix if you want faster development.”
Nancy Silverton, La Brea Bakery founder, advises: “Water quality matters more than most realize. If your tap water tastes good to drink, it’s probably fine for starter. If it tastes chlorinated or metallic, filter it first.”
Ingredients & Prep Sourdough Starter Recipe
Starter Essentials
| Step | Instructions |
|---|---|
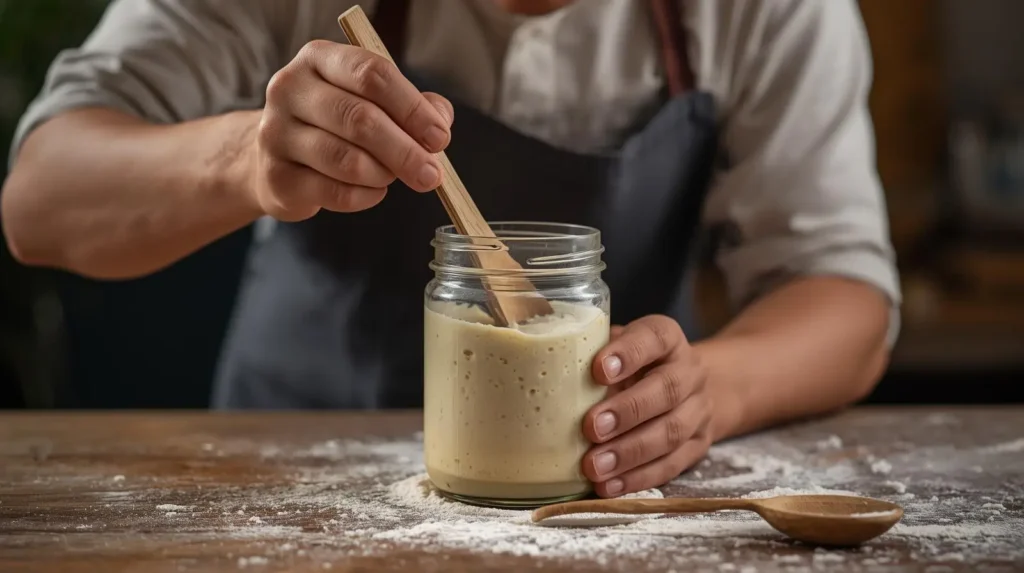
| Mix flour and water | Combine ½ cup flour + ½ cup water in a clean glass jar |
| Stir well | Ensure no dry lumps remain; mixture should be thick pancake batter consistency |
| Cover jar | Use breathable cloth secured with rubber band or lid with small gap |
| Place at room temperature | 70–75°F ideal for fermentation; avoid drafts and direct sunlight |
| Mark the level | Use tape or marker to track growth |
Equipment You’ll Need
Glass jar or container: Use a 1-quart jar with a wide mouth for easy stirring. Glass is ideal because you can see activity and it doesn’t retain odors.
Kitchen scale (optional but helpful): Measuring by weight rather than volume creates more consistent results. Aim for 1:1 ratio by weight (50g flour to 50g water).
Breathable cover: Cheesecloth, coffee filter, or paper towel secured with rubber band. Never seal completely—the starter needs air exchange.
Stirring utensil: Wooden spoon or spatula works perfectly. Avoid reactive metals like aluminum or copper.
Comfortable location: Choose a spot with stable temperature away from direct sunlight, drafts, or heat sources.
Optional Additions
A pinch of rye flour (1-2 tablespoons) added to your initial mix can accelerate fermentation. Rye contains more enzymes and natural yeast than white flour.
A teaspoon of established starter from a friend shortcuts the process by 2-3 days. However, building from scratch without this teaches you what healthy development looks like.
A tiny pinch of honey (¼ teaspoon) provides instant food for yeast, though this is controversial among purists. Skip it if you want authentic wild fermentation.
Feeding & Maintenance Schedule
Daily Feeding Instructions
Starting a Sourdough Starter Recipe culture from scratch takes 5-7 days of daily feedings. Here’s the day-by-day process:
Day 1: Mix ½ cup (60g) flour and ½ cup (60g) room temperature water in your jar. Stir thoroughly until no dry flour remains. The mixture should resemble thick pancake batter. Cover loosely and place at room temperature (70-75°F). Mark the level with tape or marker.
Day 2: You may notice a few small bubbles, but don’t expect much activity yet. Discard half the starter (about ½ cup). Add ½ cup fresh flour and ½ cup water. Stir well, cover, and return to its spot. The discarding removes waste products and provides fresh food for developing yeast.
Day 3: More bubbles should appear, and the starter may smell slightly alcoholic or tangy. This is normal. Discard half again and feed with ½ cup flour and ½ cup water. Stir, cover, and wait.
Day 4-5: Activity should increase noticeably. The starter may double in size between feedings, develop a honeycomb texture, and smell pleasantly sour. Continue the discard-and-feed routine at the same time each day.
Day 6-7: By now, your starter should reliably double in size within 4-8 hours after feeding. It will be bubbly, smell tangy but pleasant (like yogurt or beer), and pass the float test. If it’s not quite there, continue daily feedings until it consistently doubles.
Feeding Schedule Reference Table
| Day | Flour | Water | Discard Amount | Notes |
|---|---|---|---|---|
| 1 | ½ cup (60g) | ½ cup (60g) | None | Mix thoroughly, mark level |
| 2 | ½ cup (60g) | ½ cup (60g) | Half of starter | Beginning to show activity |
| 3 | ½ cup (60g) | ½ cup (60g) | Half of starter | Bubbles appearing, slight aroma |
| 4-5 | ½ cup (60g) | ½ cup (60g) | Half of starter | Increasing activity and rise |
| 6-7 | ½ cup (60g) | ½ cup (60g) | Half of starter | Should double within 4-8 hours |
| Ongoing | ½ cup (60g) | ½ cup (60g) | Half of starter | Maintain daily if kept at room temp |
Maintenance After Maturity
Once your starter is mature and active, you have several maintenance options:
Daily feeding (room temperature): If you bake frequently, keep your starter on the counter and feed it once daily. Discard half and feed with equal parts flour and water.
Weekly feeding (refrigerated): For occasional bakers, store your fed starter in the refrigerator. It slows fermentation dramatically. Feed once weekly by removing from fridge, discarding half, feeding, and returning to cold storage after 30 minutes.
Reviving from refrigeration: Take starter out the day before baking. Feed it 2-3 times at 8-12 hour intervals at room temperature to reactivate fully before using.
Chef Advice on Feeding
Ken Forkish emphasizes consistency: “Discarding and feeding is essential to keep yeast healthy. Without discarding, you’d quickly have an enormous amount of starter. More importantly, removing spent culture and adding fresh food maintains the right balance of yeast, bacteria, and nutrients.”
Chad Robertson on timing: “Feed your starter at the same time every day if possible. Consistency in schedule helps you understand your starter’s rhythm. You’ll learn exactly when it peaks—the moment it’s strongest and most active.”
Jeffrey Hamelman, baking expert and author, notes: “A stiff starter (less hydration) ferments more slowly than a liquid starter. Adjust water amounts to control fermentation speed. Beginners should stick to 100% hydration (equal flour and water) until comfortable.”
Josey Baker, founder of The Mill bakery, advises: “Don’t stress if you miss a feeding. Sourdough Starter Recipe is remarkably forgiving. A hungry starter smells more acidic and may develop hooch (liquid on top), but it’s usually recoverable with a good feeding.”
Step-by-Step Usage Instructions Sourdough Starter Recipe
Checking Starter Readiness
Your starter is ready to use when it exhibits these characteristics:
Consistent doubling: After feeding, the starter should reliably double (or even triple) in volume within 4-8 hours. This demonstrates strong yeast activity.
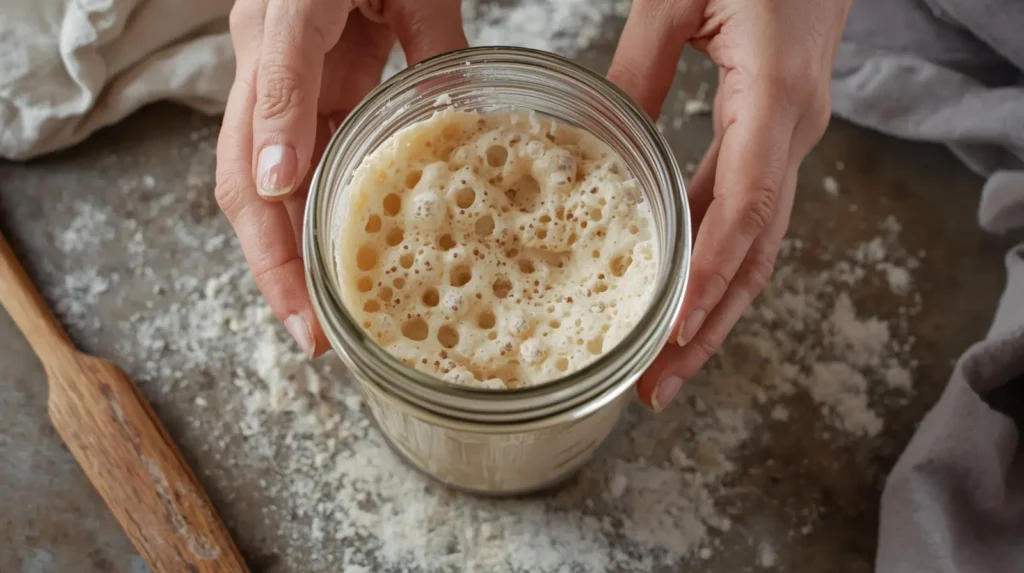
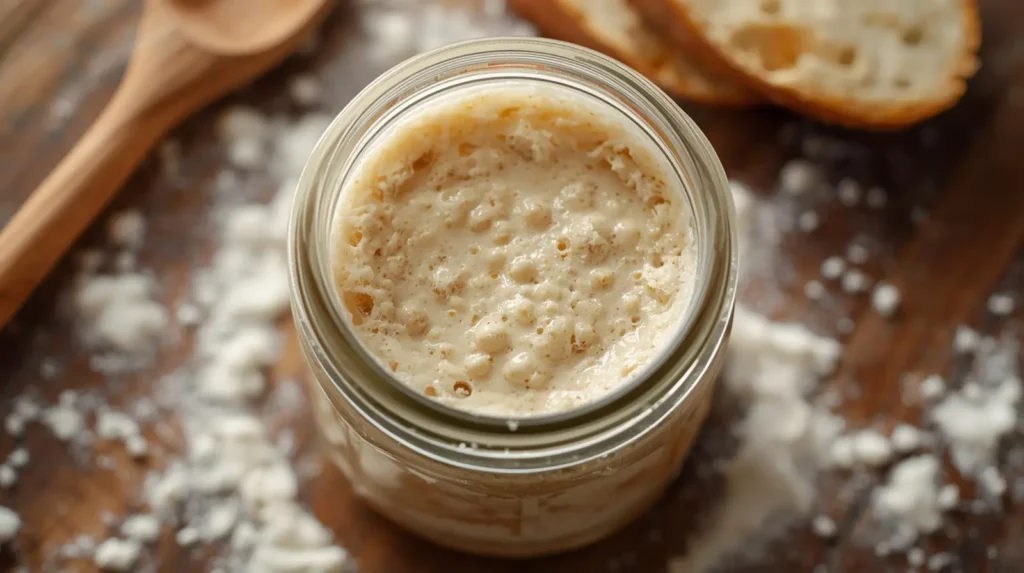
Abundant bubbles: The surface and interior should show numerous bubbles of varying sizes, creating a honeycomb-like structure. This indicates active fermentation.
Pleasant aroma: Mature starter smells tangy, slightly acidic, fruity, or yogurt-like. It should never smell rotten, like nail polish remover, or putrid.
Dome shape: At its peak, the starter’s surface should dome upward before eventually collapsing. This peak moment is ideal for baking.
Float test: Take a small spoonful of starter and drop it in a glass of water. If it floats, it’s full of gas and ready to leaven bread. If it sinks, it needs more time or another feeding.
Predictable timing: You should be able to predict when your starter will peak based on feeding time and temperature. This predictability indicates maturity.
Using Your Sourdough Starter Recipe
100% hydration starter (equal weights flour and water) is standard for most Sourdough Starter Recipe. If a recipe calls for starter, this is likely what it means unless specified otherwise.
Measure by weight when possible. A cup of starter can vary significantly in weight depending on how settled or aerated it is. Weight measurements (grams) are more accurate.
Use at peak activity for maximum rise. Feed your starter and use it when it’s at its highest point—usually 4-8 hours after feeding at room temperature.
Reserve some starter before using. Always keep at least 2 tablespoons of starter in your jar to continue the culture. Feed this reserved portion to rebuild your starter supply.
Adjusting for Different Recipes
Bread recipes typically use 50-100g of active starter per loaf. The starter provides leavening, flavor, and texture.
Pancakes and waffles can use unfed (discard) starter. These recipes don’t rely on the starter for rise—baking powder provides that. The starter adds tangy flavor.
Pizza dough benefits from overnight fermentation with starter. Use 75-100g of active starter and let the dough ferment slowly in the refrigerator for complex flavor.
Troubleshooting Common Issues
Problem & Solution Reference Table
| Issue | Possible Cause | Solution |
|---|---|---|
| No bubbles after 3+ days | Low temperature or weak yeast | Move to warmer spot (75-80°F); add pinch of rye flour |
| Foul smell (rotten, sulfuric) | Contamination or imbalanced bacteria | Discard all but 1 tbsp, feed with fresh flour/water |
| Hooch (dark liquid on top) | Hungry starter, needs feeding | Pour off or stir in; feed immediately |
| Starter too runny/liquid | High hydration ratio | Reduce water slightly or add more flour |
| Starter too dry/thick | Low hydration ratio | Add a little more water when feeding |
| Mold (fuzzy colored spots) | Contamination | Discard entirely and start over; clean jar thoroughly |
| Not doubling in size | Immature starter or wrong timing | Continue daily feedings; ensure room temp is 70-75°F |
| Smells like acetone/nail polish | Over-fermented or stressed yeast | Feed more frequently; ensure adequate temperature |
| Gray or pink tint | Unwanted bacteria | Discard and start over; check water quality |
Detailed Troubleshooting
Slow starter development: If your starter isn’t active after a week, try these fixes. Increase temperature to 75-80°F—fermentation slows dramatically in cooler environments. Switch to whole wheat or rye flour temporarily, as these contain more natural yeast. Feed twice daily instead of once. Be patient—some starters take 10-14 days in cooler climates.
Inconsistent rise: If your starter sometimes doubles and sometimes doesn’t, examine your environment. Temperature fluctuations affect fermentation dramatically. A 5-degree change can alter timing by hours. Try to maintain consistent conditions and feeding times.
Strange odors: Sourdough Starter Recipe should smell tangy, sour, yeasty, fruity, or beer-like. Nail polish remover (acetone) smell indicates stressed yeast—feed more frequently. Vinegary smell means it’s very hungry—feed immediately. Rotten or putrid smells indicate spoilage—discard and start fresh.
Chef Advice on Troubleshooting
Chad Robertson on consistency: “Consistency in feeding times and amounts is key. Your starter thrives on routine. Random feeding schedules create unpredictable fermentation. Set a phone reminder and stick to it.”
Peter Reinhart advises patience: “Every environment is different—temperature, humidity, flour quality, water chemistry. Your starter may take longer than your friend’s, and that’s completely normal. Trust the process.”
Nancy Silverton on recovery: “A neglected starter is usually salvageable. Even if it looks dead, try feeding it twice daily for three days before giving up. I’ve revived starters that seemed hopeless.”
Flavor Variations Sourdough Starter Recipe
Flour Combinations for Different Flavors
20-50% rye flour creates tangier, more assertive sourdough flavor. Rye contains more enzymes and free sugars, producing faster, more acidic fermentation. The resulting bread has a distinctive depth and slight bitterness that pairs beautifully with savory foods.
25-40% whole wheat flour adds nutty, earthy notes while keeping texture relatively light. Whole wheat contributes vitamins, minerals, and fiber along with more complex flavor than white flour alone.
10-20% spelt flour introduces a subtle sweetness and mellow character. Spelt ferments easily and creates tender crumb structure.
100% bread flour produces neutral, mild Sourdough Starter Recipe that showcases pure wheat flavor. This works beautifully for sandwich bread and applications where you want sourdough tang without overwhelming other ingredients.
Hydration Adjustments
100% hydration (equal weights flour and water) is standard and works for virtually all recipes. This is the best starting point for beginners.
75-80% hydration creates a stiffer starter that ferments more slowly and produces sweeter, less tangy bread. This firmer consistency is easier to handle and shape.
125-150% hydration makes a liquid starter that ferments quickly and produces more sour, tangy bread. This consistency is harder to maintain but creates distinctive flavor.
Flavor Enhancement Techniques
Longer fermentation times at cooler temperatures (55-65°F) develop more complex, nuanced flavors. The slower process allows enzymes more time to break down starches and proteins.
Feed ratio adjustments affect flavor. A larger feeding (1:5:5 ratio—starter:flour:water) produces milder bread. A smaller feeding (1:1:1 ratio) creates more sour flavor.
Temperature control dramatically impacts taste. Warmer fermentation (80-85°F) favors acetic acid (sharp, vinegary tang). Cooler fermentation (65-70°F) favors lactic acid (mild, yogurt-like tang).
Serving Suggestions Sourdough Starter Recipe
Recipes Perfect for Your Sourdough Starter Recipe
Classic sourdough bread: The ultimate use for your starter. Use 100g active starter, 500g bread flour, 350g water, and 10g salt. Ferment, shape, proof, and bake for crusty, tangy artisan loaves.
Sourdough pancakes: Use ½ cup discard starter, 1 cup flour, 1 cup milk, 1 egg, and 1 teaspoon baking soda. These fluffy pancakes have subtle tang that complements maple syrup beautifully.
Sourdough pizza dough: Mix ¾ cup active starter with 300g flour, 180g water, 8g salt, and 5g olive oil. Ferment overnight in the refrigerator for the best texture and flavor. The crust develops incredible complexity.
Sourdough waffles: Similar to pancakes but with added melted butter for crispy exteriors. The starter adds lightness and tang.
Sourdough crackers: Roll discard starter thin with herbs and salt, then bake until crispy. These addictive crackers use up discard deliciously.
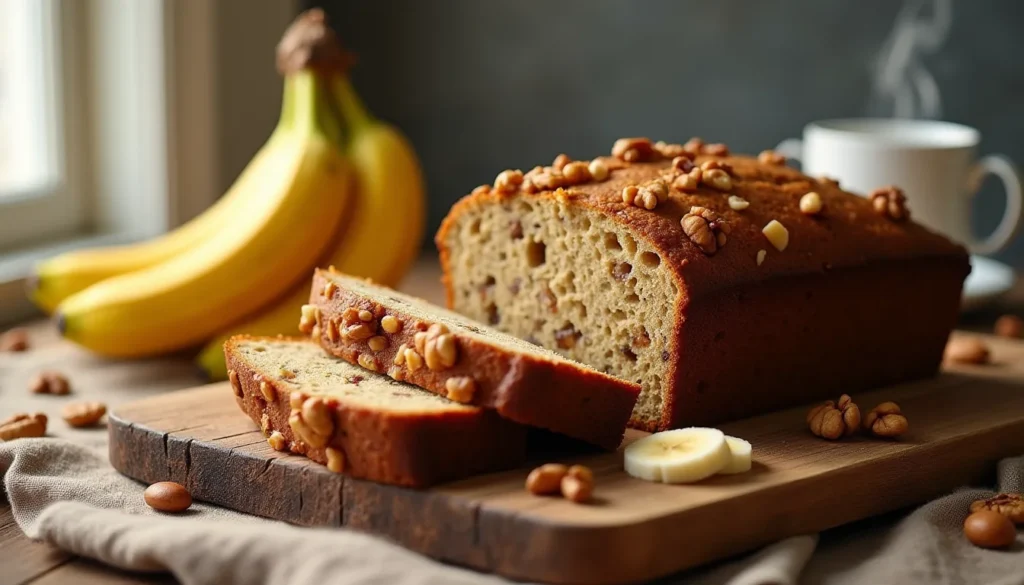
Sandwich loaves: Use starter in a standard sandwich bread recipe for softer texture with Sourdough Starter Recipeflavor. The long fermentation creates bread that stays fresh longer.
Recipe Usage Reference Table
| Recipe | Starter Amount | Starter Type | Notes |
|---|---|---|---|
| Sourdough Bread | 100g (½ cup) | Active, fed | 100% hydration starter at peak |
| Pancakes | 120g (½ cup) | Discard or unfed | No need to waste discard |
| Pizza Dough | 150g (¾ cup) | Active, fed | Ferment overnight for best texture |
| Waffles | 240g (1 cup) | Discard or unfed | Use discard for tangy flavor |
| Crackers | Any amount | Discard | Great way to use excess |
| Sandwich Loaf | 200g (⅞ cup) | Active, fed | Creates soft, lasting texture |
Storage and Maintenance Tips
Room temperature storage: Keep your jar on the counter if you bake frequently (3+ times per week). Feed daily at the same time. This keeps starter always ready but requires consistent attention.
Refrigerator storage: For occasional bakers, refrigeration is ideal. Feed your starter, let it sit at room temperature for 30-60 minutes, then refrigerate. Feed once weekly or whenever you see hooch forming.
Freezing for long-term storage: Spread active starter thinly on parchment paper, freeze until solid, then break into pieces and store in a freezer bag. Revive by thawing and feeding 2-3 times. Starter freezes successfully for up to a year.
Drying for backup: Spread starter very thinly on parchment, let dry completely (1-2 days), then break into flakes and store in an airtight container. Rehydrate with water and feed to revive. Dried starter keeps for years.
FAQs
“Can I leave my starter out overnight?”
Absolutely—in fact, that’s exactly where it should be during the development phase! Room temperature (ideally 70-75°F) is perfect for fermentation. Leaving it out overnight is standard practice. The only time you’d refrigerate is for long-term storage once the starter is mature.
If your kitchen is very warm (above 80°F), your starter will ferment faster and may need more frequent feedings. In very cool kitchens (below 65°F), fermentation slows considerably, and development takes longer.
There’s no danger in leaving starter at room temperature—it’s designed to sit out. Just ensure it’s covered with a breathable cloth to keep out dust and insects while allowing air exchange.
“How often should I feed it?”
This depends on storage method and your baking schedule. During the initial 7-day development phase, feed once daily at approximately the same time. Consistency matters more than specific timing.
Once mature, you have options. Keep it at room temperature and feed daily if you bake multiple times weekly. This maintains peak readiness but requires daily attention.
For occasional baking, refrigerate your starter and feed weekly. Some bakers stretch this to every 10-14 days, though weekly is safer for maintaining health.
Before baking, always feed your refrigerated starter 2-3 times at 8-12 hour intervals at room temperature to reactivate fully. Never use starter straight from the fridge.
“Can I freeze my starter?”
Yes, Sourdough Starter Recipe freezes successfully, though it requires revival afterward. This is ideal for long vacations or as insurance backup.
To freeze, use active starter at its peak. Spread it thinly on parchment paper or freeze in small portions (1-2 tablespoon amounts) in ice cube trays. Once frozen solid, transfer to freezer bags. Frozen starter keeps for up to 12 months.
To revive, thaw at room temperature, then feed normally. Expect to feed 2-4 times over 24-48 hours before the starter regains full strength. The first feeding might show little activity, but subsequent feedings should progressively improve.
“What flour works best for flavor?”
Flour choice dramatically impacts flavor. Rye creates the most assertive, tangy, complex flavor. Even 20% rye in your feeding routine produces noticeably more sour bread with earthy, mineral notes.
Whole wheat adds nutty, slightly sweet character without the intensity of rye. It’s perfect for balanced flavor that’s still interesting.
All-purpose flour creates the mildest, most neutral starter. This works beautifully when you want subtle Sourdough Starter Recipe tang that doesn’t overpower other ingredients.
Bread flour produces slightly stronger fermentation and better rise due to higher protein content, though flavor differences from all-purpose are minimal.
Many bakers maintain their starter with a blend—perhaps 80% all-purpose and 20% whole wheat—for balanced flavor and strong performance. Experiment to find your preference.
Conclusion
Start your Sourdough Starter Recipe journey today with this easy starter recipe and enjoy homemade bread anytime! Creating your own living culture connects you to an ancient tradition while producing the most flavorful, nutritious bread possible. The process is meditative, rewarding, and surprisingly simple once you establish your routine.
Thousands of home bakers have successfully built their starters using this method. You don’t need special skills, expensive equipment, or mysterious ingredients—just flour, water, patience, and consistency. Within a week, you’ll have a powerful leavening agent that produces bread far superior to anything from a store Sourdough Starter Recipe.
Your s Sourdough Starter Recipe becomes a kitchen companion that lasts indefinitely with basic care. Some bakers maintain starters for decades, passing them down through generations. This isn’t just a recipe—it’s the beginning of a lifelong relationship with wild fermentation.
The satisfaction of slicing into a loaf of bread leavened by your own starter, knowing you cultivated the yeast from scratch, is incomparable. The complex flavors, the artisan crust, the tender crumb—these are yours to create whenever you wish.
Next, check out our Easy Sourdough Starter Recipe Discard or Best Granola Recipe for more delicious baking ideas that complement your sourdough journey! Once you master your starter, endless possibilities await for using it in both traditional and creative applications.
How did you find results our recipes
There are no reviews yet. Be the first one to write one.