Introduction
Tired of spending money at expensive steakhouses when you could make restaurant-quality steak at home? Or worse—have you tried cooking Steak on the Stove only to end up with a gray, tough piece of meat that’s either burnt on the outside and raw inside, or overcooked throughout? You’re not alone. Learning how to cook a steak on the stove intimidates many home cooks because it seems like there’s no room for error.
This guide will teach you how to cook a steak on the stove that rivals any high-end steakhouse—perfectly seared with a caramelized crust, juicy and tender inside, with exactly the doneness you prefer. Picture a beautiful ribeye or New York strip with that iconic golden-brown exterior giving way to perfectly pink, buttery meat that melts in your mouth. The secret lies in understanding heat management, timing, and a few professional techniques that transform stovetop cooking from guesswork into a reliable system.
As someone who’s spent over 15 years mastering beef cookery in professional kitchens and teaching culinary techniques, I can confidently say that learning how to cook a steak on the stove is one of the most valuable skills in any home cook’s arsenal. Stovetop cooking actually offers more control than grilling—you can monitor temperature precisely, adjust heat instantly, and achieve consistent results regardless of weather. Once you understand the fundamentals, you’ll cook perfect steak every single time.
In this comprehensive guide, you’ll discover everything needed to master how to cook a steak on the stove, including which cuts work best for pan-searing and why, the exact temperatures and timing for foolproof results, professional techniques like butter basting that create restaurant-quality flavor, common mistakes and how to avoid them, and expert tips that separate good steak from extraordinary steak. Whether you’re cooking for a special occasion or treating yourself to a weeknight indulgence, this method will revolutionize your home cooking.
Table of Contents
Why This Steak on the Stove Method Works
This approach to how to cook a steak on the stove has become the gold standard for home cooks who demand steakhouse quality:
- Complete temperature control: Unlike outdoor grilling where weather, wind, and inconsistent heat create variables, cooking steak on the stove gives you precise control. You can adjust heat instantly, monitor temperature accurately, and achieve predictable results every single time—even in winter.
- High-heat searing creates flavor: A screaming-hot skillet creates the Maillard reaction—the chemical process that browns proteins and develops complex, savory flavors. This caramelized crust is what makes steakhouse steak so irresistible, and it’s completely achievable on your stovetop.
- Butter basting adds restaurant richness: This professional technique involves spooning hot melted butter over the steak as it cooks, basting it continuously. The butter carries aromatics like garlic and thyme, infusing the meat with incredible flavor while promoting even cooking.
- No special equipment required: You don’t need a grill, smoker, or sous vide machine. A good heavy skillet (cast iron or stainless steel), a stove, and a meat thermometer are all you need to create restaurant-quality results.
- Works year-round regardless of weather: Rain, snow, or sweltering heat—your stovetop doesn’t care. You can cook perfect steak in January as easily as July, making this a truly reliable method for any season.
- Faster than grilling with less cleanup: The entire cooking process takes 10-15 minutes from start to finish. One pan, minimal cleanup, maximum flavor. This efficiency makes cooking steak on the stove perfect for weeknight dinners.
- Consistent results once you master the technique: While grilling requires learning your specific grill’s quirks, stovetop cooking is wonderfully consistent. Master it once, and you’ll replicate perfect results indefinitely with any stove.
Choosing the Right Steak on the Stove
The foundation of learning how to cook a steak on the stove begins with selecting the right cut. Not all steaks are created equal, and some cuts perform better with high-heat pan-searing than others.
Best Cuts for Pan-Searing
When cooking steak on the stove, you want cuts that are 1 to 1.5 inches thick with good marbling (intramuscular fat that melts during cooking, creating tenderness and flavor). Cuts that are too thin cook through before developing a proper crust, while excessively thick cuts burn on the outside before the center cooks.
Ribeye is the king of Steak on the Stove. This cut from the rib section boasts exceptional marbling—those white ribbons of fat throughout the meat that melt during cooking, self-basting the Steak on the Stove from within. Ribeye delivers maximum flavor and tenderness, with a rich, buttery texture that’s nearly foolproof. The abundant fat also provides insurance against overcooking—even if you go slightly beyond your target doneness, ribeye remains juicy. Look for ribeyes that are 1 to 1.5 inches thick, weighing 10-14 ounces.
New York Strip (also called strip loin or Kansas City strip) offers a leaner alternative with excellent beefy flavor and a satisfying chew. It has less marbling than ribeye but develops a beautiful crust when pan-seared. Strip Steak on the Stove are ideal for those who prefer less fat while still wanting premium flavor and tenderness. They’re typically uniform in thickness, making them easy to cook evenly on the stove.
Filet Mignon (tenderloin) is the most tender cut but has less marbling and milder flavor than ribeye or strip. When learning how to cook a steak on the stove, filet benefits from butter basting and the addition of aromatics to compensate for its lower fat content. It’s expensive but incredibly tender, making it ideal for special occasions. Look for center-cut filets that are 1.5 to 2 inches thick.
Top Sirloin provides an affordable option with good flavor, though it’s less tender than the premium cuts above. It works well on the stove when cooked to medium-rare or medium—beyond that, it becomes tough. Sirloin is perfect for weeknight cooking when you want Steak on the Stove without the premium price tag.
Avoid very thin cuts like minute steaks or butterfly cuts when learning how to cook a steak on the stove—they cook through in seconds and can’t develop proper crust. Also avoid very thick cuts over 2 inches unless you plan to finish them in the oven after searing.
Buying Tips
When selecting steak for stovetop cooking, use your eyes and nose to identify quality. Look for meat with bright cherry-red color that appears moist but not wet or slimy. The surface should have a slight sheen without looking dried out or dull.
Examine the marbling carefully—those white flecks of intramuscular fat distributed throughout the red meat. More marbling equals more flavor and tenderness. Look for fine, evenly distributed marbling rather than large pockets of fat. Prime grade offers the most marbling (and the highest price), Choice grade provides excellent marbling at more accessible prices, and Select grade has minimal marbling and isn’t ideal for high-heat cooking.
Check the fat cap around the edges. It should be creamy white or slightly ivory, never yellow, which indicates older beef. A fat cap of about ¼ inch is ideal—enough to add flavor without being excessive.
If buying packaged steaks, check the sell-by date and examine for excessive liquid in the package. Some moisture is normal, but if the steak is swimming in liquid, it’s been sitting too long.
At a butcher counter, don’t hesitate to ask questions. Request steaks cut to your preferred thickness (1 to 1.5 inches is ideal for stovetop cooking), ask about aging (dry-aged beef has concentrated flavor that’s exceptional when pan-seared), and inquire about the grade. Developing a relationship with your butcher often results in better cuts and insider tips.
Smell the meat if possible—fresh beef has a clean, slightly metallic smell. Any sour, ammonia-like, or strong unpleasant odors indicate spoilage.
Substitutions
While ribeye, strip, and filet are ideal for learning how to cook a steak on the stove, other cuts work with adjustments. Flat iron steak (from the shoulder) is exceptionally tender with great flavor and pan-sears beautifully—it’s an underrated gem that costs less than premium cuts.
Hanger steak delivers intense beef flavor and works well on the stove, though it can be harder to find. Strip away the center membrane before cooking for best results. Skirt steak and flank steak are thin, flavorful cuts that cook very quickly on the stove (2-3 minutes per side)—they’re perfect for fajitas or slicing thin for sandwiches but require careful timing to avoid overcooking.
T-bone and porterhouse steaks (which include both strip and tenderloin) can be cooked on the stove but require care since the two different muscles cook at different rates. The tenderloin side will finish before the strip side, so position the tenderloin away from the hottest part of the pan.
If you’re avoiding beef, thick-cut pork chops (1.5 inches) can be cooked using the same stovetop method, though cook them to 145°F instead of medium-rare. Lamb chops also work beautifully with this technique.
Ingredients & Steak on the Stove
Steak Prep Essentials
Proper preparation is crucial when learning how to cook a steak on the stove. Begin by removing the steak from the refrigerator 30-45 minutes before cooking. This brings it to room temperature, which is essential for even cooking. Cold steak in a hot pan cooks unevenly—the exterior overcooks before the center warms up, resulting in a gray band of overcooked meat around a cold center.
While the steak tempers, pat it completely dry with paper towels on all surfaces. This step cannot be overstated—moisture on the surface creates steam when the steak hits the hot pan, preventing proper browning and crust development. Dry steak = beautiful brown crust. Wet steak = gray, steamed exterior. Pat it dry, wait five minutes, and pat it dry again if any additional moisture appears.
Examine your steak for any excessive fat caps on the edges. While some fat is desirable for flavor, thick caps (over ½ inch) should be trimmed down to about ¼ inch. Use a sharp knife to trim, leaving a thin layer that will render and contribute to flavor during cooking.
Score the remaining fat cap lightly with shallow cuts in a crosshatch pattern, making cuts about ½ inch apart and only ⅛ inch deep. This prevents the steak from curling during cooking (fat contracts more than meat when heated) and allows seasonings to penetrate. Don’t cut into the meat itself—just the fat cap.
If your steak has any silver skin (thin, silvery connective tissue), trim it away. Unlike fat that melts, silver skin stays tough and chewy even after cooking. Slide a sharp knife under it at a shallow angle and cut it away from the meat.
Simple Yet Perfect Steak on the Stove Seasoning
One of the beautiful aspects of learning how to cook a steak on the stove is that quality beef needs minimal seasoning—the cooking method itself creates incredible flavor through the Maillard reaction.
Basic Seasoning (for 2 steaks):
- 2 ribeye, strip, or filet mignon steaks (1 to 1.5 inches thick, 10-12 oz each)
- 2 teaspoons kosher salt (or 1 teaspoon fine sea salt per steak)
- 1 teaspoon freshly ground black pepper
- 2 tablespoons high-heat oil (avocado, grapeseed, or vegetable oil)
For Butter Basting:
- 3-4 tablespoons unsalted butter
- 3-4 sprigs fresh thyme or rosemary
- 3-4 whole garlic cloves, smashed
Season your room-temperature, thoroughly dried steaks generously with salt and pepper on all sides—top, bottom, and edges. Don’t be timid with the salt; a good guideline is about ¾ to 1 teaspoon of kosher salt per pound of steak. Salt not only seasons but also draws moisture to the surface, which then evaporates, concentrating flavor and helping create the crust.
For optimal results, season the steaks 40 minutes before cooking and leave them at room temperature. The salt will initially draw moisture to the surface (this is called “weeping”), but after 30-40 minutes, that moisture gets reabsorbed along with the salt, seasoning the meat internally. After this time, pat any remaining surface moisture dry once more before cooking.
If you’re short on time, season immediately before cooking—this is better than not seasoning at all. Just avoid the “worst” timing of 10-20 minutes before cooking, which is long enough for salt to draw out moisture but not long enough for reabsorption, leaving you with surface wetness that inhibits browning.
Pantry Staples for Steak on the Stove
Keep these ingredients on hand for perfect steak every time:
High-smoke-point oil is essential for searing. Avocado oil (smoke point ~520°F), grapeseed oil (~420°F), or refined vegetable oil work well. Avoid olive oil, which has a lower smoke point and will smoke excessively during high-heat searing. Butter alone also can’t handle the initial searing heat—it burns. Use oil for searing, then add butter later for basting.
Unsalted butter for basting adds rich flavor and helps cook the steak evenly. Unsalted is preferred because you control the salt level separately.
Fresh aromatics like garlic cloves (whole, smashed), fresh thyme, and fresh rosemary infuse the butter with flavor that transfers to the steak during basting. These are optional but highly recommended for restaurant-quality results.
Coarse kosher salt is preferred over table salt for seasoning meat—the larger crystals distribute more evenly and are easier to control. If using table salt, reduce the amount by half.
Whole peppercorns in a grinder provide superior flavor to pre-ground pepper, which loses potency quickly.
Step-by-Step Cooking Instructions
Pre-Cooking Prep Steak on the Stove
Ensure your Steak on the Stove have been at room temperature for 30-45 minutes and are completely dry. Season generously with salt and pepper on all sides. Have everything ready before you start cooking—tongs, a plate for resting the finished steak, your butter and aromatics for basting, and a meat thermometer.
Select your pan: cast iron is ideal because it retains heat exceptionally well, maintaining high temperature even when cold steak hits the surface. A 12-inch cast iron skillet accommodates two steaks comfortably. Heavy stainless steel also works well. Avoid non-stick pans, which can’t safely handle the extreme heat required for proper searing and won’t develop the same quality crust.
Heat your dry skillet (no oil yet) over high heat for 3-4 minutes until very hot—nearly smoking. This preheating is crucial for proper searing when learning how to cook a steak on the stove. Test the heat by hovering your hand several inches above the pan—you should feel intense heat radiating.
Open a window or turn on your exhaust fan. Proper searing creates some smoke—this is normal and expected. The smoke is the Maillard reaction happening, which is exactly what creates that incredible flavor and crust.
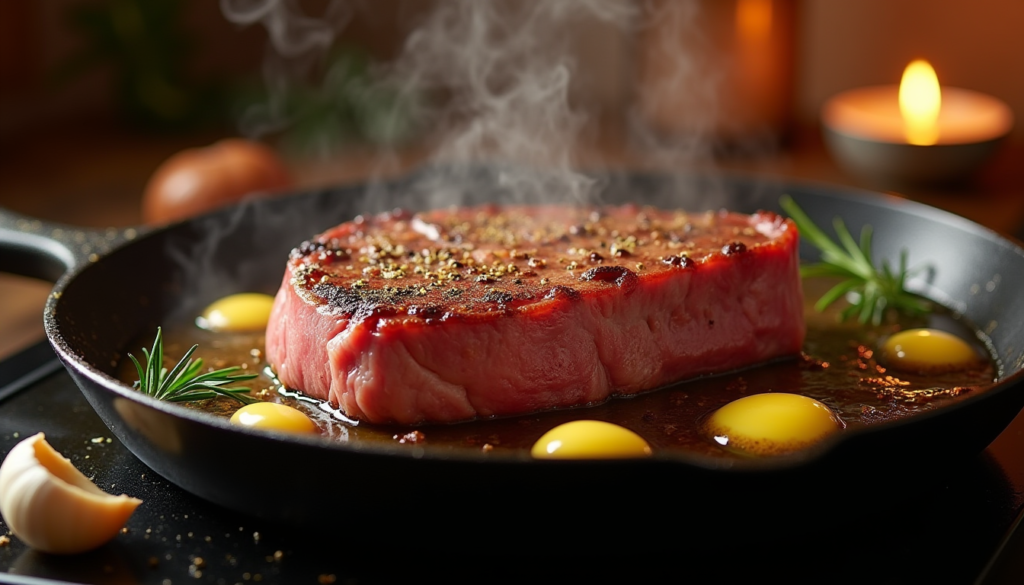
Stovetop Searing Method for Steak on the Stove
Add 2 tablespoons of high-heat oil to your screaming-hot skillet and swirl quickly to coat the bottom. The oil should shimmer and just barely begin to smoke within seconds.
Immediately and carefully lay your steaks in the pan, placing them away from you to avoid oil splatter. If cooking two steaks, leave space between them—overcrowding drops pan temperature and causes steaming instead of searing.
DO NOT TOUCH THE STEAKS for 3-4 minutes (for 1-inch thick steaks). This undisturbed time allows the Maillard reaction to occur, developing that coveted golden-brown crust. Resist the urge to peek, move, or flip the steak. You’ll hear aggressive sizzling—this is good.
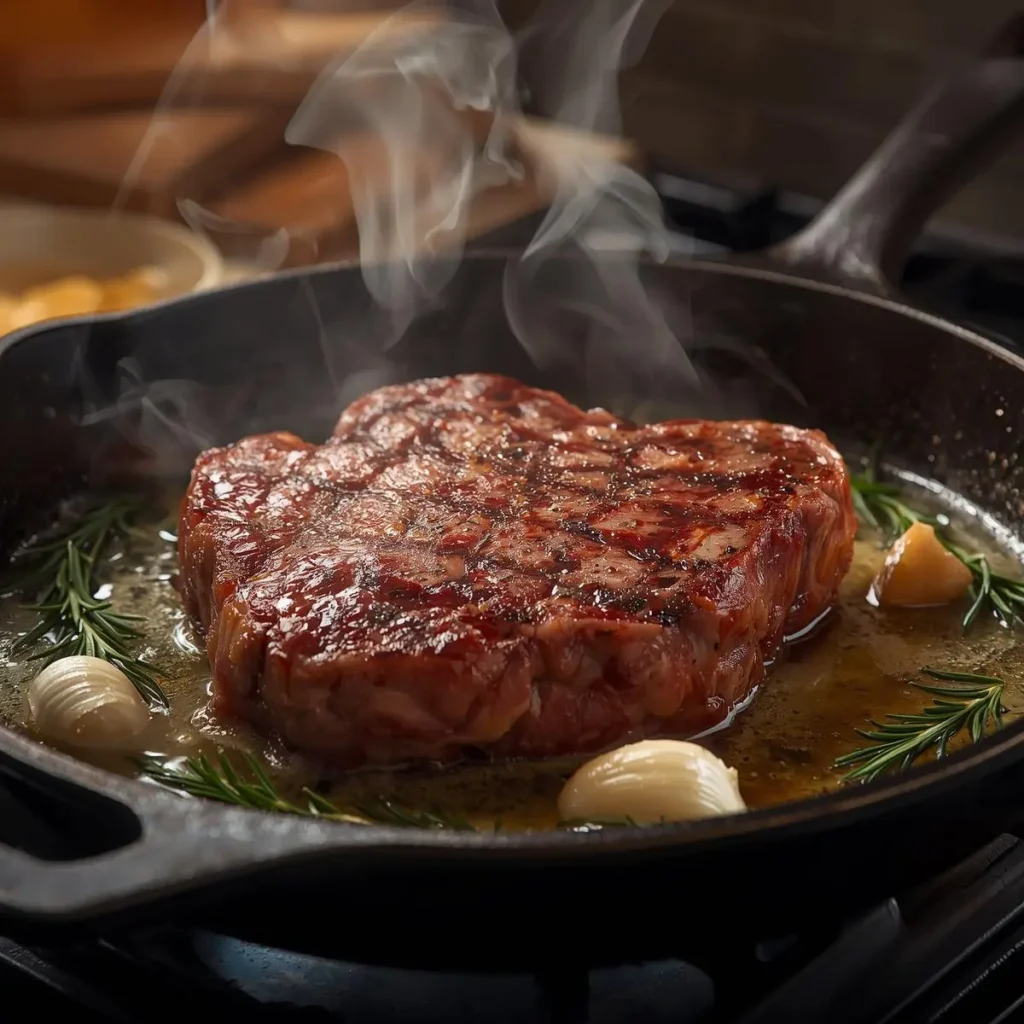
After 3-4 minutes, use tongs to lift one edge of the steak and check the bottom. It should be deeply browned with a caramelized crust. If it looks pale or is sticking to the pan, give it another 30-60 seconds. When properly seared, the steak will release easily from the pan.
Flip the steaks using tongs (never a fork, which pierces the meat and releases juices). Sear the second side for 3-4 minutes. For thicker steaks (1.5 inches), add 1-2 minutes per side.
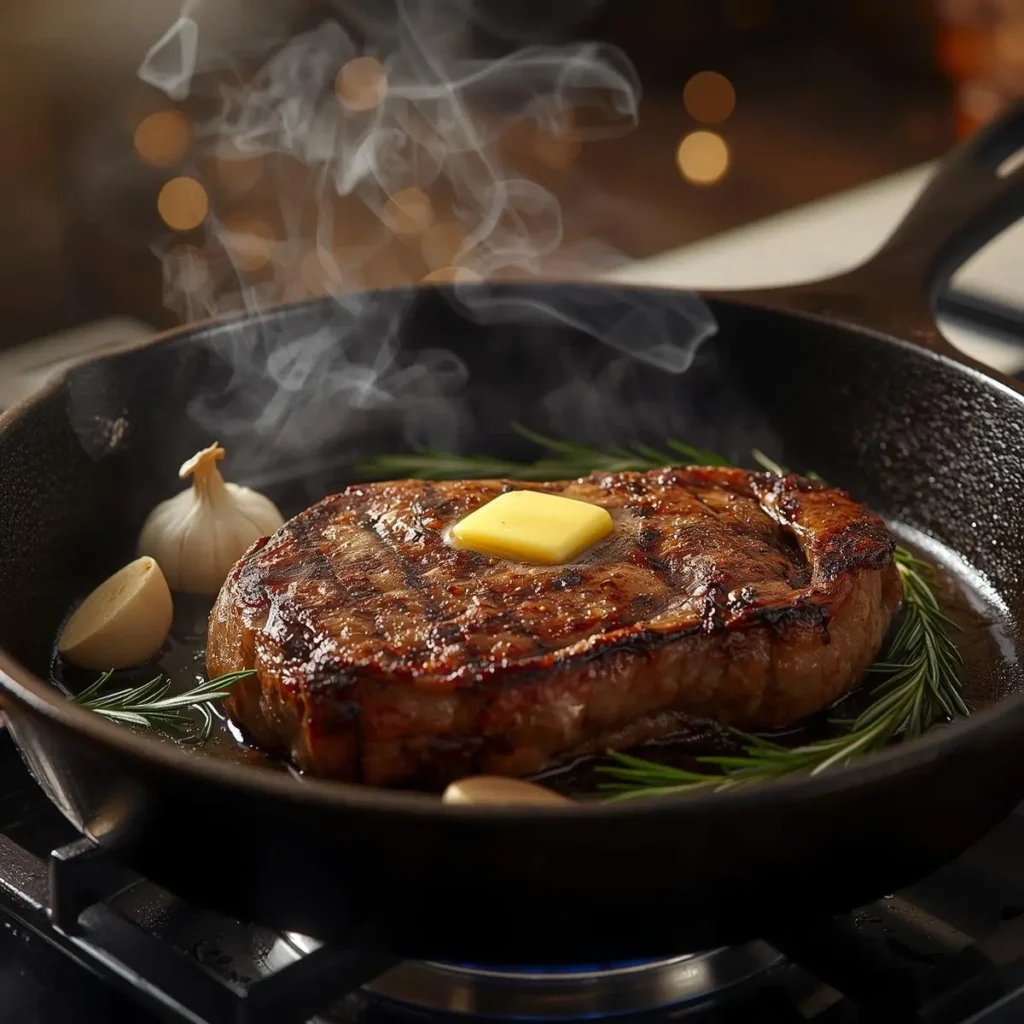
The Butter Basting Technique
After flipping, reduce heat to medium-high. Add 3-4 tablespoons of butter to the pan along with smashed garlic cloves and fresh herb sprigs (thyme or rosemary work beautifully). As the butter melts and foams, tilt the pan slightly toward you so the butter pools on one side.
Use a large spoon to continuously scoop up the hot, herb-infused butter and pour it over the top of the steaks. This basting technique, learned from French cooking, serves multiple purposes: it helps cook the steak more evenly (especially the thick parts), adds incredible flavor as the aromatics infuse the butter, creates a glossy, restaurant-quality appearance, and keeps the steak moist.
Continue basting for 1-2 minutes, constantly spooning butter over the steaks. If the butter starts to brown too much or smell burnt, reduce heat to medium. You want the butter golden and foamy, not dark brown.
Doneness Check
The only reliable way to know when your steak is done is with an instant-read meat thermometer. Insert it horizontally into the side of the steak, pushing it into the center of the thickest part. Avoid hitting bone or large fat pockets, which give inaccurate readings.
Remove the steak from heat when it reaches 5-10 degrees below your target temperature. Carryover cooking (residual heat continuing to cook the meat after removal from heat) will bring it to perfect final temperature during resting.
Target Internal Temperatures:
- Rare: Remove at 115-120°F (final temp after resting: 120-125°F) – cool red center
- Medium-rare: Remove at 125-130°F (final: 130-135°F) – warm red center — RECOMMENDED
- Medium: Remove at 130-135°F (final: 135-145°F) – warm pink center
- Medium-well: Remove at 140-145°F (final: 145-155°F) – slightly pink center
- Well-done: Remove at 150°F+ (final: 155°F+) – no pink (not recommended for premium cuts)
For premium cuts like ribeye, strip, and filet, medium-rare to medium is ideal. This temperature range allows the marbling to melt and distribute throughout the meat, creating maximum juiciness and tender texture. Rare doesn’t allow fat to render fully, resulting in chewy fat pockets. Well-done dries out the meat and eliminates the characteristics that make these cuts special.
Resting: The Critical Final Step
Transfer the cooked Steak on the Stove to a plate or cutting board. Spoon some of the herb-infused butter from the pan over the top. Tent loosely with aluminum foil and let rest for 5-7 minutes—this is absolutely non-negotiable.
During resting, the proteins that contracted during cooking relax and reabsorb juices that were driven to the center by heat. If you cut into the steak immediately, those juices flow out onto the cutting board and you’re left with drier meat. A properly rested steak retains its moisture when sliced, staying juicy and tender.
The internal temperature will rise those final 5-10 degrees to reach perfect doneness during this rest. The exterior will also cool slightly, so the temperature throughout the steak becomes more uniform.
After resting, serve the steaks whole or slice against the grain if preferred. Drizzle with any accumulated juices from the resting plate and the remaining herb butter from the pan. The exterior should be beautifully caramelized, the interior perfectly pink (for medium-rare), and every bite should be incredibly tender and juicy.
Pro Tips for Perfect Steak on the Stove
Avoiding Tough or Dry Steak
The most common failures when learning how to cook a steak on the stove are overcooking and undersearing. Prevent these with careful attention to technique:
Don’t overcook: Use a meat thermometer and pull the Steak on the Stove at 5-10 degrees below target temperature. Carryover cooking during resting will finish it perfectly. Remember that you can always cook steak more if it’s underdone, but you can’t uncook an overdone steak.
Ensure proper searing temperature: The pan must be very hot before adding steak. If the pan isn’t hot enough, the steak will steam instead of sear, resulting in gray, flavorless exterior. The aggressive sizzle when steak hits the pan tells you the temperature is right.
Don’t move the steak during searing: Let it sit undisturbed for 3-4 minutes per side. Moving it prevents crust formation and extends cooking time. Patience creates that perfect crust.
Pat the steak dry: This deserves repeating because it’s so critical. Moisture prevents browning. Dry steak browns beautifully. If you only follow one tip, make it this one.
Bring steak to room temperature: Cold steak cooks unevenly. Room temperature steak cooks uniformly, with less risk of overcooked exteriors.
Don’t skip resting: Those 5-7 minutes make the difference between good steak and great steak. The proteins relax, juices redistribute, and the final product is significantly more tender and juicy.
Don’t overcrowd the pan: Cook steaks in batches if necessary. Overcrowding drops pan temperature dramatically, causing steaming instead of searing. Leave space between steaks for proper heat circulation.
Essential Tool Recommendations
When learning how to cook a steak on the stove, certain tools dramatically improve your results:
Instant-read meat thermometer is the single most important tool for perfect steak. Digital models like ThermoWorks ThermoPop or Thermapen read in 2-3 seconds and eliminate all guesswork. This $30-100 investment guarantees perfect doneness every time, paying for itself in saved steaks.
Cast iron skillet is ideal for Steak on the Stove. The 12-inch Lodge cast iron costs $30-40 and will last generations with proper care. Its exceptional heat retention maintains high temperature when cold steak hits the surface, ensuring proper searing. It also transitions from stovetop to oven if you want to finish thick steaks using the oven method.
Heavy stainless steel skillet works well as an alternative to cast iron. Look for tri-ply or multi-clad construction with aluminum or copper core for even heat distribution. Brands like All-Clad or Tramontina deliver excellent results.
Quality tongs with scalloped edges provide secure grip without piercing meat. Spring-loaded tongs about 12 inches long give good leverage and keep your hands away from heat. Avoid forks, which puncture the surface and release juices.
Large spoon for butter basting—a regular soup spoon or serving spoon works perfectly for scooping and pouring hot butter over steaks.
Exhaust fan or good ventilation isn’t a tool per se, but proper searing creates smoke. Good ventilation prevents setting off smoke alarms and keeps your kitchen comfortable.
Storage & Reheating
Leftover steak stores in an airtight container in the refrigerator for 3-4 days. Let it cool completely before refrigerating to prevent condensation that makes the exterior soggy.
Steak is delicious cold—slice it thin for sandwiches, over salads, or alongside eggs for breakfast. These applications avoid the challenges of reheating, which constitutes additional cooking and risks overdoing already-cooked meat.
If you must reheat, the gentlest method preserves texture: bring steak to room temperature (30 minutes on counter), then place on a wire rack over a baking sheet in a 250°F oven for 20-30 minutes until warmed through. This low temperature minimizes additional cooking. Alternatively, slice cold steak thin and sear quickly in a hot skillet for 30-60 seconds per side—just enough to warm without overcooking.
The microwave works in a pinch but tends to overcook and create rubbery texture. If using microwave, use 50% power in 30-second intervals, checking frequently.
For best results when you know you’ll have leftovers, slightly undercook your steaks initially. Cook to rare or medium-rare, and reheating will bring them closer to medium while remaining delicious.
You can freeze cooked steak, though texture will be slightly compromised after thawing. Wrap tightly in plastic wrap, then in foil, and freeze for up to 3 months. Thaw overnight in the refrigerator before reheating gently.
Flavor Variations
Classic Garlic-Herb Butter
Elevate your Steak on the Stove with compound butter that melts into every bite. Mix 4 tablespoons softened butter with 2 minced garlic cloves, 1 tablespoon fresh chopped parsley, 1 teaspoon fresh thyme leaves, ½ teaspoon salt, and ¼ teaspoon black pepper.
Form into a log using plastic wrap, refrigerate until firm, then slice into coins. Top each hot steak with a pat of compound butter immediately after removing from the pan. As the steak rests, the butter melts into the meat, creating incredible richness and flavor.
You can make compound butter ahead and freeze for up to 3 months, having restaurant-quality enhancement ready whenever you cook steak on the stove.
Peppercorn-Crusted Steak
Create a steakhouse classic with bold peppercorn crust. Coarsely crack 2-3 tablespoons of mixed peppercorns (black, white, green, pink) using a mortar and pestle or by placing in a sealed plastic bag and crushing with a heavy pan.
After seasoning with salt, press the cracked peppercorns firmly into both sides of the steak so they adhere. Cook as directed—the high heat toasts the peppercorns, intensifying their flavor and creating a spicy, aromatic crust that’s not overwhelmingly hot.
Serve with a pan sauce: after removing steaks, add ¼ cup cognac or brandy to the hot skillet (careful—it may flame), scrape up browned bits, add ½ cup heavy cream, and simmer until thickened. Pour this peppercorn cream sauce over the rested steaks.
Cajun-Spiced Steak
Give your Steak on the Stove Louisiana flair with bold Cajun seasoning. Mix 1 tablespoon paprika, 1 teaspoon garlic powder, 1 teaspoon onion powder, ½ teaspoon cayenne pepper, ½ teaspoon dried thyme, ½ teaspoon dried oregano, ½ teaspoon salt, and ½ teaspoon black pepper.
Rub this mixture all over the steak before cooking. The spices form a flavorful bark during searing, creating complexity that complements the beef’s natural richness. Adjust cayenne based on heat preference.
This variation pairs wonderfully with butter basting using fresh thyme. Serve with creamy coleslaw and cornbread for a Southern-inspired meal.
Asian-Inspired Sesame-Ginger Steak
Transform your Steak on the Stove with Asian aromatics. Create a quick marinade with 3 tablespoons soy sauce, 1 tablespoon sesame oil, 1 tablespoon rice vinegar, 2 teaspoons fresh grated ginger, 2 minced garlic cloves, and 1 teaspoon brown sugar.
Marinate steaks for 1-4 hours, then remove, pat very dry, and cook as directed. During butter basting, add thin slices of fresh ginger to the butter for extra aromatic depth.
After resting, slice the steak thin and serve over rice or Asian greens, garnished with toasted sesame seeds, sliced scallions, and a drizzle of the pan juices mixed with a splash of soy sauce.
Coffee-Rubbed Steak
Coffee and beef create an unexpected but phenomenal pairing. Combine 2 tablespoons finely ground coffee, 1 tablespoon brown sugar, 1 teaspoon smoked paprika, 1 teaspoon garlic powder, 1 teaspoon kosher salt, and ½ teaspoon black pepper.
Rub this mixture over the steak 20-30 minutes before cooking. The coffee adds earthy depth and enhances the Maillard browning, while brown sugar caramelizes during searing, creating a slightly sweet crust that contrasts beautifully with savory beef.
This variation is surprisingly versatile—it pairs well with traditional steakhouse sides but also works with Mexican-inspired accompaniments like black beans and roasted corn.
Serving Suggestions
Perfect Steak on the Stove deserves accompaniments that complement its rich, savory flavor without competing:
Classic Steakhouse Sides: Creamy mashed potatoes provide comforting richness and mild flavor that lets the steak shine. Loaded baked potatoes with sour cream, butter, chives, and bacon create a complete indulgent meal. Crispy steak fries or truffle fries add textural contrast. Creamed spinach contributes richness while adding nutrition.
Vegetables: Roasted or grilled asparagus with lemon offers elegant simplicity and slight bitterness that cuts through richness. Sautéed mushrooms (especially wild varieties) provide umami depth that enhances beef. Roasted Brussels sprouts with balsamic glaze bring caramelized sweetness. A simple wedge salad with blue cheese dressing, bacon, and tomatoes provides cool, crisp contrast.
Sauces Beyond Butter: While butter basting creates incredible flavor, you can offer additional sauces: classic béarnaise for French elegance, chimichurri for bright herbaceous notes, horseradish cream for those who enjoy sharp spice, or red wine reduction for sophisticated depth.
Bread: Crusty artisan bread or warm dinner rolls are perfect for soaking up steak juices and herb butter—don’t let a drop go to waste.
Wine Pairings: Steak’s rich flavor and marbling pair beautifully with full-bodied red wines. Cabernet Sauvignon offers bold tannins that cut through fat while complementing beef’s flavor. Malbec from Argentina provides fruit-forward richness with smooth tannins. Syrah/Shiraz delivers peppery spice that enhances seasoned steak. For special occasions, aged Bordeaux or California Napa Cabernet creates memorable pairings.
Beer Pairings: Beer lovers should reach for robust options: stouts and porters provide roasted malt flavors that echo the steak’s char, while IPAs offer hoppy bitterness that cuts richness. Belgian dubbels contribute malty sweetness and moderate bitterness that work beautifully.
FAQs
Can I cook frozen steak on the stove?
Yes, you can cook steak from frozen using a modified technique, though fresh or properly thawed is always preferred. For frozen steaks, sear them directly from the freezer in a hot skillet for 90 seconds per side to develop crust, then reduce heat to medium and continue cooking for 12-18 minutes, flipping every 2-3 minutes, until they reach your target internal temperature. The lower temperature after initial searing prevents burning the exterior while the frozen center heats through. This method works but won’t achieve the same quality as properly thawed steak. The better approach: thaw frozen steaks in the refrigerator overnight (24 hours for thick cuts). Never thaw at room temperature or in warm water, as this promotes bacterial growth.
How do I know when my steak is done without a thermometer?
While a thermometer is the most reliable tool, you can use the “touch test” to estimate doneness. Press the center of the steak with your index finger:
- Rare feels like the fleshy part of your palm below your thumb when your hand is relaxed (very soft)
- Medium-rare feels like that same spot when you touch your thumb to your index finger (slight resistance with give)
- Medium feels like touching thumb to middle finger (more resistance, some give)
- Medium-well feels like touching thumb to ring finger (firm with slight give)
- Well-done feels like touching thumb to pinky (very firm)
This method requires practice and is less accurate than a thermometer, but it works in a pinch. Visual cues also help: medium-rare steak should feel somewhat firm to the touch but not hard, and when you cut into it (only do this once it’s rested), it should be warm and red-pink in the center.
Why is my steak tough even though I didn’t overcook it?
If your steak is tough despite proper cooking temperature, several factors could be responsible. First, you may have chosen a tougher cut—not all steaks are naturally tender, and some require slow cooking rather than high-heat pan-searing. Second, you might not have let the steak rest adequately—cutting immediately causes juices to escape, resulting in drier, tougher texture. Third, if you’re slicing the steak, cutting with the grain rather than against it makes it seem much tougher even when properly cooked. Finally, the steak quality matters—Select grade or beef without adequate marbling will be tougher than Choice or Prime grades regardless of cooking method.
How did you find results our recipes
There are no reviews yet. Be the first one to write one.