Introduction
Tired of dense or crumbly gluten free pancake recipe results that leave you disappointed at breakfast? You’re definitely not alone. Finding a gluten-free pancake that’s actually fluffy, soft, and doesn’t taste like cardboard can feel impossible. Too often, gluten-free pancakes turn out gritty, fall apart when you flip them, or have that unmistakable “gluten-free” taste that nobody wants.
These pancakes are soft, fluffy, and taste just like classic buttermilk pancakes—without the gluten! They’re golden brown, perfectly tender, and stack beautifully without crumbling. Whether you have celiac disease, gluten sensitivity, or simply prefer gluten-free eating, this recipe delivers the pancake experience you’ve been craving.
After years of testing gluten-free flours and experimenting with different ratios, I’ve finally mastered the perfect texture. Through countless batches and careful attention to ingredient interactions, I’ve developed a foolproof method that works every single time.
In this comprehensive guide, you’ll discover everything you need to create the ultimate gluten free pancake recipe, including the best gluten-free flour blends, essential cooking tips that prevent common mistakes, proper mixing techniques, and answers to your most pressing questions. Let’s transform your gluten-free breakfast game forever.
Table of Contents
Why This Gluten Free Pancake Works
This gluten free pancake recipe succeeds where others fail because it focuses on texture, taste, and accessibility using straightforward techniques anyone can master. Here’s what makes these pancakes exceptional:
- Uses simple, naturally gluten-free ingredients for the perfect gluten free pancake recipe – No hunting down obscure specialty items. The ingredients are readily available at most grocery stores, and many you probably already have in your pantry.
- Ready in just 20 minutes—ideal for busy mornings – From mixing bowl to breakfast table in under half an hour. This recipe fits seamlessly into hectic weekday schedules while still delivering weekend-worthy results.
- Fluffy, golden pancakes every time without special equipment – You don’t need a stand mixer, fancy griddle, or professional kitchen tools. A simple bowl, whisk, and non-stick skillet are all you need for perfect pancakes.
- Tastes identical to traditional pancakes – The carefully balanced flour blend and proper technique eliminate that telltale gluten-free flavor and texture. Even gluten-eating family members won’t notice the difference.
- Holds together beautifully when flipping – No more pancakes that break apart or stick to your spatula. The right binding agents create structural integrity that rivals traditional pancakes.
- Naturally customizable for various dietary needs – Easily adaptable to dairy-free, egg-free, or vegan requirements without sacrificing quality or taste.
Choosing the Right Gluten Free Pancake Recipe
Creating outstanding Gluten Free Pancake starts with understanding ingredients and why each component matters. Let’s explore the essentials.
Best Ingredients for Gluten Free Pancake
The foundation of any successful gluten free pancake recipe lies in selecting the right flour blend and supporting ingredients:
Gluten-Free Flour Blend: A mix of rice flour and almond flour adds softness and flavor while mimicking the properties of wheat flour. White rice flour provides a neutral base with fine texture, while almond flour contributes moisture, richness, and subtle nutty flavor. This combination creates pancakes that are tender rather than gummy or crumbly.
Xanthan Gum: This ingredient helps with structure by replacing the binding properties of Gluten Free Pancake. Just ½ teaspoon provides enough elasticity to hold pancakes together without making them gummy. If your store-bought gluten-free flour blend already contains xanthan gum or guar gum, you can skip adding extra.
Baking Powder: Essential for creating those characteristic fluffy bubbles and light texture. Use certified gluten-free baking powder to ensure no cross-contamination. Fresh baking powder (less than 6 months old) produces better rise.
Eggs: Provide structure, moisture, and binding. The proteins in eggs create a network that supports the pancake structure, while the fats add richness and tenderness.
Milk: Dairy milk creates tender pancakes and activates the baking powder. The fat content contributes to flavor and texture—whole milk produces the richest results, though any milk percentage works.
Sugar: Just enough sweetness to balance flavors without making pancakes taste like dessert. Sugar also helps with browning and tender crumb structure.
Butter: Melted butter adds rich flavor and moisture. The fat prevents dryness and creates tender pancakes with beautiful golden color.
Buying Tips
Quality ingredients make a noticeable difference in your gluten free pancake recipe results:
Look for certified Gluten Free Pancake oats and baking powder to ensure safety – Cross-contamination during processing is common, so certified Gluten Free Pancake labels are crucial for those with celiac disease or severe sensitivity. Even small amounts of gluten can cause problems for sensitive individuals.
Choose fine-textured Gluten Free Pancake flour blends – Coarser flours create gritty pancakes. Brands like Bob’s Red Mill 1-to-1 Baking Flour, King Arthur Measure for Measure, or Cup4Cup produce excellent results with fine, consistent texture.
Check expiration dates on baking powder – Old baking powder loses potency and won’t create proper lift. Test your baking powder by mixing a teaspoon with hot water—it should bubble vigorously.
Buy almond flour from refrigerated sections – The high fat content in almond flour can go rancid at room temperature. Refrigerated or frozen options stay fresher longer.
Select unsweetened almond milk if using dairy alternatives – Sweetened versions can make pancakes too sweet and affect texture.
Substitutions
This gluten free pancake recipe accommodates various dietary needs and preferences:
Dairy-Free Option: Use coconut milk instead of dairy milk for creamy, slightly sweet pancakes. Almond milk, oat milk (certified Gluten Free Pancake), or soy milk also work well. Replace butter with coconut oil or dairy-free butter alternative.
Vegan Version: Use flax eggs instead of regular eggs (1 tablespoon ground flaxseed mixed with 3 tablespoons water per egg, let sit 5 minutes to thicken). Combine with dairy-free milk and butter substitutes for completely plant-based pancakes.
Nut-Free: Replace almond flour with additional rice flour or oat flour (certified Gluten Free Pancake). The texture will be slightly different but still delicious. Use oat milk or rice milk instead of almond milk.
Sugar-Free: Substitute with monk fruit sweetener or erythritol in equal amounts. Stevia works but use sparingly as it’s much sweeter than sugar.
Egg-Free: Try commercial egg replacers like Bob’s Red Mill Egg Replacer, or use additional mashed banana (though this changes flavor). Aquafaba (3 tablespoons per egg) also works surprisingly well.
Ingredients & Prep Gluten Free Pancake Recipe
Proper preparation ensures your gluten free pancake recipe turns out perfectly every time. Here’s everything you need.
Gluten Free Pancake Recipe Prep Essentials
Mixing Dry Ingredients: In a large bowl, whisk together all dry ingredients thoroughly—Gluten Free Pancake flour blend, almond flour, sugar, baking powder, xanthan gum (if needed), and salt. Whisking for 30-60 seconds ensures even distribution and prevents pockets of baking powder or xanthan gum, which can create uneven texture.
Preparing Wet Ingredients: In a separate medium bowl, whisk together eggs, milk, melted butter, and vanilla extract until well combined. The butter should be melted but not hot, as hot butter can cook the eggs prematurely.
Combining Wet and Dry: Pour wet ingredients into dry ingredients and stir gently with a spatula or wooden spoon. Mix until just combined—the batter should be slightly lumpy. Overmixing develops the structure too much and creates tough, rubbery pancakes. A few small lumps are perfectly fine and will disappear during cooking.
Resting the Batter: This is the secret weapon for perfect Gluten Free Pancake. Let the batter rest for 10-15 minutes at room temperature. During this time, the gluten-free flours hydrate fully, the xanthan gum activates, and the baking powder begins working. This rest period transforms the batter from thin and grainy to thick and smooth. You’ll notice the batter thickens considerably—this is exactly what you want.
Flavor Enhancements
Elevate your gluten free pancake recipe with these delicious add-ins:
Vanilla Extract: 1 teaspoon of pure vanilla extract adds warmth and depth. This is a must-have for the base recipe and complements all flavor variations.
Blueberries: Fold ½ cup fresh or frozen blueberries into the batter just before cooking. Frozen blueberries work beautifully—no need to thaw, though they may create purple-tinted pancakes.
Cinnamon: Add 1 teaspoon ground cinnamon to dry ingredients for warming spice. Pairs exceptionally well with apple or banana additions.
Lemon Zest: 1 tablespoon fresh lemon zest creates bright, fresh flavor perfect for spring and summer breakfasts.
Chocolate Chips: Sprinkle mini chocolate chips directly onto pancakes after pouring batter onto the griddle, or fold ½ cup into the batter.
Pantry Staples for gluten free pancake recipe
Keep these essentials stocked for spontaneous gluten free pancake recipe preparation:
- Gluten-free flour blend (all-purpose style with xanthan gum)
- Almond flour (fine ground, blanched)
- Baking powder (certified gluten-free)
- Xanthan gum (if your flour blend doesn’t include it)
- Granulated sugar or preferred sweetener
- Salt (fine sea salt or table salt)
- Eggs (room temperature work best)
- Milk (dairy or non-dairy)
- Butter or neutral oil for cooking
- Vanilla extract (pure, not imitation)
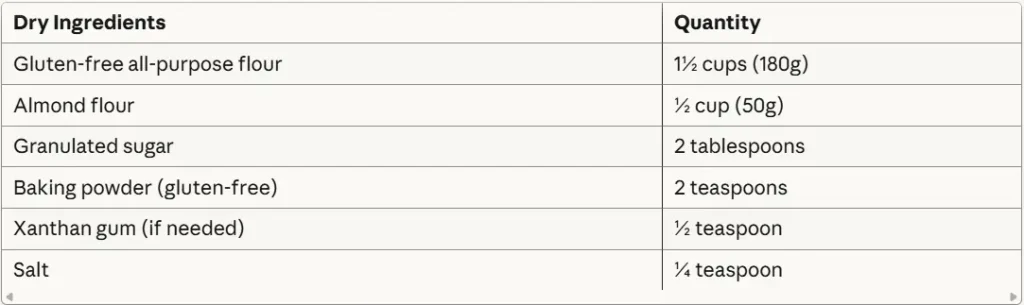
Complete Ingredient Table
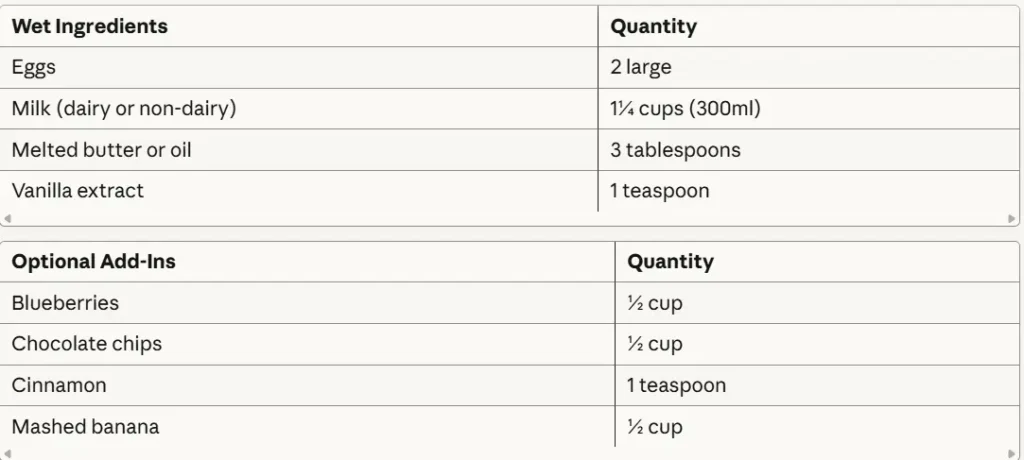
Prep Time Breakdown
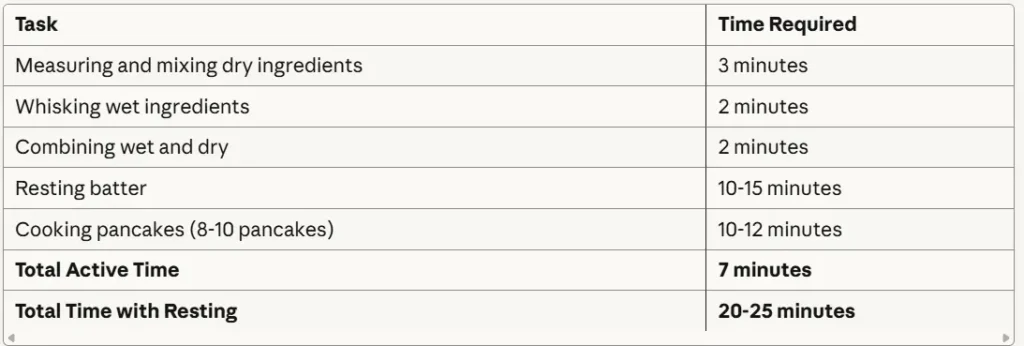
Yield: 8-10 medium pancakes (about 4-inch diameter)
Step-by-Step Cooking Instructions
Follow these detailed instructions for flawless gluten free pancake recipe results every time.
Pre-Cooking Prep: Mix Batter for Gluten Free Pancake Recipe and Preheat Griddle
Step 1: Gather all ingredients and equipment. Measure accurately using proper measuring techniques—spoon flour into measuring cups and level off with a knife rather than scooping, which compacts flour and adds too much.
Step 2: In a large mixing bowl, combine all dry ingredients: gluten-free flour blend, almond flour, sugar, baking powder, xanthan gum (if using), and salt. Whisk vigorously for 30-60 seconds to eliminate clumps and ensure even distribution. This step is crucial for preventing pockets of leavening agent or binding gum.
Step 3: In a separate medium bowl, crack the eggs and whisk until the yolks and whites are fully combined. Add milk, melted butter (cooled slightly), and vanilla extract. Whisk until the mixture is smooth and unified, about 30 seconds.
Step 4: Create a well in the center of the dry ingredients. Pour all wet ingredients into this well. Using a silicone spatula or wooden spoon, gently fold the wet ingredients into the dry. Use broad, sweeping motions and stir only until you can no longer see dry flour. The batter will be lumpy—this is correct. Overmixing is the enemy of tender pancakes.
Step 5: Cover the bowl with a clean kitchen towel and let the batter rest at room temperature for 10-15 minutes. During this crucial rest period, watch the batter transform from thin and slightly grainy to thicker and smoother. The gluten-free flours need this time to fully hydrate.
Step 6: While the batter rests, preheat your cooking surface. For a non-stick skillet or griddle, set heat to medium (about 350°F if your pan has temperature control). For cast iron, preheat over medium-low heat for 5 minutes—cast iron retains heat better and can burn pancakes if too hot. Test readiness by sprinkling a few drops of water on the surface; they should sizzle and evaporate within 2-3 seconds.
Step 7: Lightly grease your cooking surface with butter or neutral oil. Use a paper towel to spread a thin, even layer. Too much oil creates greasy pancakes; too little causes sticking.
Cooking Method: Pour ¼ Cup of Batter Per Pancake; Cook Until Bubbles Form and Flip
Step 1: After the batter has rested, give it one or two gentle stirs—it will have thickened noticeably. If the batter seems too thick to pour easily (it should slowly pour off a spoon), add milk one tablespoon at a time until you reach pourable consistency.
Step 2: Using a ¼-cup measuring cup or ladle, pour batter onto the preheated griddle. Pour from low height (about 2 inches above the surface) to minimize splattering. The batter should spread into a circle naturally—if it doesn’t spread at all, it’s too thick; if it spreads too thin, it’s too runny.
Step 3: Cook without touching or moving the pancakes. This is difficult but essential for even cooking and proper browning. Watch for these signs that it’s time to flip:
- Small bubbles form across the entire surface of the pancake (2-3 minutes)
- Bubbles begin to pop and leave small holes
- The edges look dry and set rather than wet
- The bottom is golden brown when you lift the edge slightly with a spatula
Step 4: Flip the pancake with a confident, quick motion using a wide, thin spatula. Slide the spatula completely under the pancake, lift, and flip in one smooth motion. Hesitation leads to splattered batter and broken pancakes.
Step 5: Cook the second side for 1-2 minutes—less time than the first side. The second side cooks faster because the pan is fully heated and the pancake is partially cooked. Watch for the edges to look fully set and dry.
Step 6: Continue cooking pancakes in batches. Adjust heat as needed—if pancakes brown too quickly before cooking through, reduce heat slightly. Add a small amount of butter or oil between batches as needed, wiping away any burnt butter with a paper towel.
Doneness Check: Pancakes Should Be Golden Brown and Springy to the Touch
Visual cues: Perfectly cooked gluten free pancakes are golden brown on both sides with even color distribution. They shouldn’t have pale spots (undercooked) or dark brown/black spots (burned). The edges should look dry and set, not wet or shiny.
Touch test: Gently press the center of a pancake with your fingertip. It should feel springy and bounce back immediately. If your finger leaves an indentation or the center feels mushy, the pancake needs more cooking time.
Internal temperature: For those who want precision, the internal temperature should reach 200-205°F. This ensures the center is fully cooked without being dry.
Thickness indicator: Gluten-free pancakes should be about ½ inch thick when cooked. If they’re much thinner, your batter may be too thin; much thicker, and it may be too thick or you used too much batter per pancake.
Structural integrity: When you pick up a pancake with a spatula, it should hold together completely without any breaking, cracking, or crumbling. Properly made gluten free pancakes are surprisingly sturdy.
Serving Step: Serve Warm with Maple Syrup, Berries, or Nut Butter
Keep warm while cooking: Place finished pancakes on an oven-safe plate in a 200°F oven while you finish cooking the batch. Cover loosely with foil to prevent drying. This keeps all pancakes warm and fresh for serving together.
Stack properly: Stack pancakes with the prettiest side facing out. The first side you cook (which forms more bubbles) is traditionally considered the “top” and should face up.
Classic toppings:
- Pure maple syrup (warm it in the microwave for 20 seconds for extra luxury)
- Butter pat on top that melts into the pancakes
- Fresh berries (strawberries, blueberries, raspberries, or blackberries)
- Sliced bananas
- Whipped cream for special occasions
Gourmet toppings:
- Almond butter or peanut butter
- Greek yogurt and honey
- Fruit compote or jam
- Powdered sugar dusted through a fine-mesh strainer
- Toasted nuts or granola
- Fresh whipped cream with vanilla
- Lemon curd and blueberries
Plating presentation: For beautiful presentation, stack 3-4 pancakes, add a pat of butter on top, drizzle with syrup, and arrange fresh berries around the base. Dust with powdered sugar and add a sprig of mint for restaurant-quality appearance.
Pro Tips for Perfect Gluten Free Pancake Recipe
Master these professional techniques to elevate your gluten free pancakes from good to extraordinary.
Avoiding Grittiness: Let the Batter Rest for 10 Minutes to Hydrate the Flour Blend
The science behind resting: Gluten-free flours, especially rice flour, need time to absorb liquid fully. Unlike wheat flour that hydrates quickly, gluten-free flours have different particle structures that absorb moisture more slowly. Without proper resting, you get grainy, gritty pancakes with unpleasant texture.
Optimal rest time: 10-15 minutes at room temperature is the sweet spot. Less than 10 minutes doesn’t allow full hydration; more than 20 minutes can cause the leavening to activate too early, resulting in less fluffy pancakes.
What to watch for: After resting, the batter should noticeably thicken and become smoother. You might see the batter rise slightly as the baking powder begins working. Small bubbles forming on the surface indicate proper activation.
Temperature matters: Always rest batter at room temperature, not in the refrigerator. Cold temperatures slow hydration and can cause the butter to solidify, creating lumpy batter.
Don’t skip this step: This is the number one tip for improving gluten-free pancake texture. Even if you’re in a rush, taking these 10 minutes makes the difference between disappointing and delicious.
Tool Recommendations: Non-Stick Skillet, Silicone Spatula, Measuring Cups
Non-stick skillet or electric griddle: A quality non-stick surface is crucial for gluten free pancake recipe success. Gluten-free batters can be stickier than traditional batters, so proper coating is essential. A 10-12 inch skillet allows cooking 3-4 pancakes simultaneously. Electric griddles with temperature control provide consistent heat and large cooking surfaces—ideal for feeding families.
Wide, thin spatula: Use a spatula that’s at least 3 inches wide with a thin, beveled edge that slides easily under pancakes. Silicone-coated or solid silicone spatulas are gentle on non-stick surfaces and flexible enough to flip confidently without breaking pancakes.
Accurate measuring cups: Gluten-free baking requires precision. Use proper dry measuring cups (not liquid measuring cups) for flour. A kitchen scale is even better—measuring by weight eliminates variables caused by how flour is scooped or packed.
Large mixing bowls: Use bowls larger than you think necessary. A roomy bowl makes whisking and folding easier without spilling. Glass or stainless steel bowls work best.
Whisk: A balloon whisk with multiple wires thoroughly combines ingredients and eliminates lumps better than a fork or spoon.
¼-cup measure or ladle: Consistent portioning creates uniform pancakes that cook evenly. A ¼-cup measure or 2-ounce ladle produces perfect 4-inch pancakes.
Storage & Reheating: Store Gluten Free Pancake Recipe Leftovers in the Fridge for 3 Days or Freeze Up to a Month
Refrigerator storage: Let pancakes cool completely to room temperature on a wire rack—this prevents condensation that makes them soggy. Stack cooled pancakes with parchment paper between each one to prevent sticking. Place in an airtight container or resealable bag. Properly stored, gluten free pancakes stay fresh for 3-4 days.
Freezer storage: For longer storage, freeze pancakes up to 1 month. Place cooled pancakes in a single layer on a baking sheet and freeze for 1 hour (flash freezing prevents them from sticking together). Once frozen solid, transfer to a freezer bag or container with parchment between layers. Label with the date.
Reheating from refrigerator:
- Microwave: Place 1-3 pancakes on a microwave-safe plate. Cover with a damp paper towel to prevent drying. Microwave for 20-30 seconds per pancake until heated through.
- Toaster: Place pancakes in toaster slots and toast on medium setting. This method restores crispness to the exterior.
- Oven: Preheat to 350°F. Arrange pancakes in a single layer on a baking sheet. Cover with foil and warm for 5-7 minutes.
- Skillet: Heat a lightly greased skillet over medium-low heat. Warm pancakes for 1-2 minutes per side.
Reheating from frozen: No need to thaw. Add 10-20 seconds to microwave time, an extra minute to toaster setting, or 3-5 minutes to oven time. Frozen pancakes reheat beautifully and taste freshly made.
Meal prep strategy: Make a double or triple batch on weekends. Freeze in individual portions for quick weekday breakfasts. Kids can grab pre-portioned pancakes and reheat themselves.
Quality check: Properly stored and reheated pancakes should taste fresh and maintain their fluffy texture. If they seem dry, brush with a tiny amount of melted butter before reheating.
Flavor Variations
Transform your basic gluten free pancake recipe into exciting new creations with these delicious variations.
Banana Pancakes: Add Mashed Banana and Cinnamon
Create naturally sweet, moist pancakes with banana and warm spices:
Ingredients to add:
- ½ cup mashed ripe banana (about 1 large banana)
- 1 teaspoon ground cinnamon
- ¼ teaspoon nutmeg (optional)
- Reduce milk by 2 tablespoons to compensate for banana moisture
Method: Mash banana thoroughly with a fork until smooth. Add to wet ingredients before combining with dry. Add cinnamon and nutmeg to dry ingredients. The batter will be slightly thicker and have natural sweetness from the banana.
Flavor profile: Sweet with caramelized banana flavor, warming spice notes, and extra moisture. These pancakes have a tender, almost cake-like crumb.
Serving suggestion: Top with sliced bananas, chopped walnuts, and a drizzle of honey. A sprinkle of cinnamon and a dollop of Greek yogurt complement beautifully.
Pro tip: Use very ripe bananas with brown spots for maximum sweetness and banana flavor. These pancakes brown faster due to natural sugars, so watch heat carefully.
Chocolate Chip: Fold in Mini Chocolate Chips for a Sweet Twist
Turn breakfast into a treat with chocolate-studded pancakes:
Ingredients to add:
- ½ cup mini chocolate chips (regular size works but mini distributes better)
- 1 extra tablespoon sugar in batter (optional, for extra sweetness)
- ½ teaspoon instant espresso powder (optional, intensifies chocolate flavor)
Method: Fold chocolate chips into rested batter just before cooking. Don’t add them earlier or they’ll sink. Alternatively, sprinkle chips directly onto pancakes immediately after pouring batter onto the griddle—this creates a prettier top surface with visible chips.
Chocolate options: Semi-sweet chips provide balanced sweetness, dark chocolate chips create a more sophisticated flavor, milk chocolate chips are kid-friendly, and white chocolate chips offer unique sweetness.
Cooking note: Chocolate chips can burn if heat is too high. Use medium-low heat and cook slightly longer to ensure centers cook through without burning chocolate.
Serving suggestion: Dust with powdered sugar, add a dollop of whipped cream, and serve with fresh strawberries. Or drizzle with chocolate sauce for ultimate indulgence.
Protein Boost: Mix in a Scoop of Vanilla Protein Powder or Greek Yogurt
Create filling, nutritious pancakes perfect for post-workout or sustained energy:
Protein powder version:
- Add ¼ cup (about 30g) vanilla protein powder
- Increase milk by 3-4 tablespoons to compensate for powder absorption
- Reduce almond flour to ¼ cup to maintain proper flour ratio
- The batter may be slightly thicker and more dense
Protein powder types: Whey protein creates fluffy pancakes (not suitable for dairy-free), pea protein works for vegan diets but has stronger flavor, and collagen peptides add protein without flavor change but less structure.
Greek yogurt version:
- Replace ½ cup milk with ½ cup plain Greek yogurt
- The batter will be thicker and create exceptionally tender, tangy pancakes
- Extra protein without adding protein powder
- Creates a more tender crumb similar to buttermilk pancakes
Nutritional boost: Protein pancakes contain approximately 8-10g protein per serving, making them more satiating and blood-sugar stable than regular pancakes.
Serving suggestion: Top with almond butter, sliced banana, chia seeds, and a drizzle of honey for a complete, balanced breakfast.
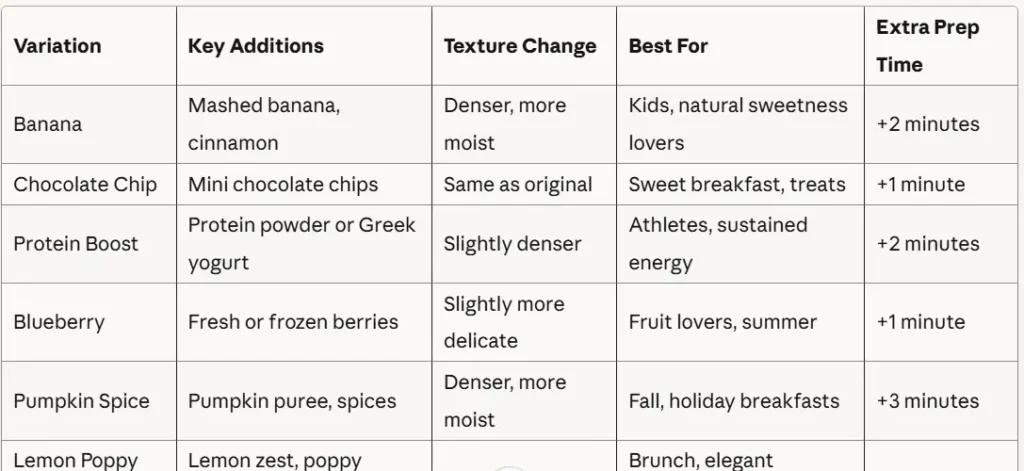
Variation Comparison Table
Serving Suggestions
Elevate your gluten free pancake recipe presentation and pairing with these thoughtful serving ideas.
Pair with Sides: Fresh Fruit, Yogurt, or Crispy Bacon
Fresh fruit: Create visual appeal and nutritional balance with colorful fruit accompaniments:
- Berry medley: Combine strawberries, blueberries, raspberries, and blackberries for antioxidant-rich topping
- Tropical mix: Mango, pineapple, and kiwi bring bright, refreshing flavors
- Sliced banana: Classic pairing that adds natural sweetness and creamy texture
- Caramelized apples: Sauté apple slices in butter and cinnamon for warm, comforting side
- Fruit compote: Simmer mixed berries with a touch of sugar for luxurious topping
Yogurt options: Add protein and probiotic benefits with yogurt sides:
- Greek yogurt: Plain or vanilla provides tangy contrast and extra protein
- Honey yogurt: Drizzle honey into yogurt for natural sweetness
- Parfait style: Layer yogurt, fruit, and granola alongside pancakes
- Yogurt dollop: Place a spoonful on top of pancakes like whipped cream
Crispy bacon: The savory-sweet combination is a breakfast classic:
- Traditional bacon: Crispy, thick-cut bacon provides salty contrast
- Turkey bacon: Lighter option with less fat
- Vegetarian bacon: Plant-based alternatives for meat-free breakfasts
- Canadian bacon: Leaner choice with mild flavor
Other protein sides:
- Sausage links or patties: Pork, turkey, or vegetarian varieties
- Scrambled eggs: Add another protein element for complete meal
- Smoked salmon: Sophisticated brunch option
- Breakfast burritos: Pair pancakes with savory egg-filled sides
Drink Pairings: Coffee, Almond Milk Latte, or Orange Juice Go Great with Gluten Free Pancake Recipe
Coffee: The breakfast beverage staple complements pancakes perfectly:
- Black coffee: Clean, bitter notes contrast with sweet pancakes
- Coffee with cream: Smooth, rich accompaniment
- Flavored coffee: Vanilla, hazelnut, or caramel complement various pancake flavors
- Cold brew: Smooth, less acidic option for summer breakfasts
Almond milk latte: Dairy-free option that pairs beautifully with gluten-free eating:
- Classic latte: Espresso with steamed almond milk creates creamy beverage
- Vanilla latte: Sweet vanilla notes complement most pancake variations
- Caramel latte: Indulgent option for special breakfasts
- Iced latte: Refreshing summer breakfast beverage
Orange juice: Traditional breakfast drink that adds vitamin C:
- Fresh-squeezed: Bright, natural flavor with pulp
- Store-bought: Convenient classic
- Orange-mango blend: Tropical twist on tradition
- Mimosa: For adult brunches, combine orange juice with champagne
Other beverage pairings:
- Milk: Whole, 2%, almond, oat, or coconut milk all work wonderfully
- Hot chocolate: Kids’ favorite that pairs with chocolate chip pancakes
- Smoothies: Fruit smoothies add nutrition and refreshment
- Green tea: Light, antioxidant-rich option for health-conscious breakfasts
- Herbal tea: Chamomile or mint tea for gentle morning beverage
Serving Occasions and Presentation Ideas
Weekend family breakfast: Stack pancakes family-style on a large platter. Set up a topping bar with maple syrup, fresh fruit, whipped cream, chocolate chips, and nuts. Let everyone customize their pancakes.
Brunch entertaining: Plate individual stacks of 3 pancakes with artistic topping arrangements. Dust with powdered sugar, add edible flowers, and serve with champagne mimosas for elegant presentation.
Weekday breakfast: Keep pancakes warm in the oven while preparing other breakfast components. Serve with pre-portioned toppings for quick morning meal.
Kids’ breakfast: Create fun shapes using cookie cutters on cooked pancakes. Make pancake faces with fruit and chocolate chips. Serve with colorful plates and fun utensils.
Meal prep: Package individual portions (2-3 pancakes) in containers with small containers of syrup and fruit. Refrigerate or freeze for grab-and-go breakfasts throughout the week.
FAQs
Get answers to the most common questions about making the perfect gluten free pancake recipe.
Can I Make the Batter Ahead of Time?
Yes, but with limitations. Gluten-free pancake batter can be made ahead, though it performs best when cooked immediately after resting.
Short-term storage (2-4 hours): Mix the batter and let it rest as directed. Store in an airtight container in the refrigerator. Before cooking, let the batter sit at room temperature for 10 minutes and stir gently. You may need to add 1-2 tablespoons of milk to thin it slightly, as it thickens during refrigeration.
Overnight storage: Not ideal for best results. The baking powder loses some leavening power over time, creating less fluffy pancakes. If you must make batter the night before, add half the baking powder when mixing, then add the remaining baking powder in the morningRetry
H
ContinueEdit
and stir gently before cooking. Let it rest 5 minutes after adding the second portion of baking powder.
What happens during storage: The baking powder begins reacting with the liquid immediately, creating carbon dioxide bubbles that make pancakes fluffy. Over time, these bubbles dissipate, resulting in denser pancakes. The gluten-free flours also continue absorbing liquid, making the batter very thick.
Better alternative: Instead of making batter ahead, measure and combine all dry ingredients in an airtight container. Store at room temperature for up to 1 week. In the morning, quickly whisk together wet ingredients and combine with dry—you’ll save time without sacrificing quality.
Freezing batter: Not recommended. Freezing damages the leavening action and changes the texture of the batter. It’s better to cook the pancakes and freeze them instead.
Best practice: Make the batter fresh each time, taking advantage of the 10-15 minute rest period to set the table, prepare toppings, or start coffee. The active mixing time is only 5-7 minutes, and fresh batter produces the best results.
Why Are My Pancakes Falling Apart?
Pancakes that fall apart or crumble typically result from one of several common issues:
Insufficient binding: Gluten-free flours lack the natural binding properties of wheat gluten. If you forgot xanthan gum or your flour blend doesn’t contain a binder (xanthan gum or guar gum), pancakes won’t hold together. Solution: Add ½ teaspoon xanthan gum to your recipe.
Not enough eggs: Eggs provide crucial structure and binding. If you reduced eggs or used egg substitutes that don’t bind as well, pancakes will be fragile. Solution: Use the full amount of eggs called for, or use reliable egg replacers like flax eggs (which require extra resting time to work properly).
Batter too thin: Overly thin batter spreads too much and creates fragile pancakes that break during flipping. Solution: Let the batter rest fully—it should be thick enough to slowly pour from a spoon. If still too thin after resting, add 1-2 tablespoons more flour.
Flipping too early: Flipping before the first side is properly set causes pancakes to tear. Solution: Wait until bubbles form across the entire surface, pop, and leave holes. The edges should look dry and set. This takes 2-3 minutes—patience is key.
Wrong spatula: A spatula that’s too narrow or thick-edged can’t get fully under the pancake, causing breaking. Solution: Use a wide, thin spatula that slides easily under the entire pancake.
Cooking temperature too high: Extremely high heat cooks the outside before the inside sets, creating pancakes that look done but are structurally weak. Solution: Use medium heat (about 350°F) for even cooking throughout.
Skipping the rest period: Gluten-free flours need time to hydrate and the xanthan gum needs time to activate. Without resting, the batter hasn’t developed proper structure. Solution: Always rest batter 10-15 minutes.
Which Gluten-Free Flour Works Best?
The best gluten-free flour for pancakes is a high-quality all-purpose gluten-free flour blend that already contains xanthan gum or guar gum. Here’s a detailed breakdown:
Top recommended brands:
Bob’s Red Mill 1-to-1 Baking Flour: Contains garbanzo bean flour, potato starch, tapioca flour, whole grain sweet white sorghum flour, and fava bean flour with xanthan gum. This blend creates tender, flavorful pancakes with excellent structure. Widely available and consistently reliable.
King Arthur Measure for Measure Flour: Contains rice flour, whole grain brown rice flour, potato starch, and tapioca starch with xanthan gum. Produces lighter, more delicate pancakes with neutral flavor. Professional bakers’ choice.
Cup4Cup: Contains cornstarch, white rice flour, brown rice flour, milk powder, tapioca flour, potato starch, and xanthan gum. Note: Contains dairy, so not suitable for dairy-free diets. Creates pancakes closest to traditional wheat-flour pancakes.
Single flour options (requires additional ingredients):
Rice flour alone: Too gritty and creates crumbly pancakes. Must be combined with other flours and binding agents. Not recommended as sole flour.
Almond flour alone: Too dense and creates heavy pancakes that don’t rise properly. Works beautifully when combined with rice-based flours (as in this recipe) but not alone.
Oat flour: Certified gluten-free oat flour creates tender pancakes with slight sweetness. Can work alone with eggs and xanthan gum, but combining with rice flour produces better texture.
Coconut flour: Extremely absorbent—cannot be substituted 1:1 for other flours. Requires completely different ratios. Not recommended for this recipe.
What to avoid: Straight wheat flour substitution without xanthan gum creates crumbly, grainy pancakes. Bean flours alone (like chickpea flour) have strong flavors that overpower pancakes.
Homemade blend option: If you prefer making your own blend, combine:
- 2 cups white rice flour
- ⅔ cup potato starch (not potato flour—they’re different)
- ⓘ cup tapioca starch/flour
- 1 tablespoon xanthan gum
Mix thoroughly and store in an airtight container. Use cup-for-cup like commercial blends.
Storage tip: Store gluten-free flour blends in airtight containers in a cool, dry place for up to 6 months, or refrigerate/freeze for up to 1 year. Gluten-free flours can go rancid faster than wheat flour, especially those containing nuts or whole grains.
How Do I Make These Dairy-Free?
Converting this gluten free pancake recipe to dairy-free is simple and produces excellent results:
Milk substitutions (choose one):
- Almond milk: Neutral flavor, widely available, works perfectly in pancakes. Use unsweetened for best results.
- Oat milk: Creamy texture closest to dairy milk, slightly sweet. Ensure it’s certified gluten-free.
- Coconut milk: From carton (not canned). Adds subtle coconut flavor and richness.
- Soy milk: High protein content creates sturdy pancakes, neutral flavor.
- Cashew milk: Very creamy, neutral flavor, works beautifully.
- Rice milk: Thinner consistency—add 2 tablespoons less than recipe calls for.
Butter substitutions (for the 3 tablespoons melted butter):
- Coconut oil: Melted, adds slight coconut flavor. Use refined coconut oil for neutral taste.
- Vegan butter: Brands like Earth Balance or Miyoko’s work excellently. Use same amount as dairy butter.
- Neutral oil: Vegetable, canola, or grapeseed oil work well. Slightly less rich flavor but perfectly functional.
- Olive oil: Extra light olive oil (not extra virgin, which is too strong). Adds subtle fruity notes.
Butter for cooking surface:
- Coconut oil: Works perfectly for greasing the pan.
- Vegan butter: Melts and spreads like dairy butter.
- Cooking spray: Ensure it’s dairy-free—check ingredients for milk derivatives.
Important note about almond flour: The recipe already uses almond flour, which is naturally dairy-free. No substitution needed there.
Taste and texture differences: Dairy-free versions taste virtually identical to the original. Coconut oil may add slight coconut flavor, which most people find pleasant. The texture remains fluffy and soft. You won’t notice a difference in the final pancakes.
Complete dairy-free ingredient list: Use gluten-free flour blend, almond flour, sugar, baking powder, xanthan gum, salt, eggs, non-dairy milk, coconut oil or vegan butter, and vanilla extract.
Can I Make These Vegan?
Yes! You can make completely vegan gluten free pancakes with a few simple substitutions:
Egg replacements (for 2 eggs, choose one):
Flax eggs (most popular choice):
- Mix 2 tablespoons ground flaxseed meal with 6 tablespoons water
- Stir well and let sit 5-10 minutes until thick and gelatinous
- This creates binding and moisture similar to eggs
- Adds slight nutty flavor and darker color
- Rest the final batter 15 minutes instead of 10 for best results
Chia eggs:
- Mix 2 tablespoons ground chia seeds with 6 tablespoons water
- Let sit 5-10 minutes until gel forms
- Works identically to flax eggs
- Creates small dark specks in pancakes
Commercial egg replacer:
- Bob’s Red Mill Egg Replacer or Ener-G Egg Replacer
- Follow package directions (typically 1 tablespoon powder + 3 tablespoons water per egg)
- Most reliable texture, no flavor change
Aquafaba:
- 6 tablespoons aquafaba (liquid from canned chickpeas)
- Whisk vigorously for 30 seconds until slightly frothy before using
- Creates fluffy, light pancakes
- Completely neutral flavor
Mashed banana: ½ cup mashed ripe banana can replace eggs, but this significantly changes flavor and makes pancakes denser. Better as a flavor variation than straight substitution.
Dairy replacements: Follow the dairy-free instructions above—use non-dairy milk and coconut oil or vegan butter.
Complete vegan ingredient list:
- 1½ cups gluten-free all-purpose flour
- ½ cup almond flour
- 2 tablespoons sugar
- 2 teaspoons baking powder
- ½ teaspoon xanthan gum (if needed)
- ¼ teaspoon salt
- 2 flax/chia eggs or egg replacer equivalent
- 1¼ cups non-dairy milk
- 3 tablespoons coconut oil or vegan butter, melted
- 1 teaspoon vanilla extract
Cooking and texture notes: Vegan pancakes may be slightly less fluffy than egg-based versions but still delicious. They might take 30-60 seconds longer to cook. Flip when bubbles form and pop, just like regular pancakes. The extended 15-minute rest is crucial for egg-free versions to develop proper structure.
Best results tip: For the fluffiest vegan pancakes, use aquafaba or commercial egg replacer rather than flax eggs. These create more rise and lighter texture.
Why Are My Pancakes Gummy or Dense?
Dense, gummy gluten-free pancakes are frustrating but usually result from fixable issues:
Too much xanthan gum: More isn’t better with xanthan gum. Too much creates gummy, sticky texture. If your flour blend already contains xanthan gum, don’t add more. Solution: Check your flour blend label. Only add xanthan gum if the blend doesn’t contain it.
Overmixing the batter: Unlike wheat-based pancakes where gluten development is a concern, overmixing gluten-free batter breaks down the structure and creates dense texture. Solution: Mix only until dry ingredients are just moistened. The batter should be lumpy.
Undercooking: Gluten-free pancakes need to cook fully through or the center remains gummy. Solution: Use medium heat and cook until bubbles form, pop, and leave holes. The second side should cook 1-2 minutes. Press gently in the center—it should spring back.
Too much liquid: Excess liquid creates heavy, gummy pancakes that don’t cook through properly. Solution: Measure liquids carefully. After resting, the batter should be thick but pourable—like thick cake batter, not soup.
Wrong flour ratio: Some gluten-free flours are denser than others. Using all almond flour or all coconut flour creates dense results. Solution: Use a balanced blend as specified in the recipe—combining different flours creates better texture.
Altitude issues: High altitude requires adjustments. The lower air pressure affects rising. Solution: At altitudes above 3,500 feet, reduce baking powder by ¼ teaspoon and increase liquid by 2 tablespoons.
Old baking powder: Expired baking powder doesn’t create enough lift, resulting in dense pancakes. Solution: Test baking powder by mixing 1 teaspoon with hot water—it should bubble vigorously. Replace if older than 6 months.
How Can I Make Pancakes Fluffier?
Achieve maximum fluffiness with these expert techniques:
Separate eggs: For extra-fluffy pancakes, separate the eggs. Mix yolks with wet ingredients. Beat egg whites to soft peaks, then gently fold into batter after combining wet and dry ingredients. This incorporates extra air for lighter texture.
Don’t overmix: Mix only until combined. Lumps are fine—they’ll disappear during cooking. Overmixing deflates the batter and creates dense pancakes.
Fresh baking powder: Use baking powder less than 6 months old. Fresh leavening creates maximum rise.
Proper resting: The 10-15 minute rest allows the baking powder to activate and create bubbles before cooking. Don’t skip this crucial step.
Correct heat: Medium heat (350°F) allows pancakes to rise fully before the outside sets. Too high heat sets the outside before the inside can rise, creating flat pancakes.
Don’t press down: Never press pancakes with the spatula while cooking. This deflates the air bubbles you’ve worked to create.
Add club soda: For extra lift, replace ¼ cup of milk with ¼ cup club soda or seltzer water. Add it last, stir gently, and cook immediately to capture the bubbles.
Whipped egg whites method: The single most effective technique for ultra-fluffy pancakes. Beat 2 egg whites to soft peaks, fold gently into completed batter. Cook immediately.
Buttermilk substitute: For tangier, fluffier pancakes, add 1 tablespoon lemon juice or vinegar to the milk and let sit 5 minutes before using. The acid reacts with baking powder for extra lift.
Conclusion
This delicious gluten free pancake recipe proves that avoiding gluten doesn’t mean sacrificing flavor, texture, or satisfaction. These fluffy, golden pancakes taste identical to traditional pancakes while accommodating gluten-free, dairy-free, and even vegan dietary needs. With simple ingredients you likely have in your pantry and just 20 minutes from start to finish, perfect pancakes are always within reach.
Whip up this gluten free pancake recipe today and enjoy fluffy perfection! Whether you’re feeding a crowd at weekend brunch, meal-prepping breakfasts for the week, or treating yourself to a special breakfast, this reliable recipe delivers consistent, delicious results every single time.
Loved by thousands of readers looking for soft, gluten-free breakfasts! Home cooks around the world have discovered that gluten-free pancakes can be just as delicious—if not better—than traditional versions when made with the right techniques and ingredient ratios.
The secret to success lies in three key factors: using a quality gluten-free flour blend with proper binding agents, allowing the crucial 10-15 minute rest period for flour hydration, and cooking at the right temperature with patience for perfect browning. Master these fundamentals, and you’ll create pancakes so good that no one will guess they’re gluten-free.
Ready to expand your gluten-free breakfast repertoire? Try our Easy Gluten-Free Waffle Guide next! Discover how to make crispy-on-the-outside, fluffy-on-the-inside waffles that pair perfectly with your favorite toppings. Plus, explore our gluten-free muffin collection for grab-and-go breakfast options that keep you fueled throughout busy mornings.
Save this recipe, share it with friends who need gluten-free options, and experiment with the flavor variations to find your family’s favorite. From banana cinnamon to chocolate chip, from protein-packed to fruit-studded, the possibilities are endless. Your gluten-free breakfast dreams start here—happy cooking!Retry
How did you find results our recipes
There are no reviews yet. Be the first one to write one.