Introduction
Tired of flat or bland bisquick pancake recipe results that leave your family underwhelmed at breakfast? You’re not alone. Despite Bisquick’s reputation for convenience, many home cooks struggle with pancakes that turn out dense, rubbery, or lacking that homemade taste everyone craves.
These Bisquick pancakes are fluffy, golden, and ready in minutes! They’re perfectly tender with a light, airy texture and that classic buttermilk flavor that makes breakfast special. Whether you’re feeding hungry kids before school or hosting a leisurely weekend brunch, this recipe delivers consistently excellent results with minimal effort.
After years of weekend breakfasts and countless batches served to family and friends, I’ve perfected this easy Bisquick pancake recipe. Through trial and error, I’ve discovered the exact techniques and simple tweaks that transform basic Bisquick mix into restaurant-quality pancakes every single time.
In this comprehensive guide, you’ll learn everything you need to master the perfect bisquick pancake recipe, including essential batter tips for optimal texture, foolproof cooking tricks that guarantee golden-brown perfection, creative flavor variations, and answers to your most common questions. Let’s dive into making breakfast better, faster, and easier than ever before.
Table of Contents
Why This Bisquick Pancake Recipe Works
This bisquick pancake recipe stands out because it prioritizes simplicity, taste, and quick preparation without sacrificing quality. Here’s what makes these pancakes exceptional:
- Uses classic Bisquick Pancake recipemix for reliable, fluffy pancakes every time – Bisquick Pancake recipepre-measured blend of flour, leavening agents, and shortening eliminates guesswork and ensures consistent results. The mix is specifically formulated for perfect pancakes, so you’re starting with a proven foundation.
- Takes just 15 minutes from start to finish—perfect for busy mornings – With minimal measuring and mixing required, you can have hot pancakes on the table in a quarter of an hour. No complicated steps or lengthy prep time means breakfast happens fast, even on hectic weekday mornings.
- Customizable with fruit, chocolate chips, or spices – The simple base recipe serves as a blank canvas for endless creativity. Add sweet mix-ins for kids, sophisticated flavors for adults, or keep it classic—the choice is yours.
- Requires only basic pantry staples – You probably already have everything needed: Bisquick Pancake recipe mix, eggs, and milk. No specialty ingredients or trips to multiple stores required.
- Foolproof for beginners and experienced cooks alike – The straightforward method virtually guarantees success. Even if you’ve never made pancakes before, you’ll achieve impressive results on your first attempt.
- Budget-friendly breakfast solution – Bisquick pancakes cost just pennies per serving, making them an economical choice for feeding families without compromising on taste or satisfaction.
Choosing the Right Bisquick Pancake Recipe
Understanding your ingredients and options ensures you create the best possible bisquick pancake recipe every time.
Best Ingredients for This Recipe
The beauty of Bisquick pancakes lies in their simplicity, but understanding each component helps you achieve optimal results:
Bisquick Mix: This all-purpose baking mix creates consistent texture because it contains pre-measured flour, baking powder, salt, and shortening in perfect proportions. The shortening is already incorporated, which means less work for you and reliably tender pancakes. Bisquick Pancake recipeformulation has been perfected over decades for ideal rise and texture.
Types of Bisquick Pancake recipe: Original Bisquick creates classic, fluffy pancakes with rich flavor. Heart Smart Bisquick uses less saturated fat and works well but produces slightly less rich flavor. Gluten-Free Bisquick Pancake recipe accommodates dietary restrictions—follow package directions as ratios differ slightly from original.
Eggs: Add richness, moisture, and binding power to pancakes. Eggs provide structure that keeps pancakes from falling apart and contributes to the golden color and tender crumb. Room temperature eggs incorporate more easily into the batter.
Milk: Provides liquid for batter consistency and adds flavor, fat, and protein that create tender pancakes. Whole milk produces the richest, most flavorful results, though any milk percentage works. The liquid activates the leavening agents in Bisquick Pancake recipe, creating those characteristic bubbles and fluffy texture.
Sugar (Optional): While Bisquick Pancake recipe contains some sweetness, adding 1-2 tablespoons of sugar enhances flavor and helps with browning. The sugar caramelizes slightly during cooking, creating beautiful golden color and subtle sweetness that complements maple syrup.
Butter or Oil: Used for greasing the cooking surface. Butter adds flavor and creates beautiful browning, while neutral oil works perfectly if you prefer less richness or need dairy-free cooking.
Buying Tips bisquick pancake recipe
Smart shopping ensures the best bisquick pancake recipe results:
Use fresh Bisquick mix for the fluffiest pancakes – Check the expiration date on the box. Bisquick Pancake recipe contains leavening agents that lose potency over time, especially if the box has been opened and exposed to air and moisture. Fresh mix (within 6 months of opening) produces noticeably fluffier, lighter pancakes.
Store Bisquick properly: After opening, transfer Bisquick Pancake recipe to an airtight container or reseal the box carefully. Store in a cool, dry place—not near the stove or in humid areas. Moisture causes the mix to clump and can activate leavening prematurely.
Choose quality eggs: Fresh eggs with bright orange yolks create richer color and better flavor. Check the sell-by date and choose eggs stored in refrigerated cases.
Milk selection: For richest flavor, choose whole milk or at least 2%. The fat content contributes significantly to pancake tenderness and taste. However, any milk percentage works if you prefer lighter options.
Buy real maple syrup: While not part of the batter, authentic maple syrup elevates the breakfast experience significantly. The complex flavor profile complements pancakes far better than artificial syrups.
Substitutions
This bisquick pancake recipe easily adapts to various dietary needs and preferences:
Dairy-Free Milk: Use almond milk for dairy-free pancakes with slightly nutty flavor. Other excellent options include oat milk (creamy and neutral), soy milk (protein-rich), coconut milk from a carton (subtle coconut flavor), or cashew milk (very creamy). Use the same amount as dairy milk—no adjustments needed.
Egg Substitutes: For egg-free pancakes, use commercial egg replacer following package directions (typically 1 tablespoon powder plus 3 tablespoons water per egg). Alternatively, mix 1 tablespoon ground flaxseed with 3 tablespoons water per egg, let sit 5 minutes until gelatinous. Note: Egg-free pancakes will be slightly less fluffy but still delicious.
Water Instead of Milk: Yes, you can use water, though pancakes will be less rich and flavorful. To compensate, add 1 tablespoon melted butter or oil to the batter for moisture and richness. The pancakes will still be good but won’t have that luxurious taste milk provides.
Natural Sweetness: Add mashed banana (about ½ cup, reducing milk by ¼ cup) for natural sweetness and extra moisture. Ripe bananas add beautiful flavor and eliminate the need for additional sugar. Applesauce works similarly.
Buttermilk Upgrade: Replace regular milk with buttermilk for tangier, even fluffier pancakes. Buttermilk’s acidity reacts with baking powder for extra rise and tender crumb. This creates pancakes reminiscent of traditional buttermilk recipes.
Low-Sugar Option: Reduce or eliminate added sugar. Bisquick Pancake recipe contains some sweetness, and toppings like syrup add more, so the base can be less sweet without issue.
Ingredients & Prep Bisquick Pancake Recipe
Proper preparation ensures your bisquick pancake recipe succeeds every time. Here’s everything you need.
Bisquick Pancake Recipe Prep Essentials
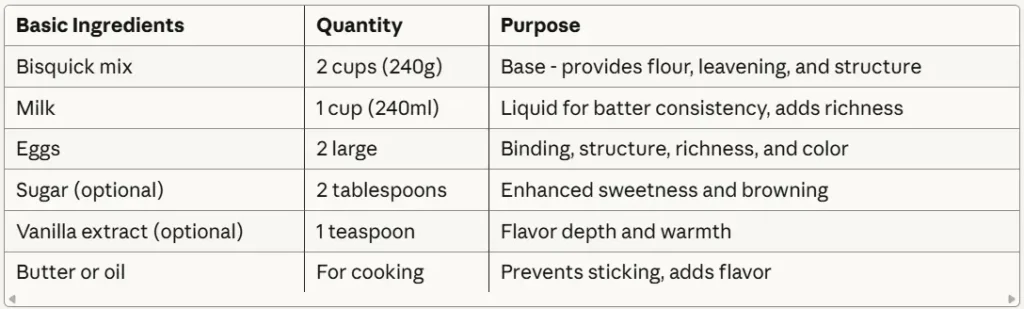
Gathering Ingredients: Assemble everything before you start—Bisquick Pancake recipe mix, eggs, milk, sugar (if using), and butter for greasing. Having ingredients ready streamlines the process and prevents scrambling mid-recipe.
Mixing Dry and Wet Ingredients Smoothly: The key to perfect Bisquick pancakes is gentle mixing. In a medium bowl, whisk together Bisquick Pancake recipe mix and sugar (if using) for 10 seconds to distribute evenly. Create a well in the center. In a separate small bowl or large measuring cup, whisk together eggs and milk until combined. Pour wet ingredients into the well in dry ingredients.
Proper Mixing Technique: Stir gently with a fork, whisk, or wooden spoon using folding motions. Mix only until the Bisquick Pancake recipe is moistened—15-20 strokes maximum. The batter should be lumpy with small pockets of dry mix visible. This is correct! Lumps disappear during cooking, and overmixing develops the flour’s structure too much, creating tough, rubbery pancakes instead of tender ones.
Batter Consistency: The finished batter should be thick but pourable—similar to thick cream or cake batter. It should slowly pour from a spoon, not run like water. If too thick (barely pourable), add milk 1 tablespoon at a time. If too thin (runs quickly), add Bisquick 1 tablespoon at a time.
Resting (Optional but Beneficial): While not required for Bisquick Pancake recipe like it is for gluten-free versions, letting the batter rest 5 minutes produces even better results. The rest allows the leavening to activate and the flour to hydrate fully, creating slightly fluffier pancakes.
Flavor Additions
Transform basic bisquick pancake recipe into something special with these simple additions:
Vanilla Extract: Add 1 teaspoon pure vanilla extract to wet ingredients before mixing. This single addition elevates the flavor profile significantly, adding warmth and depth that makes pancakes taste homemade rather than mix-based.
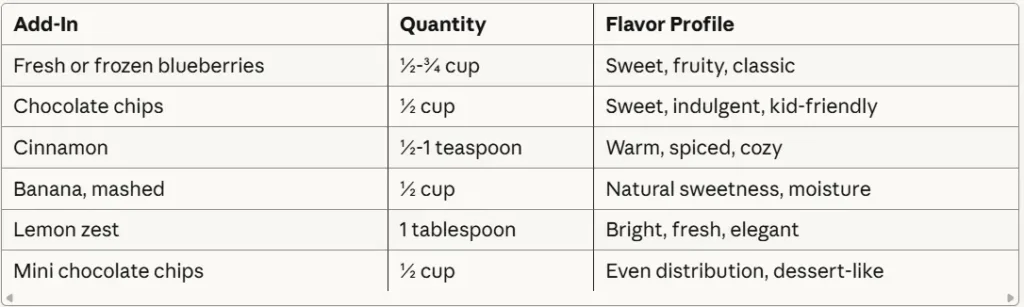
Cinnamon: Whisk ½-1 teaspoon ground cinnamon into the Bisquick Pancake recipe mix before adding wet ingredients. Cinnamon adds warming spice that pairs beautifully with maple syrup and creates an inviting aroma.
Blueberries: Fold ½-¾ cup fresh or frozen blueberries into batter after mixing. Don’t thaw frozen berries—they work perfectly as-is and prevent purple-tinted batter. Gently fold to avoid bursting berries.
Lemon Zest: Add 1 tablespoon fresh lemon zest for bright, fresh flavor. Pairs exceptionally well with blueberries for a bakery-style pancake experience.
Chocolate Chips: Fold in ½ cup mini or regular chocolate chips for kid-friendly, dessert-like pancakes. Sprinkle chips directly onto pancakes after pouring batter onto griddle for better distribution.
Nutmeg: A pinch of freshly grated nutmeg adds sophisticated flavor that complements cinnamon beautifully.
Pantry Staples
Keep these essentials stocked for spontaneous bisquick pancake recipe preparation:
- Bisquick mix (Original, Heart Smart, or Gluten-Free)
- Eggs (large)
- Milk (dairy or non-dairy)
- Granulated sugar (optional but recommended)
- Butter for cooking (or neutral oil)
- Vanilla extract (pure, not imitation)
- Salt (if you prefer slightly more savory flavor)
- Maple syrup for serving
- Cooking spray (alternative to butter for greasing)
Complete Ingredient Table
Optional Add-Ins
Prep Time Breakdown
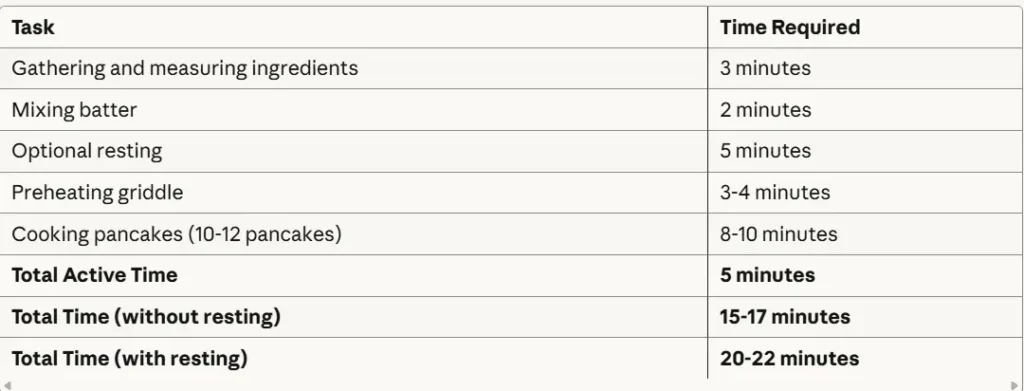
Yield: 10-12 medium pancakes (about 4-inch diameter)
Step-by-Step Cooking Instructions
Follow these detailed instructions for perfect bisquick pancake recipe results every time.
Pre-Cooking Prep: Prepare Bisquick Pancake Recipe Batter and Preheat Griddle
Step 1: Begin by preheating your cooking surface. If using an electric griddle, set to 375°F. For a stovetop skillet or griddle, place over medium heat and let preheat for 3-4 minutes. Proper preheating is crucial—a properly heated surface creates those beautiful golden-brown pancakes with fluffy interiors.
Step 2: While the griddle heats, prepare your batter. In a medium mixing bowl, measure 2 cups Bisquick Pancake recipe mix. If adding sugar, add 2 tablespoons now. Whisk briefly to combine and eliminate any lumps in the mix.
Step 3: In a separate bowl, measuring cup, or small bowl, crack 2 eggs. Whisk until yolks and whites are fully combined—the mixture should be uniform yellow. Add 1 cup milk and 1 teaspoon vanilla extract (if using). Whisk until completely combined, about 20 seconds.
Step 4: Pour the wet ingredients into the Bisquick Pancake recipe mix all at once. Using a fork, whisk, or wooden spoon, stir gently with broad folding motions. Mix only until the Bisquick is moistened—you should still see small lumps and maybe a few dry spots. This takes about 15-20 gentle stirs. Stop mixing! Overmixing is the most common mistake and creates tough, rubbery pancakes.
Step 5: If adding blueberries, chocolate chips, or other mix-ins, fold them in now with just 2-3 gentle stirs. You want them distributed but not overmixed.
Step 6: Let the batter rest for 5 minutes if time permits. You’ll notice it thickens slightly and small bubbles may appear on the surface—this is the leavening activating. While optional, this step produces noticeably fluffier results.
Step 7: Test your griddle temperature. Sprinkle a few drops of water on the surface—they should sizzle and evaporate within 2-3 seconds. If they evaporate instantly, the heat is too high; if they just sit there, it’s too low. Adjust heat as needed.
Step 8: Lightly grease the cooking surface with butter or cooking spray. Use a paper towel to spread a thin, even layer. You want just enough to prevent sticking—too much creates greasy pancakes with crispy, uneven edges.
Cooking Method: Pour Batter by ¼ Cup Onto Hot Griddle; Flip When Bubbles Form
Step 1: Using a ¼-cup measuring cup, ladle, or large spoon, scoop batter and pour onto the preheated griddle. Pour from about 2-3 inches above the surface, allowing the batter to spread naturally into a circle. Each pancake should be approximately 4 inches in diameter. Space pancakes at least 2 inches apart to allow room for flipping.
Step 2: Cook without touching the pancakes. Resist the urge to press, poke, or adjust them. Let them cook undisturbed for 2-3 minutes. Watch for these visual cues that indicate it’s time to flip:
- Bubbles form across the entire surface of the pancake
- The bubbles begin to pop and stay open (leave small holes)
- The edges look dry and slightly matte rather than wet and shiny
- The bottom is golden brown when you gently lift the edge with a spatula
Step 3: When you see these signs, slide a wide, thin spatula completely under the pancake. In one confident, smooth motion, flip the pancake. Don’t hesitate or flip tentatively—confidence creates clean flips without splattered batter. The pancake should land flat and intact.
Step 4: Cook the second side for 1-2 minutes—significantly less time than the first side. The pancake is already partially cooked, and the griddle is fully heated, so cooking happens faster. Watch for the edges to look completely set and the bottom to achieve golden-brown color.
Step 5: Remove finished pancakes to a serving plate. If cooking in batches, keep finished pancakes warm by placing the plate in a 200°F oven, covering loosely with foil.
Step 6: Continue cooking remaining batter. After every 2-3 pancakes, wipe the griddle with a paper towel to remove any burnt butter or dark spots, then lightly re-grease. Adjust heat if pancakes are browning too quickly (reduce heat) or taking too long to brown (increase heat slightly).
Batch Cooking Tips: An electric griddle allows cooking 6-8 pancakes simultaneously. A standard 10-12 inch skillet fits 3-4 pancakes. Plan accordingly based on your equipment.
Doneness Check: Pancakes Should Be Golden Brown on Both Sides
Visual indicators: Perfectly cooked Bisquick Pancake recipe display even golden-brown color on both sides—no pale spots or dark brown/burnt areas. The first side (with bubbles) typically shows darker color than the second side. Both sides should look dry and fully set, not wet or shiny.
Texture test: Gently press the center of a pancake with your finger. It should feel firm and springy, bouncing back immediately when pressed. If the center feels soft, squishy, or leaves an indentation, the pancake needs more cooking time.
Structural check: When you pick up a pancake with your spatula, it should hold together completely without bending excessively or breaking. Properly cooked pancakes have enough structure to stack without compressing or falling apart.
Internal temperature: For precision, pancakes are fully cooked when the internal temperature reaches 190-200°F. Most home cooks don’t check temperature, but this guarantees doneness if you’re uncertain.
Thickness assessment: Bisquick Pancake recipe should be about ½ inch thick when cooked. They’ll puff during cooking as the leavening creates air pockets, then settle slightly when removed from heat. This thickness ensures fluffy texture throughout.
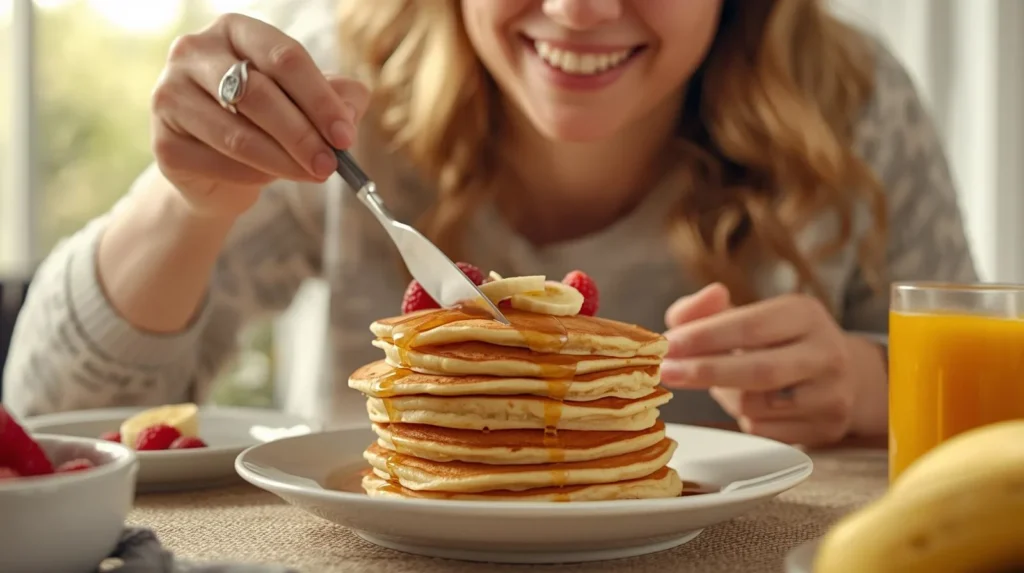
Serving Step: Serve Warm with Butter, Maple Syrup, or Fruit Toppings
Immediate serving: For best texture and flavor, serve pancakes warm as soon as they’re finished. The exterior is slightly crisp while the interior remains tender and fluffy—this perfect contrast fades as pancakes cool.
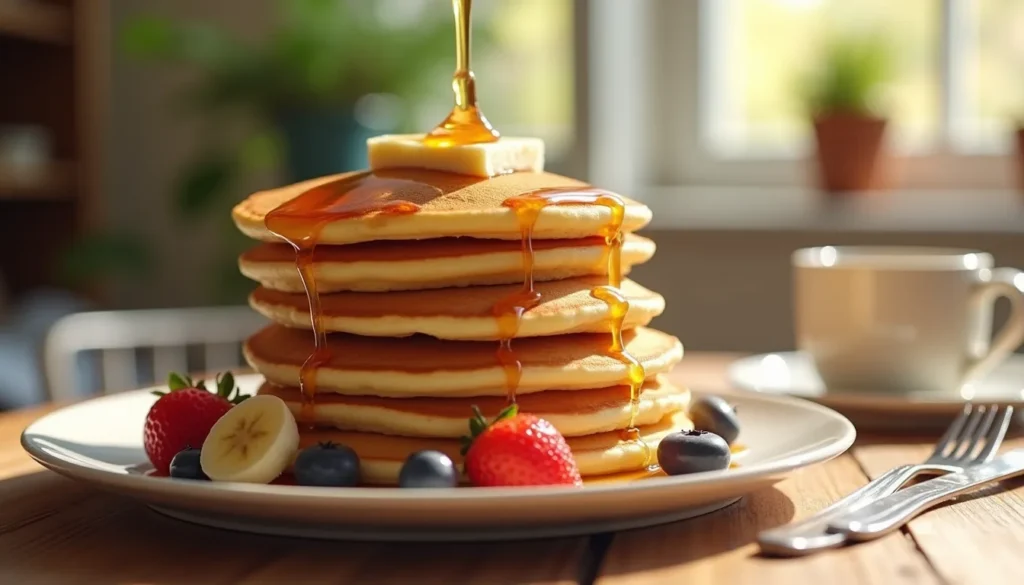
Classic presentation: Stack 2-4 pancakes on each plate. Top with a pat of butter that melts beautifully into the warm pancakes. Drizzle generously with warm maple syrup. The warmth intensifies the maple flavor and creates an inviting breakfast experience.
Butter application: Place butter between pancake layers as well as on top. As it melts, it soaks into each pancake, distributing rich flavor throughout the stack.
Syrup warming: Heat maple syrup in the microwave for 15-20 seconds before serving. Warm syrup is thinner, pours more easily, and tastes more aromatic than cold syrup.
Fruit toppings: Fresh berries (strawberries, blueberries, raspberries), sliced bananas, or sautéed apples make beautiful, flavorful additions. Arrange artfully on top or around the stack.
Whipped cream: For special occasions, add a dollop of whipped cream and dust with powdered sugar for bakery-style presentation.
Portion sizes: 2-3 pancakes make a standard serving for adults, while 1-2 suit children. Adjust portions based on appetite and accompanying sides.
Pro Tips for Perfect Bisquick Pancake Recipe
Master these expert techniques to elevate your Bisquick Pancake recipe from good to outstanding.
Avoiding Flat Pancakes: Don’t Overmix the Batter; Lumps Are Okay
The science of mixing: When you mix Bisquick Pancake recipe with liquid, the flour begins developing structure. The more you stir, the tougher and denser that structure becomes. Overmixed batter creates flat, rubbery, tough pancakes instead of light, fluffy ones.
What lumpy batter should look like: After mixing, you should see small lumps throughout the batter—some areas may still have visible dry Bisquick Pancake recipe. This is correct! The lumps will disappear completely during cooking as the flour hydrates and the heat works its magic.
Counting strokes: Literally count your stirring motions—stop at 20 maximum. Some professional bakers stop at 15. It feels wrong to leave lumps, but this restraint creates superior texture.
The folding motion: Instead of stirring in circles, use large folding motions. Scrape the bottom of the bowl, lift up, and fold over. This gentler action minimizes gluten development while still incorporating ingredients.
What happens when you overmix: The batter becomes very smooth and develops a slightly glossy appearance. Pancakes made from overmixed batter are flat, dense, chewy, and may have tunnels or holes. They lack that characteristic fluffy, tender crumb.
Fresh vs. old batter: Even properly mixed batter becomes tougher if it sits too long. The leavening activates and then dissipates, and the flour continues developing structure. Use batter within 30 minutes of mixing for best results.
Tool Recommendations: Whisk, Non-Stick Pan, Spatula, and Measuring Cups
Whisk: A simple wire whisk is perfect for combining wet ingredients and for the initial mixing of wet into dry. A balloon whisk with many wires works beautifully, though a fork also works in a pinch. Avoid electric mixers—they’re too powerful and encourage overmixing.
Non-stick pan or griddle: Essential for easy cooking and flipping. A quality non-stick surface requires minimal greasing and prevents sticking that ruins pancakes. Options include:
- Electric griddle: Provides large cooking surface and precise temperature control. Ideal for feeding families.
- Non-stick skillet: 10-12 inch diameter fits 3-4 pancakes. Lightweight and easy to handle.
- Cast iron griddle: Excellent heat retention but requires proper seasoning and more careful temperature monitoring.
Wide, thin spatula: The single most important tool for successful flipping. Your spatula should be:
- At least 3-4 inches wide to support entire pancakes
- Thin enough to slide easily under pancakes without tearing them
- Flexible but sturdy enough to flip confidently
- Made of silicone, nylon, or coated metal safe for non-stick surfaces
Accurate measuring cups: Proper measurements ensure consistent results:
- Dry measuring cups: For measuring Bisquick Pancake recipe—scoop and level
- Liquid measuring cup: For milk—read at eye level
- ¼ cup measure: For portioning batter consistently onto the griddle
Mixing bowls: Use a medium bowl (2-3 quart capacity) for mixing. Glass or stainless steel bowls work best. The bowl should be roomy enough for comfortable mixing without splashing.
Ladle or large spoon: A 2-ounce ladle or large serving spoon helps portion batter consistently for uniform-sized bisquick pancake recipe.
Storage & Reheating: Store Leftover Bisquick Pancake Recipe in the Fridge Up to 3 Days or Freeze for 1 Month
Cooling properly: Let bisquick pancake recipe cool completely to room temperature on a wire cooling rack. This takes about 15-20 minutes. Cooling on a rack prevents condensation that makes pancakes soggy. Never stack hot pancakes directly—they’ll steam and become gummy.
Refrigerator storage: Once cooled, stack pancakes with sheets of parchment or wax paper between each one to prevent sticking. Place in an airtight container or resealable plastic bag. Properly stored, bisquick pancake recipe stay fresh for 3-4 days in the refrigerator.
Freezer storage for longer keeping: Bisquick Pancake recipe freeze exceptionally well for up to 1 month:
- Cool bisquick pancake recipe completely on a wire rack
- Arrange in a single layer on a parchment-lined baking sheet
- Freeze for 1-2 hours until solid (flash freezing prevents sticking)
- Transfer frozen bisquick pancake recipe to a freezer bag or airtight container
- Place parchment between layers if stacking
- Label with date and contents
- Freeze for up to 1 month
Reheating from refrigerator:
Microwave method (fastest): Place 1-3 pancakes on a microwave-safe plate. Cover with a slightly damp paper towel to prevent drying. Microwave on high for 20 seconds per pancake (20 seconds for 1, 40 for 2, etc.). Check and add 10-second increments if needed.
Toaster method (best texture): Place bisquick pancake recipe in toaster slots. Toast on medium setting—they’ll warm through and the edges become slightly crisp, creating appealing texture contrast. Watch carefully to prevent burning.
Oven method (for batches): Preheat oven to 350°F. Arrange bisquick pancake recipe in a single layer on a baking sheet. Cover loosely with aluminum foil to prevent drying. Warm for 5-8 minutes until heated through.
Skillet method (closest to fresh): Heat a lightly greased skillet over medium-low heat. Place bisquick pancake recipe in skillet and warm for 1-2 minutes per side. This method restores texture most similar to freshly cooked.
Reheating from frozen: No need to thaw—reheat directly from frozen. Add 10-20 seconds to microwave times, set toaster to medium-dark, or add 3-5 minutes to oven time. Frozen bisquick pancake recipe reheat beautifully and taste remarkably fresh.
Meal prep strategy: Make a double batch on weekends. Freeze individual portions for grab-and-go weekday breakfasts. Kids can reheat their own bisquick pancake recipe, making mornings easier for everyone.
Quality after storage: Properly stored and reheated pancakes retain excellent flavor and texture. They may be slightly less fluffy than fresh but are still delicious and satisfying.
Flavor Variations
Transform your basic bisquick pancake recipe into exciting creations with these delicious variations.
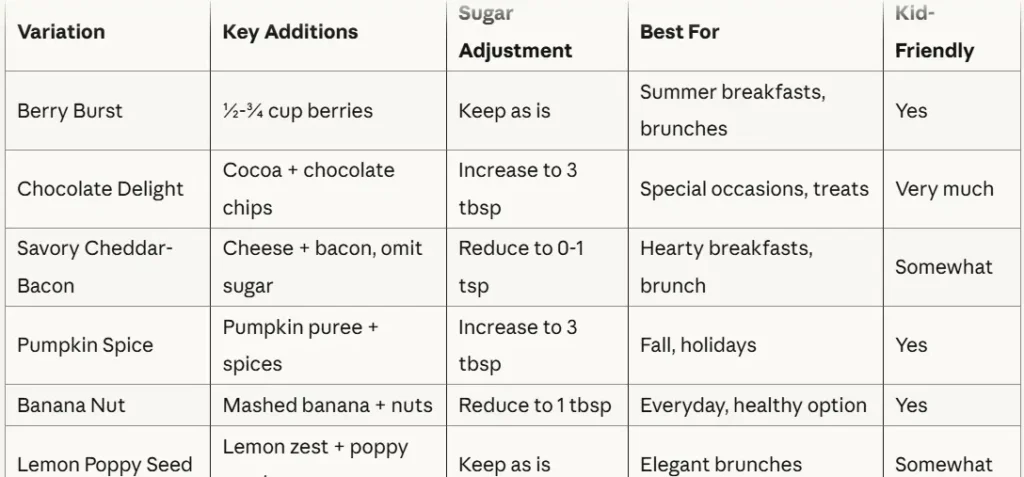
Berry Burst: Add Fresh Blueberries or Strawberries to the Batter
Create fruity, bakery-style pancakes bursting with fresh flavor:
Blueberry bisquick pancake recipe:
- Fold ½-¾ cup fresh or frozen blueberries into batter after mixing
- Don’t thaw frozen berries—use straight from freezer to prevent purple batter
- Gently fold with just 2-3 strokes to avoid bursting berries
- Expect slight purple tinting where berries touch batter—this is normal
- Blueberries add natural sweetness and moisture
Strawberry pancakes:
- Dice ½ cup fresh strawberries into small pieces (about ¼-inch cubes)
- Pat strawberries dry with paper towels to remove excess moisture
- Fold into batter gently
- Strawberries are softer than blueberries and break down more during cooking
- Creates beautiful pink-tinted streaks throughout pancakes
Mixed berry:
- Combine ¼ cup each of blueberries, diced strawberries, and raspberries
- This creates complex fruit flavor and beautiful appearance
- Perfect for special occasions or brunch entertaining
Cooking adjustments: Berry pancakes may need slightly longer cooking time (add 30 seconds per side) because the fruit adds moisture. Watch for bubbles across the entire surface before flipping.
Serving suggestion: Top with additional fresh berries, whipped cream, and a light dusting of powdered sugar. Serve with berry syrup or preserves instead of maple syrup for intensified fruit flavor.
Pro tip: Toss berries in 1 tablespoon Bisquick Pancake recipe before folding into batter. This coating prevents them from sinking to the bottom and helps distribute them evenly throughout bisquick pancake recipe.
Chocolate Delight: Mix in Cocoa Powder and Chocolate Chips
Transform breakfast into a decadent chocolate experience:
Chocolate pancake base:
- Replace 3 tablespoons Bisquick Pancake recipe with 3 tablespoons unsweetened cocoa powder
- Increase sugar to 3 tablespoons for balanced sweetness
- Sift cocoa with Bisquick to eliminate lumps
- Add ½ teaspoon vanilla extract for enhanced chocolate flavor
- The batter will be darker brown and smell wonderfully chocolatey
Adding chocolate chips:
- Fold in ½ cup semi-sweet or milk chocolate chips after mixing
- Mini chips distribute more evenly than regular-sized chips
- For extra indulgence, use both cocoa and chocolate chips
- Dark chocolate chips create sophisticated, less-sweet flavor
Cooking considerations: Chocolate bisquick pancake recipe brown faster due to cocoa content. Use medium or medium-low heat to prevent burning before the inside cooks through. They should be golden-brown (darker than regular pancakes) with fully cooked centers.
Double chocolate version: Use chocolate chips in the basic batter without adding cocoa powder. This creates chocolate-studded bisquick pancake recipe with classic pancake flavor punctuated by melty chocolate.
White chocolate variation: Use white chocolate chips and add ½ teaspoon almond extract for sophisticated flavor combination.
Serving suggestions:
- Dust with powdered sugar for contrast
- Top with chocolate syrup or Nutella
- Add whipped cream and fresh strawberries
- Serve with vanilla ice cream for dessert-style breakfast
- Sprinkle with mini chocolate chips before serving
Kid-friendly tip: These chocolate bisquick pancake recipe are a hit with children and make ordinary mornings feel special. They’re also excellent for birthday breakfasts or celebrations.
Savory Twist: Reduce Sugar and Add Cheddar Cheese or Cooked Bacon Bits
Move beyond sweet breakfast with these savory bisquick pancake recipe variations:
Basic savory pancake base:
- Reduce or eliminate sugar (use no sugar or just 1 teaspoon)
- Add ¼ teaspoon black pepper to batter
- Consider adding ¼ teaspoon garlic powder or onion powder
- These create a neutral base for savory additions
Cheddar cheese pancakes:
- Fold ¾ cup shredded sharp cheddar cheese into batter
- Add ¼ teaspoon black pepper and pinch of cayenne (optional)
- The cheese melts during cooking, creating pockets of savory goodness
- Serve with sour cream instead of syrup
- Perfect alongside scrambled eggs or as breakfast sandwich base
Bacon pancakes:
- Cook 4-6 strips bacon until crispy, then crumble
- Reserve 1 tablespoon bacon grease to replace some of the cooking butter
- Fold ½ cup crumbled bacon into batter
- Add ¼ teaspoon black pepper
- The salty, smoky flavor creates restaurant-quality breakfast
- Maple syrup actually pairs beautifully with bacon bisquick pancake recipe (sweet-savory combo)
Cheddar-bacon combination:
- Use both cheese and bacon for ultimate savory bisquick pancake recipe
- Add sliced green onions (2 tablespoons) for extra flavor
- These are hearty enough to be a complete meal
Ham and cheese:
- Add ½ cup diced cooked ham and ½ cup shredded cheddar
- Include ¼ teaspoon dry mustard powder
- These taste similar to ham and cheese omelets in pancake form
Corn and jalapeño:
- Fold in ½ cup corn kernels (fresh, canned-drained, or frozen-thawed)
- Add 1-2 tablespoons finely diced jalapeño
- Include ½ cup shredded pepper jack cheese
- Creates Southwestern-style pancakes
Serving savory pancakes:
- Top with sour cream, Greek yogurt, or crème fraîche instead of syrup
- Add sliced avocado for richness
- Serve with salsa or hot sauce
- Use as a base for eggs Benedict variation
- Make breakfast sandwiches with fried egg and cheese between two savory pancakes
When to serve: Savory pancakes work wonderfully for brunch, late breakfast, or even light dinner (breakfast-for-dinner). They’re unexpected and impressive for entertaining.
Additional Flavor Variations
Pumpkin spice (fall favorite):
- Add ½ cup canned pumpkin puree (reduce milk to ¾ cup)
- Mix in 1 te
H
ContinueEdit
aspoon pumpkin pie spice or ½ teaspoon each cinnamon and nutmeg
- Increase sugar to 3 tablespoons
- These taste like pumpkin pie for breakfast
Banana nut:
- Mash ½ cup very ripe banana and add to wet ingredients (reduce milk by 2 tablespoons)
- Fold in ½ cup chopped walnuts or pecans
- Add ½ teaspoon cinnamon
- Natural sweetness means you can reduce added sugar
Lemon poppy seed:
- Add 2 tablespoons fresh lemon zest to batter
- Fold in 1 tablespoon poppy seeds
- Add 1 tablespoon fresh lemon juice (reduce milk by 1 tablespoon)
- Creates elegant, bakery-style pancakes perfect for brunch
Cinnamon roll:
- Add 1½ teaspoons cinnamon to batter
- Swirl 2 tablespoons melted butter mixed with 2 tablespoons brown sugar and ½ teaspoon cinnamon onto pancakes while cooking
- Drizzle with cream cheese glaze (powdered sugar + cream cheese + milk)
Variation Comparison Table
Serving Suggestions
Elevate your bisquick pancake recipe presentation and create complete, satisfying meals with these serving ideas.
Pair with Sides: Scrambled Eggs, Sausage Links, or Fresh Fruit Salad
Scrambled eggs: The classic breakfast protein pairing creates a balanced meal with both carbohydrates and protein:
- Classic scrambled: Soft, creamy scrambled eggs provide protein and richness
- Cheese scrambled: Add shredded cheddar for extra flavor
- Veggie scrambled: Include diced peppers, onions, and tomatoes for nutrition
- Portion: 2 eggs per person alongside 2-3 pancakes creates satisfying portions
Sausage links: Savory breakfast sausage provides the perfect sweet-savory contrast:
- Traditional pork sausage: Classic breakfast flavor that everyone loves
- Turkey sausage: Leaner option with less fat
- Chicken-apple sausage: Slightly sweet variety that complements pancakes beautifully
- Vegetarian sausage: Plant-based options for meat-free breakfasts
- Portion: 2-3 links per person
Bacon: Crispy bacon strips offer irresistible salty-sweet combination:
- Cook until crispy for best texture contrast with soft pancakes
- Thick-cut bacon provides meatier bites
- Turkey bacon offers lighter alternative
- 2-3 strips per person is standard
Fresh fruit salad: Adds color, nutrition, and refreshing contrast:
- Mixed berries: Strawberries, blueberries, raspberries, and blackberries
- Tropical mix: Pineapple, mango, kiwi, and banana
- Melon medley: Watermelon, cantaloupe, and honeydew cubes
- Apple and grape: Simple, kid-friendly combination
- Toss fruit with squeeze of lemon juice and touch of honey for enhanced flavor
Hash browns: Crispy potatoes complete the classic diner-style breakfast:
- Shredded hash browns, crispy and golden
- Diced home fries with peppers and onions
- Tater tots for kid-friendly option
Yogurt parfait: For lighter, healthier breakfast:
- Layer Greek yogurt with granola and berries
- Provides protein and probiotics
- Creates balanced meal when paired with 1-2 pancakes
Drink Pairings: Pair Your Bisquick Pancake Recipe with Orange Juice, Coffee, or a Latte
Orange juice: The breakfast classic that adds vitamin C and bright flavor:
- Fresh-squeezed: Premium choice with vibrant, natural flavor and visible pulp
- Store-bought: Convenient and consistent; choose pulp-free or with pulp based on preference
- Orange-mango blend: Tropical twist that kids especially enjoy
- Mimosa: For adult brunches, combine equal parts orange juice and champagne
- Serve chilled in glasses; about 6-8 ounces per person
Coffee: Essential morning beverage for many adults:
- Black coffee: Strong, bold flavor that cuts through sweet pancakes
- Coffee with cream and sugar: Smooth, approachable option
- Flavored coffee: Vanilla, hazelnut, or caramel varieties complement pancake sweetness
- Cold brew: Smooth, less acidic option perfect for summer mornings
- Iced coffee: Refreshing alternative to hot coffee
Latte: Elevated coffee drink that feels special:
- Classic latte: Espresso with steamed milk creates creamy, comforting beverage
- Vanilla latte: Sweet vanilla syrup complements pancakes beautifully
- Caramel latte: Indulgent option for special breakfasts
- Mocha: Chocolate-coffee combination pairs wonderfully with chocolate chip pancakes
- Iced latte: Perfect for warm weather breakfasts
Milk: Simple, classic pairing especially popular with children:
- Whole milk: Rich and creamy
- Chocolate milk: Kid-favorite that makes breakfast feel special
- Almond milk: Dairy-free option with subtle nutty flavor
- Oat milk: Creamy plant-based alternative
- Serve cold; about 8 ounces per person
Hot chocolate: Cozy beverage perfect for winter mornings:
- Made with real cocoa and milk
- Top with whipped cream and mini marshmallows
- Especially popular with children
- Pairs excellently with chocolate chip pancakes
Tea: Lighter alternative to coffee:
- Black tea: English Breakfast or Earl Grey provide gentle caffeine
- Green tea: Antioxidant-rich with delicate flavor
- Herbal tea: Chamomile or peppermint for caffeine-free option
- Chai latte: Spiced tea with steamed milk feels luxurious
Smoothies: Nutritious beverage that adds fruits and vegetables:
- Berry smoothies complement berry pancakes
- Green smoothies add nutrition to indulgent breakfast
- Tropical smoothies create vacation-like breakfast vibe
- Protein smoothies make meal more filling
Other beverage ideas:
- Apple cider (warm for fall/winter)
- Fresh-pressed juice blends
- Sparkling water with fruit for elegant touch
- Coconut water for tropical breakfast theme
Serving Occasions and Presentation Ideas
Weekend family breakfast: Stack pancakes on a large serving platter family-style. Set up a self-serve topping station with maple syrup, butter, fresh fruit, whipped cream, chocolate chips, and nuts. Let everyone customize their pancakes for interactive, fun breakfast.
Brunch entertaining: Plate individual servings of 3 beautifully stacked pancakes. Dust with powdered sugar using a fine-mesh strainer. Add fresh berries artfully arranged around the base. Place a butter pat on top and serve syrup in small pitchers or ramekins on the side. Add a sprig of fresh mint for color.
Weekday quick breakfast: Keep portion simple—2 pancakes per person with basic toppings. Serve with pre-portioned fruit and quick protein like hard-boiled eggs. Everything can be prepared in under 15 minutes for stress-free mornings.
Kids’ breakfast party: Create pancake faces using fruit slices, chocolate chips, and whipped cream. Use cookie cutters to make fun shapes (hearts, stars, animals). Serve on colorful plates with silly straws in milk glasses.
Breakfast-for-dinner: Serve pancakes as a fun, easy dinner option. Pair with scrambled eggs, bacon, and hash browns for complete breakfast-dinner. Kids love this unexpected meal, and it’s budget-friendly.
Meal prep: Make large batches on Sunday. Package individual portions (2-3 pancakes) in containers or bags. Refrigerate or freeze for grab-and-go breakfasts all week. Include small containers of syrup and instructions for reheating.
FAQs
Get answers to the most common questions about making the perfect bisquick pancake recipe.
Can I Make These Without Eggs?
Yes, you can make egg-free Bisquick pancakes, though the texture will be slightly different from the original. Here are your best options:
Commercial egg replacer (most reliable):
- Use Bob’s Red Mill Egg Replacer or Ener-G Egg Replacer
- Follow package directions: typically 1 tablespoon powder mixed with 3 tablespoons water per egg
- For this recipe (2 eggs): mix 2 tablespoons powder with 6 tablespoons water
- Let the mixture sit 2-3 minutes to thicken before adding to recipe
- This produces results closest to traditional pancakes
Flax eggs (natural option):
- Mix 2 tablespoons ground flaxseed meal with 6 tablespoons water
- Stir well and let sit 5-10 minutes until thick and gelatinous
- Add to recipe in place of eggs
- Creates slightly denser pancakes with nutty flavor and darker color
- Nutritionally beneficial with added fiber and omega-3s
Applesauce:
- Use ¼ cup unsweetened applesauce per egg (½ cup total for this recipe)
- Reduce milk by 2 tablespoons to compensate for extra moisture
- Creates moist, slightly denser pancakes
- Adds subtle apple flavor
- Good option if you have picky eaters who dislike visible seeds
Mashed banana:
- Use ¼ cup mashed very ripe banana per egg (½ cup total)
- Reduce milk by 2 tablespoons
- Significantly changes flavor—pancakes taste banana-forward
- Best if you’re already making banana pancakes
Extra baking powder method:
- Increase Bisquick by 2 tablespoons
- Add 1 extra teaspoon baking powder
- Increase milk to 1¼ cups
- This creates eggless pancakes using only leavening for rise
- Results are acceptable but less rich than egg-containing versions
What to expect: Egg-free pancakes will be:
- Slightly less fluffy and more dense
- Less rich in flavor
- More fragile when flipping (use extra care)
- Still delicious and satisfying
Best results tip: For fluffiest egg-free pancakes, separate the egg replacer preparation from other wet ingredients. Mix the egg replacer thoroughly, let it sit to thicken, then combine with milk and other liquids before adding to Bisquick.
Cooking adjustments: Egg-free pancakes may take 30-60 seconds longer per side to cook through. Be patient and wait for bubbles to form before flipping.
How Do I Make My Pancakes Fluffier?
Achieve maximum fluffiness with these proven techniques:
Don’t overmix the batter (most important):
- Mix only until Bisquick is moistened—15-20 strokes maximum
- Lumpy batter is correct—lumps disappear during cooking
- Overmixing develops gluten, creating dense, flat pancakes
- Use gentle folding motions rather than vigorous stirring
Use fresh Bisquick:
- Check expiration date—use mix within 6 months of opening
- Fresh leavening agents create maximum rise
- Store Bisquick in airtight container in cool, dry place
- Old mix produces noticeably flatter pancakes
Let batter rest 5-10 minutes:
- Resting allows leavening to activate and create bubbles
- Flour hydrates fully during rest period
- Batter thickens and becomes smoother
- This one step dramatically improves fluffiness
Add extra leavening:
- Mix ½ teaspoon baking powder into the Bisquick before adding wet ingredients
- This boost creates extra rise, especially if your Bisquick is older
- Don’t add more than ½ teaspoon or pancakes may taste metallic
Separate and whip egg whites:
- Separate eggs; add yolks to wet ingredients as usual
- Beat egg whites to soft peaks using electric mixer
- Fold whipped whites gently into finished batter as final step
- This incorporates air for incredibly light, fluffy pancakes
- Professional technique that makes noticeable difference
Use club soda or seltzer:
- Replace ¼ cup milk with ¼ cup club soda
- The carbonation adds extra bubbles and lift
- Mix gently and cook immediately to capture bubbles
- Simple trick that creates impressive results
Buttermilk upgrade:
- Replace regular milk with buttermilk for tangier, fluffier pancakes
- Buttermilk’s acidity reacts with leavening for extra rise
- If you don’t have buttermilk, make substitute: add 1 tablespoon lemon juice or vinegar to 1 cup milk, let sit 5 minutes
Proper cooking temperature:
- Use medium heat (350-375°F)
- Too-high heat sets the outside before inside can rise
- Proper temperature allows full expansion during cooking
- Test with water droplets—should sizzle and evaporate in 2-3 seconds
Don’t press down while cooking:
- Never flatten pancakes with spatula during cooking
- Pressing deflates air pockets and creates dense pancakes
- Let them cook undisturbed until ready to flip
Flip only once:
- Flipping multiple times deflates pancakes
- Wait for bubbles across entire surface, then flip once
- Second side cooks in 1-2 minutes—that’s it
Serve immediately:
- Pancakes are fluffiest right off the griddle
- They deflate slightly as they cool
- Keep warm in 200°F oven if cooking in batches
Can I Use Water Instead of Milk?
Yes, you can use water instead of milk in your bisquick pancake recipe, though there are important differences:
How water affects pancakes:
- Less rich flavor: Milk contains fat and natural sugars that add richness and subtle sweetness. Water is neutral, so pancakes taste more plain.
- Less tender texture: Milk proteins and fats create tenderness. Water-based pancakes may be slightly tougher.
- Lighter color: Milk contributes to golden-brown color through Maillard reaction. Water-based pancakes are paler.
- Still fluffy: The leavening still works, so pancakes will rise properly—they just won’t taste as rich.
When water works well:
- Emergency situations when you’re out of milk
- Dietary restrictions (dairy-free, vegan when combined with egg substitute)
- Reducing calories and fat
- Making savory pancakes where milk’s sweetness isn’t desired
How to improve water-based pancakes:
- Add fat: Mix 2 tablespoons melted butter or neutral oil into the batter for richness and moisture
- Add flavor: Use 1½ teaspoons vanilla extract instead of 1 teaspoon
- Increase sugar: Add an extra tablespoon of sugar to compensate for milk’s natural sweetness
- Use butter for cooking: Grease griddle generously with butter to add flavor
Better alternatives to water: If you don’t have regular milk, these options are superior to water:
- Non-dairy milk: Almond, oat, soy, or coconut milk from cartons work excellently
- Powdered milk: Reconstitute according to package directions—creates results identical to fresh milk
- Evaporated milk: Dilute with equal parts water (½ cup evaporated milk + ½ cup water for this recipe)
- Half-and-half diluted: Mix ½ cup half-and-half with ½ cup water for extra-rich pancakes
- Buttermilk: Creates tangier, fluffier pancakes
Ratio adjustment: When using water, you may need slightly less liquid because water is thinner than milk. Start with ¾ cup water, then add more tablespoon by tablespoon until you reach proper consistency (thick but pourable).
The verdict: Water works in a pinch, but milk (dairy or non-dairy) produces noticeably better pancakes. If using water, add butter or oil and extra vanilla to improve flavor.
Why Are My Pancakes Sticking to the Pan?
Pancakes sticking to the pan is frustrating but usually results from easily fixable issues:
Insufficient greasing:
- Solution: Grease the pan more generously with butter or cooking spray
- Before each batch, add a small amount of butter or spray
- Use a paper towel to spread butter evenly across entire cooking surface
- Don’t skip this step even with non-stick surfaces
Pan not hot enough:
- Solution: Preheat pan thoroughly before adding batter—3-4 minutes minimum
- Test temperature with water droplets: they should sizzle and evaporate in 2-3 seconds
- Cold or insufficiently heated pans cause batter to stick
- Electric griddles should reach 375°F
Pan too hot:
- Solution: Reduce heat to medium or medium-low
- Extremely high heat causes batter to stick and burn
- Pancakes should take 2-3 minutes per side—if cooking faster, heat is too high
Damaged non-stick coating:
- Solution: Replace pans with scratched or worn non-stick surfaces
- Metal utensils, harsh scrubbing, and age damage non-stick coating
- Once damaged, pans lose their non-stick properties permanently
- Invest in quality non-stick pan and protect it
Using wrong type of pan:
- Solution: Use proper non-stick pan, electric griddle, or well-seasoned cast iron
- Stainless steel pans require significantly more fat and expertise
- Non-stick surfaces designed for pancakes work best
Flipping too early:
- Solution: Wait until bubbles form across entire surface and pop
- Flipping before first side is fully set causes tearing and sticking
- Pancakes release naturally when properly cooked
- If pancake resists when you slide spatula under, wait longer
Dirty pan with burnt residue:
- Solution: Wipe pan between batches with paper towel
- Remove any burnt butter or dark spots before cooking next batch
- Re-grease after cleaning
- Built-up residue causes subsequent pancakes to stick
Batter too thin:
- Solution: Add 1-2 tablespoons more Bisquick to thicken batter
- Very thin batter spreads too much and sticks more easily
- Proper batter should be thick but pourable
Best prevention strategy:
- Preheat pan thoroughly (3-4 minutes)
- Grease well with butter or cooking spray
- Test one small pancake first to ensure proper temperature
- Wipe and re-grease pan between batches
- Wait for bubbles before flipping
How Long Do Leftover Pancakes Last?
Refrigerator storage: 3-4 days when properly stored
- Cool pancakes completely on wire rack (15-20 minutes)
- Stack with parchment paper between each pancake
- Place in airtight container or resealable bag
- Store in refrigerator at 40°F or below
- Quality is best within first 2-3 days
- After 4 days, pancakes may develop off-flavors or dry out
Freezer storage: Up to 1 month for best quality
- Flash freeze: arrange pancakes in single layer on baking sheet, freeze 1-2 hours
- Transfer frozen pancakes to freezer bag or airtight container
- Place parchment between layers if stacking
- Remove as much air as possible from storage bags
- Label with date and contents
- Technically safe indefinitely if kept frozen, but quality degrades after 1 month
- May develop freezer burn or off-flavors after 2+ months
Signs pancakes have gone bad:
- Sour or off smell
- Visible mold (fuzzy spots, green/black/white patches)
- Slimy texture
- Discoloration beyond normal drying
- If in doubt, throw it out
Food safety notes:
- Never leave pancakes at room temperature more than 2 hours
- Cool completely before storing to prevent condensation
- Don’t store warm pancakes in sealed containers—creates moisture that promotes bacterial growth
- Refrigerate or freeze within 2 hours of cooking
Quality after storage:
- Refrigerated pancakes: Maintain good texture and flavor for 3 days
- Frozen pancakes: Surprisingly close to fresh when properly reheated
- Both methods work excellently for meal prep
Conclusion
This easy bisquick pancake recipe proves that delicious homemade breakfast doesn’t require complicated techniques or extensive time. With just Bisquick mix, eggs, and milk, you can create fluffy, golden pancakes in just 15 minutes from start to finish. The convenience of Bisquick combined with proper technique delivers consistently excellent results that rival traditional from-scratch recipes.
Make this bisquick pancake recipe today and enjoy breakfast made easy! Whether you’re rushing through weekday mornings, hosting a leisurely weekend brunch, or simply craving comfort food, these reliable pancakes deliver satisfaction every time. The simple method and minimal ingredients mean breakfast is always within reach, no matter how busy life gets.
Tried and loved by thousands of home cooks across the country! Generations of families have relied on Bisquick pancakes for quick, delicious breakfasts. This perfected recipe builds on that trust with techniques that maximize fluffiness, prevent common mistakes, and allow endless customization to suit your family’s preferences.
The secret to success lies in three simple principles: don’t overmix the batter (lumps are okay!), use proper heat and greasing for perfect browning, and serve warm with your favorite toppings. Master these basics, and you’ll create pancakes so delicious that your family will request them again and again.
From classic buttermilk-style pancakes to creative variations like chocolate chip, berry burst, or savory cheddar-bacon, this versatile recipe adapts to any occasion or craving. The ability to make ahead and freeze means you can enjoy homemade pancakes any day of the week with minimal effort.
Ready to expand your easy breakfast repertoire? Try our Classic Waffle Guide next! Discover how to make crispy, golden waffles that pair perfectly with your favorite toppings. Plus, explore our collection of quick breakfast recipes for more time-saving morning solutions that don’t sacrifice flavor.
Save this recipe, share it with friends who need simple breakfast solutions, and experiment with the flavor variations to find your family’s favorites. Your mornings just got easier and more delicious—happy cooking!
How did you find results our recipes
There are no reviews yet. Be the first one to write one.